![]()
High Performance Clusters
As discussed in the intro session on the cloud, cloud providers offers near infinite compute resources. However, using these resources comes at a hefty price often and it is therefore important to be aware of another resource many have access to: High Performance Clusters or HPC. HPCs exist all over the world, and many time you already have access to one or can easily get access to one. If you are an university student you most likely have a local HPC that you can access through your institution. Else, there exist public HPC resources that everybody (with a project) can apply for. As an example in the EU we have EuroHPC initiative that currently has 8 different supercomputers with a centralized location for applying for resources that are both open for research projects and start-ups.
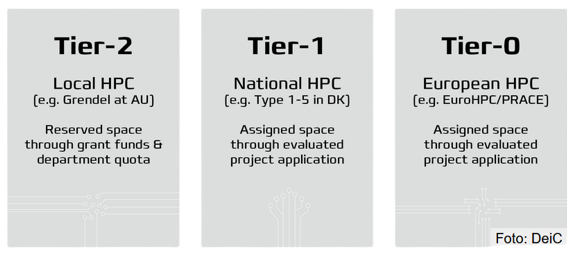
Depending on your application, you may have different needs and it is therefore important to be aware also of the different tiers of HPC. In Europe, HPC are often categorized such that Tier-0 are European Centers with petaflop or hexascale machines, Tier 1 are National centers of supercomputers, and Tier 2 are Regional centers. The lower the Tier, the larger applications it is possible to run.
Cluster architectures
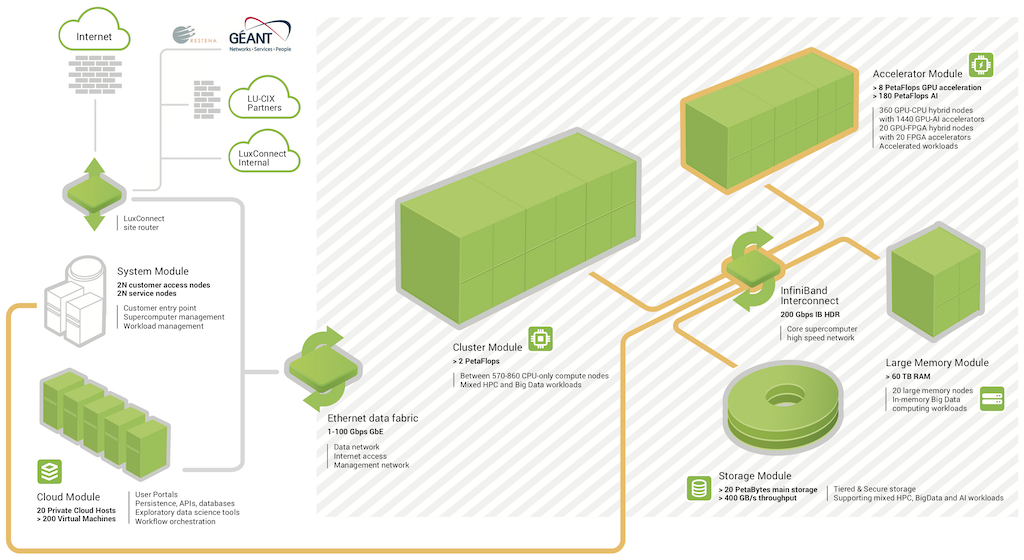
In very general terms, cluster can come as two different kind of systems: supercomputers and LSF (Load Sharing Facility). A supercomputer (as shown below) is organized into different modules, that are separated by network link. When you login to a supercomputer you will meet the front end which contains all the software needed to run computations. When you submit a job it will get sent to the backend modules which in most cases includes: general compute modules (CPU), acceleration modules (GPU), a memory module (RAM) and finally a storage module (HDD). Depending on your application you may need one module more than another. For example in deep learning the acceleration module is important but in physics simulation the general compute module / storage model is probably more important.
Alternatively, LSF are a network of computers where each computer has its own CPU, GPU, RAM etc. and the individual computes (or nodes) are then connected by network. The important different between a supercomputer and as LSF systems is how the resources are organized. When comparing supercomputers to LSF system it is generally the case that it is better to run on a LSF system if you are only requesting resources that can be handled by a single node, however it is better to run on a supercomputer if you have a resource intensive application that requires many devices to communicate with each others.
Regardless of cluster architectures, on the software side of HPC, the most important part is what's called the HPC scheduler. Without a HPC scheduler an HPC cluster would just be a bunch of servers with different jobs interfering with each other. The problem is when you have a large collection of resources and a large collection of users, you cannot rely on the users just running their applications without interfering with each other. A HPC scheduler is in charge of managing that whenever an user request to run an application, they get put in a queue and whenever the resources their application ask for are available the application gets run.
The biggest bach control systems for doing scheduling on HPC are:
- SLURM
- MOAB HPC Suite
- PBS Works
We are going to take a look at PBS works as that is what is installed on our local university cluster.
❔ Exercises
The following exercises are focused on local students at DTU that want to use our local HPC resources. That said, the steps in the exercise are fairly general to other types of cluster. For the purpose of this exercise we are going to see how we can run this image classifier script , but feel free to work with whatever application you want to.
-
Start by accessing the cluster. This can either be through
sshin a terminal or if you want a graphical interface thinlinc can be installed. In general we recommend following the steps in the DTU HPC cluster guide for DTU students as the setup depends on if you are on campus or not. -
When you have access to the cluster we are going to start with the setup phase. In the setup phase we are going to setup the environment necessary for our computations. If you have accessed the cluster through graphical interface start by opening a terminal.
-
Lets start by setting up conda for controlling our dependencies. If you have not already worked with
conda, please checkout module M2 on package managers and virtual environments. In general you should be able to setup (mini)conda through these two commands: -
Close the terminal and open a new for the installation to complete. Type
condain the terminal to check that everything is fine. Go ahead and create a new environment that we can install dependencies inand activate it.
-
Copy over any files you need. For the image classifier script you need the requirements file and the actual application.
-
Next, install all the requirements you need. If you want to run the image classifier script you can run this command in the terminal
using this requirements file.
-
-
That's all the setup needed. You would need to go through the creating of environment and installation of requirements whenever you start a new project (no need for reinstalling conda). For the next step we need to look at how to submit jobs on the cluster. We are now ready to submit the our first job to the cluster:
-
Start by checking the statistics for the different clusters. Try to use both the
qstatcommand which should give an overview of the different cluster, number of running jobs and number of pending jobs. For many system you can also try the much more user friendly commandclassstatcommand. -
Figure out which queue you want to use. For the sake of the exercises it needs to be one with GPU support. For DTU students, any queue that starts with
gpuare GPU accelerated. -
Now we are going to develop a bash script for submitting our job. We have provided an example of such scripts. Take a careful look and go each line and make sure you understand it. Afterwards, change it to your needs (queue and student email).
-
Try to submit the script:
You can check the status of your script by running the
bstatcommand. Hopefully, the job should go through really quickly. Take a look at the output file, it should be called something likegpu_*.out. Also take a look at thegpu_*.errfile. Does both files look as they should?
-
-
Lets now try to run our application on the cluster. To do that we need to take care of two things:
-
First we need to load the correct version of CUDA. A cluster system often contains multiple versions of specific software to suit the needs of all their users, and it is the users that are in charge of loading the correct software during job submission. The only extra software that needs to be loaded for most PyTorch applications are a CUDA module. You can check which modules are available on the cluster with
Afterwards, add the correct CUDA version you need to the
jobscript.shfile. If you are trying to run the provided image classifier script then the correct version isCUDA/11.7(can be seen in the requirements file). -
We are now ready to add in our application. The only thing we need to take care of is telling the system to run it using the
pythonversion that is connected to ourhpc_envwe created in the beginning. Try typing:which should give you the full path. Then add to the bottom of the
jobscriptfile:~/miniconda3/envs/hpc_env/bin/python \ image_classifier.py \ --trainer.accelerator 'gpu' --trainer.devices 1 --trainer.max_epochs 5which will run the image classifier script (change it if you are running something else).
-
Finally submit the job:
and check when it is done that it has produced what you expected.
-
(Optional) If you application supports multi GPUs also try that out. You would first need to change the jobscript to request multiple GPUs and additionally you would need to tell your application to run on multiple GPUs. For the image classifier script it can be done by changing the
--trainer.devicesflag to2(or higher).
-
This ends the module on using HPC systems.