![]()
Editor/IDE
Core Module
Notebooks are useful for prototyping, developing simple code, and explaining/visualizing aspects of a codebase. However,
larger machine learning projects require working with multiple .py files, making notebooks a suboptimal workflow.
Therefore, a good editor/IDE is essential for efficient development.
Many opinions exist on this matter, but for simplicity, we recommend getting started with one of the following three:
| Editor | Webpage | Comment (Biased opinion) |
|---|---|---|
| Spyder | https://www.spyder-ide.org/ | A Matlab-like environment that is easy to get started with |
| Visual Studio Code | https://code.visualstudio.com/ | Support for multiple languages with fairly easy setup |
| PyCharm | https://www.jetbrains.com/pycharm/ | An IDE for Python professionals. Will take a bit of time to get used to |
We recommend Visual Studio (VS) Code if you don't have an editor installed or want to try something new. The following sections will focus on explaining VS Code.
Below, you can see an overview of the VS Code interface.
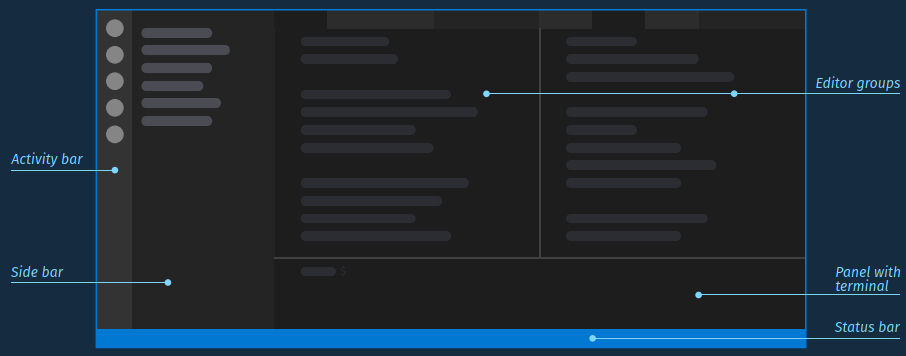
The main components of VS Code are:
-
The action bar: VS Code is not an editor meant for any one language and can do many things. One of the core reasons that VS Code has become so popular is that custom plug-ins called extensions can be installed to add functionality to VS Code. It is in the action bar that you can navigate between these different applications when you have installed them.
-
The sidebar: The sidebar has different functionality depending on what extension you have open. In most cases, the sidebar will just contain the file explorer.
-
The editor: This is where your code is. VS Code supports several layouts in the editor (one column, two columns, etc.). You can make a custom layout by dragging a file to where you want the layout to split.
-
The panel: The panel contains a terminal for you to interact with. This can quickly be used to try out code by opening a
pythoninterpreter, management of environments, etc. -
The status bar: The status bar contains information based on the extensions you have installed. In particular, for Python development, the status bar can be used to change the conda environment.
❔ Exercises
The overall goal of the exercises is that you should start familiarizing yourself with the editor you have chosen. If you are already an expert in one of them, feel free to skip the rest. You should at least be able to:
- Create a new file
- Run a Python script
- Change the Python environment
The instructions below are specific to Visual Studio Code, but we recommend that you try to answer the questions
if using another editor. In the exercise_files folder belonging to this session, we have put cheat sheets for VS Code
(one for Windows and one for Mac/Linux) that can give you an easy overview of the different macros in VS Code. The
following exercises are just to get you started, but you can find many more tutorials
in the VS Code Python tutorial.
-
VS Code is a versatile editor that supports many languages. For Python development, install the following extensions:
- Python: general Python support for VS Code
- Pylance: language server for Python that provides better code completion and type-checking
- Jupyter: support for Jupyter notebooks directly in VS Code
- Python Environments: allows for easy management of virtual environments
-
If you install the
Pythonpackage, you should see something like this in your status bar:
which indicates that you are using the stock Python installation instead of the one you have created using
conda. Click it and change the Python environment to the one you want to use. -
One of the most useful tools in VS Code is the built-in
Explorer, which allows you to navigate the entire project. To take advantage of VS Code, make sure that what you are working on is a project. Create a folder calledhello(somewhere on your laptop) and open it in VS Code (ClickFile->Open Folder). You should end up with a completely clean workspace (as shown below). Click theNew filebutton and create a file calledhello.py.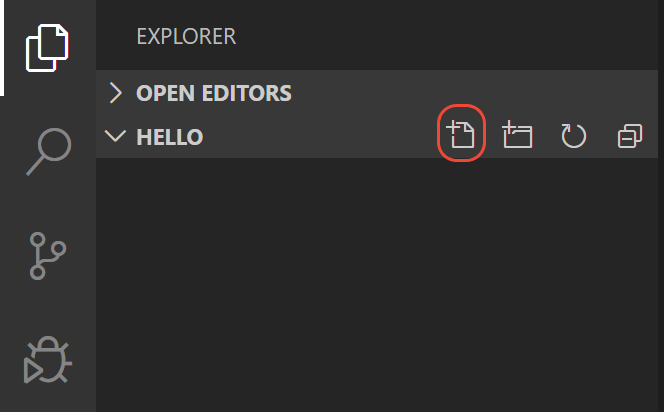
Image credit -
Finally, let's run some code. Add something simple to the
hello.pyfile like: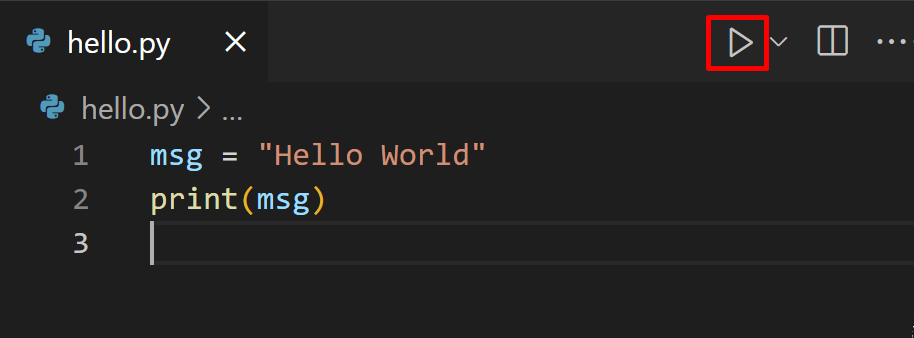
Image credit and click the
runbutton as shown in the image. It should create a new terminal, activate the environment that you have chosen, and finally run your script. In addition to clicking therunbutton, you can also:- Select some code and press
Shift+Enterto run it in the terminal - Select some code and right-click, choosing to run it in an interactive window (where you can interact with the results like in a Jupyter Notebook)
- Select some code and press
That's the basics of using VS Code. We highly recommend that you revisit this tutorial during the course when we get to topics such as debugging and version control, which VS Code can help with. We can also recommend this blog post that goes over some good extensions for AI/ML development in VS Code.
A note on Jupyter notebooks in production environments
As already stated, Jupyter Notebooks are great for development as they allow developers to easily test out new ideas. However, they often lead to pain points when models need to be deployed. We highly recommend reading section 5.1.1 of this paper by Shankar et al. which in more detail discusses the strong opinions on Jupyter notebooks that exist within the developer community.
All this said, there exists one simple tool to make notebooks work better in a production setting. It's called
nbconvert and can be installed with
You may need some further dependencies such as Pandoc, TeX and Pyppeteer for it to work (see install instructions
in the nbconvert documentation). After
this, converting a notebook to a .py script is as simple as:
which will produce a similarly named script called my_notebook.py. We highly recommend that you stick to developing
scripts directly during the course to get experience with doing so, but nbconvert can be a fantastic tool to have
in your toolbox.
AI assistance
You are probably all familiar with using AI tools for solving different tasks in your daily life, and you have most likely also used AI tools like ChatGPT or similar for programming. However, most of these tools are not directly integrated into your editor, which can lead to a lot of context switching that in general leads to lower productivity.
We are therefore in this section going to be looking at GitHub Copilot, which is an AI tool that directly integrates into your editor, eliminating the need to switch between browser tabs or external tools. In addition, the strength of having AI directly in your editor is that it can provide suggestions based on the code you are currently writing and in general just has access to a larger context than a standalone tool.
❔ Exercises
-
As of writing this, GitHub Copilot is free for all students, teachers and maintainers of popular open-source projects. As a student, sign up for the Student Developer Pack.
-
Install the GitHub Copilot extension in your editor.
-
GitHub Copilot has many different features, but the most important one is the ability to provide suggestions based on the code you are currently writing. Try to write some code in a new Python file and see if you can get some suggestions from GitHub Copilot on how to complete the code. If you have no idea what to try out here is a simple example of starting out coding a neural network in PyTorch:
GitHub Copilot will most likely suggest that you complete the code using linear layers with an input dimension of
28*28. Can you explain why it suggests this and where this bias comes from? -
The second feature that can be very useful is the ability to directly chat or ask questions about your code. Try highlighting (in your code editor) the code from the previous exercise and press
Ctrl+iwhich should open a chat window. Ask it to complete it with a convolutional neural network instead of a linear one.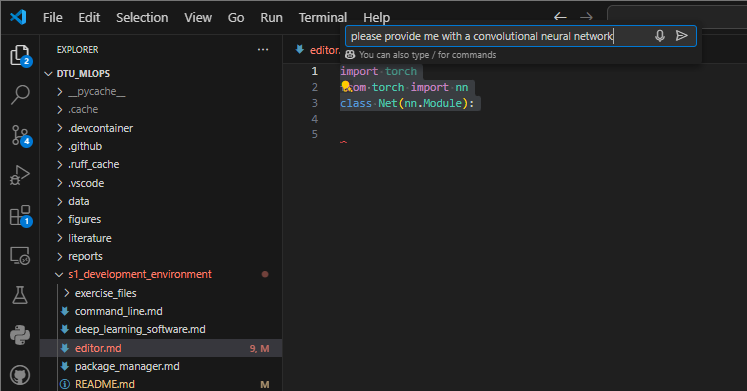
-
Finally, let's try the built-in chat feature. You can get to this by clicking the
Chaticon in the Activity bar and begin to ask questions similar to how you would ask ChatGPT. However, we also have the option of providing context either from the code editor or the terminal. Try saving the following code in a Python script calledcopilot.py:import torch from torch import nn class Net(nn.Module): def __init__(self): super(Net, self).__init__() self.fc1 = nn.Linear(28*28, 128) self.fc2 = nn.Linear(128, 64) self.fc3 = nn.Linear(64, 10) def forward(self, x): x = x.view(-1, 28*28) x = torch.relu(self.fc1(x)) x = torch.relu(self.fc2(x)) x = self.fc3(x) return x model = Net() print(model(torch.randn(1, 1, 14, 14)))and run it in the terminal:
It will naturally give you an error, but you can now ask GitHub Copilot for help. The easiest way to do this is by highlighting the output in the terminal and then running the
GitHub Copilot: Explain This (Terminal)command (see the image below, useCtrl+Shift+Pto open the command palette and search for the command). Does the explanation make sense e.g. can you figure out what to change to get the code running?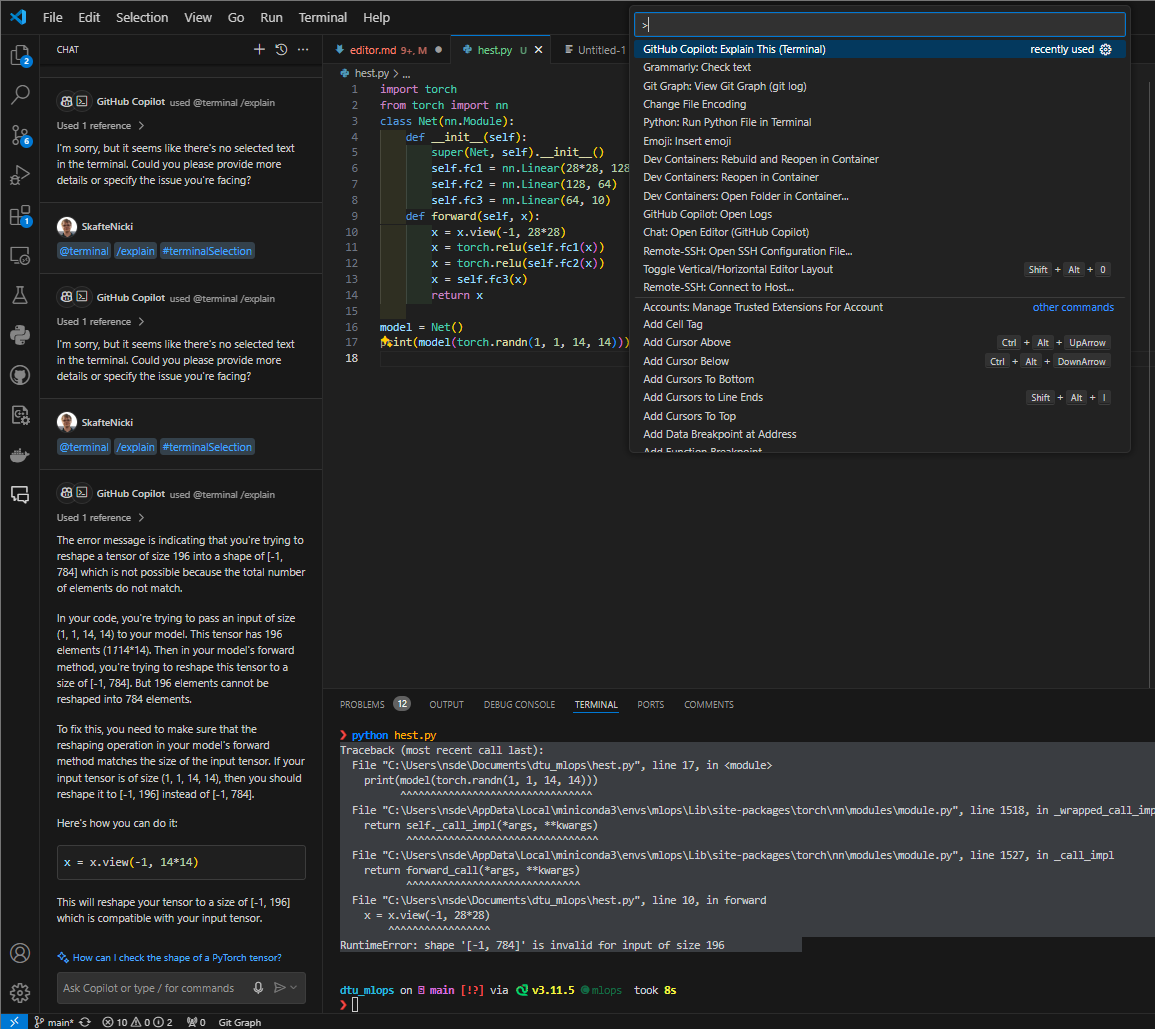
-
(Optional) Just to investigate the difference between using GitHub Copilot and ChatGPT, try to redo the previous exercises using ChatGPT. What are the main differences between the two tools? (1)
 Remember that ChatGPT is a general AI model, meaning that it was trained to be good at many
tasks, whereas GitHub Copilot (which uses OpenAI's Codex model under the hood) was specifically trained to be
good at coding.
Remember that ChatGPT is a general AI model, meaning that it was trained to be good at many
tasks, whereas GitHub Copilot (which uses OpenAI's Codex model under the hood) was specifically trained to be
good at coding.
That was a small introduction to GitHub Copilot. We highly recommend that you try to use it during the course to see how it can help you solve both the exercises and the final project. However, when using AI tools it is always important to remember that they are not perfect and that you need to critically evaluate the suggestions they provide. In the end, you are the one responsible for the code you write, not the AI tool.