![]()
Git
Core Module
Proper collaboration with other people will require that you can work on the same codebase in an organized manner. This is the reason that version control exists. Simply stated, it is a way to keep track of:
- Who made changes to the code
- When did the change happen
- What changes were made
For a full explanation, please see this page.
Secondly, it is important to note that GitHub is not git! GitHub is the dominating player when it comes to hosting repositories, but that does not mean that they are the only ones providing free repository hosting (see bitbucket or gitlab for some other examples).
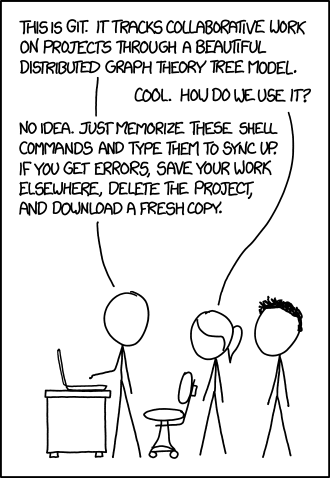
That said, we will be using git and GitHub throughout this course. It is a requirement for passing this course that you create a public repository with your code and use git to upload any code changes. How much you choose to integrate this into your own projects depends, but you are at least expected to be familiar with git+GitHub.
Initial config
What does Git stand for?
The name "git" was given by Linus Torvalds when he wrote the very first version. He described the tool as "the stupid content tracker" and the name as (depending on your mood):
- Random three-letter combination that is pronounceable, and not actually used by any common UNIX command. The fact that it is a mispronunciation of "get" may or may not be relevant.
- Stupid. Contemptible and Despicable. Simple. Take your pick from the dictionary of slang.
- "Global information tracker": you're in a good mood, and it actually works for you. Angels sing, and a light suddenly fills the room.
- "Goddamn idiotic truckload of sh*t": when it breaks
-
Install git on your computer and make sure that your installation is working by writing
git helpin a terminal and it should show you the help message for git. -
Create a GitHub account if you do not already have one.
-
To make sure that we do not have to type in our GitHub username every time that we want to make some changes, we can once and for all set it on our local machine.
Git overview
The most simple way to think of version control is that it is just nodes with lines connecting them:

Each node, which we call a commit, is uniquely identified by a hash string. Each node stores what our code looked like at that point in time (when we made the commit) and using the hash codes we can easily revert to a specific point in time.
The commits are made up of local changes that we make to our code. A basic workflow for adding commits can be seen below:
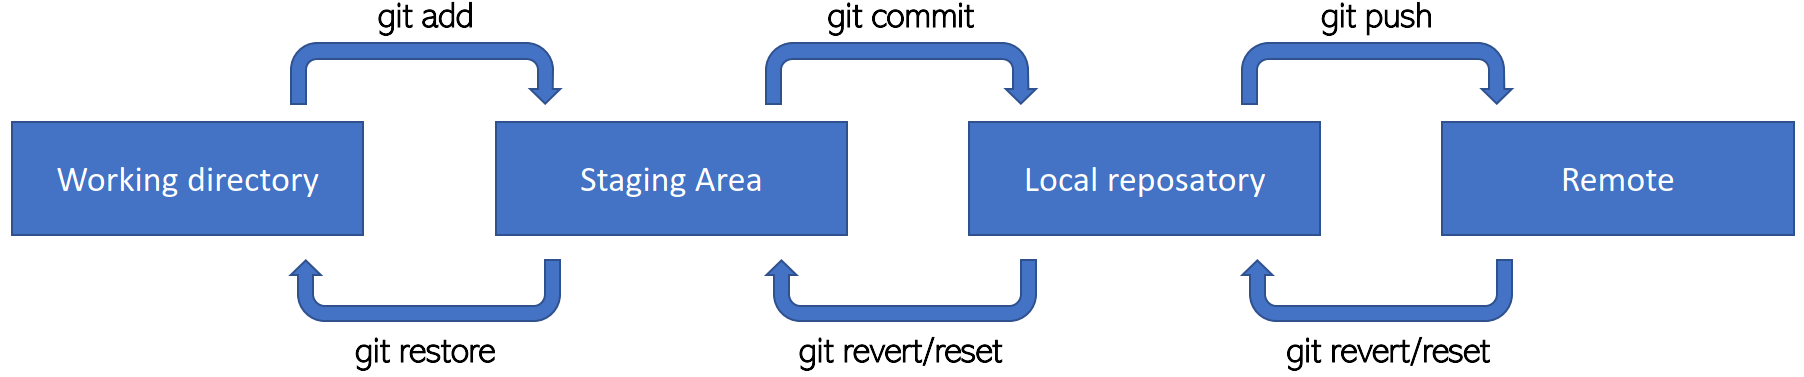
Assuming that we have made some changes to our local working directory and that we want to get these updates to be online in the remote repository we have to do the following steps:
-
First we run the command
git add. This will move our changes to the staging area. While changes are in the staging area we can very easily revert them (usinggit restore). There has therefore not been assigned a unique hash to the code yet, and so we can still overwrite it. -
To take our code from the staging area and make it into a commit, we simply run
git commitwhich will locally add a node to the graph. Note again that we have not pushed the commit to the online repository yet. -
Finally, we want others to be able to use the changes that we made. We do a simple
git pushand our commit goes online.
Of course, the real power of version control is the ability to make branches, as in the image below.
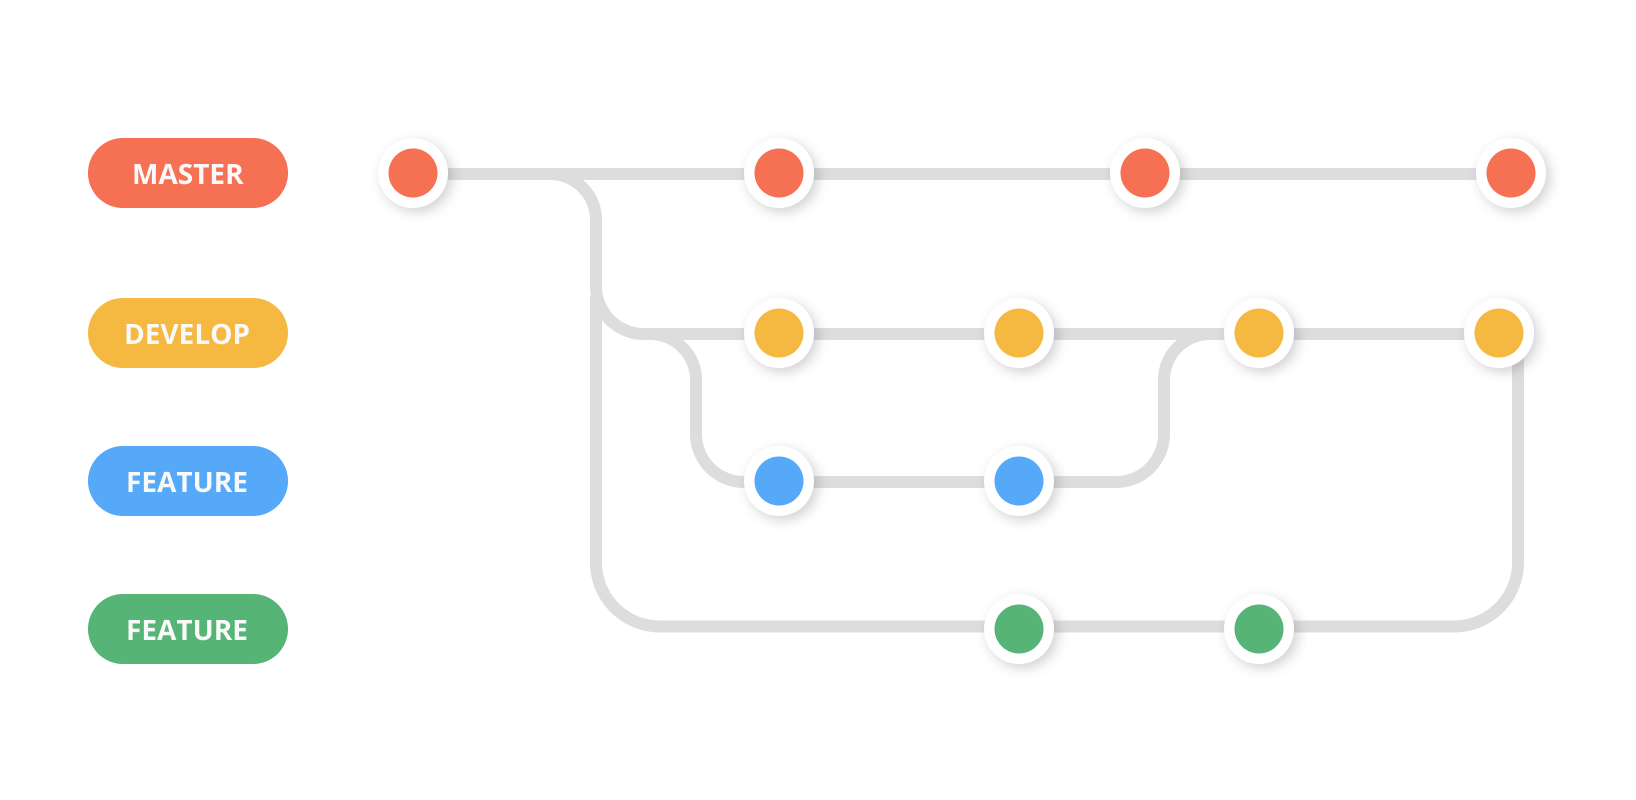
Each branch can contain code that is not present on other branches. This is useful when you are many developers working together on the same project.
❔ Exercises
-
In your GitHub account create a repository, where the intention is that you upload the code from the final exercise from yesterday.
-
After creating the repository, clone it to your computer.
-
Move/copy the three files from yesterday into the repository (and any others that you made).
-
Add the files to a commit by using the
git addcommand. -
Commit the files using the
git commitcommand where you use the-margument to provide a commit message (1). Writing a good commit message is a skill in and of itself. A commit message should be
short but informative about the work you are trying to commit. Try to practice writing good commit messages
throughout the course. You can see
this guideline for help.
Writing a good commit message is a skill in and of itself. A commit message should be
short but informative about the work you are trying to commit. Try to practice writing good commit messages
throughout the course. You can see
this guideline for help.
-
Finally push the files to your repository using
git push. Make sure to check online that the files have been updated in your repository (1).- Be aware that you either need to generate a token to remote push from you local
terminal or install the
GitHub CLI.
-
You can always use the command
git statusto check where you are in the process of making a commit. -
Also checkout the
git logcommand, which will show you the history of commits that you have made.
-
-
Make sure that you understand how to make branches, as this will allow you to try out code changes without messing with your working code. Creating a new branch can be done using:
Afterwards, you can use
git checkout(1) to change between branches (remember to commit your work!). Try adding something (a file, a new line of code, etc.) to the newly created branch, commit it and try changing back to main afterwards. You should hopefully see whatever you added on the branch is not present on the main branch.- The
git checkoutcommand is used for a lot of different things in git. It can be used to change branches, to revert changes and to create new branches. An alternative is usinggit switchandgit restorewhich are more modern commands.
-
If you do not already have a cloned version of the repository belonging to the course, make sure to make one! I am continuously updating/changing some of the material during the course and I therefore recommend that you each day before the lecture do a
git pullon your local copy. -
Git may seem like a waste of time when solutions like Dropbox, Google Drive, etc. exist, and it is not completely untrue when you are only one or two working on a project. However, these file management systems fall short when hundreds to thousands of people work together. For this exercise you will go through the steps of sending an open-source contribution:
-
Go online and find a project you do not own, where you can improve the code. You can either look at this page of good issues to get started with or for simplicity you can just choose the repository belonging to the course. Now fork the project by clicking the fork button.

This will create a local copy of the repository which you have complete writing access to. Note that code updates to the original repository do not update code in your local repository.
-
Clone your local fork of the project using
git clone. -
As default your local repository will be on the
main branch(HINT: you can check this with thegit statuscommand). It is good practice to make a new branch when working on some changes. Use thegit branchcommand followed by thegit checkoutcommand to create a new branch. -
You are now ready to make changes to the repository. Try to find something to improve (any spelling mistakes?). When you have made the changes, do the standard git cycle:
add -> commit -> push. -
Go online to the original repository and go to the
Pull requeststab. Find thecomparebutton and choose the button to compare themaster branchof the original repo with the branch that you just created in your own repository. Check the diff on the page to make sure that it contains the changes you have made. -
Write a bit about the changes you have made and click
Create pull request:).
-
-
Forking a repository has the consequence that your fork and the repository that you forked can diverge. To mitigate this we can set what is called a remote upstream. Take a look at this page , and set a remote upstream for the repository you just forked.
-
After setting the upstream branch, we need to pull and merge any updates. Take a look at this page and figure out how to do this.
-
As a final exercise we want to simulate a merge conflict, which happens when two users try to commit changes to exactly the same lines of code in the codebase, and git is not able to resolve how the different commits should be integrated.
-
In your browser, open your favorite repository (it could be the one you just worked on), go to any file of your choosing and click the edit button (see image below) and make some change to the file. For example, if you choose a Python file you can just import some random packages at the top of the file. Commit the change.

-
Make sure not to pull the change you just made to your local computer. Locally make changes to the same file in the same lines and commit them afterwards.
-
Now try to
git pullthe online changes. What should (hopefully) happen is that git will tell you that it found a merge conflict that needs to be resolved. Open the file and you should see something like this<<<<<<< HEAD this is some content to mess with content to append ======= totally different content to merge later >>>>>>> masterthis should be interpreted as: everything that's between
<<<<<<<and=======are the changes made by your local commit and everything between=======and>>>>>>>are the changes you are trying to pull. To fix the merge conflict you simply have to make the code in the two "cells" work together. When you are done, remove the identifiers<<<<<<<,=======and>>>>>>>.Merge, rebase or fast-forward?
On a
git pullyou can get messages like this the first time you try to pull after a merge conflict:hint: You have divergent branches and need to specify how to reconcile them. hint: You can do so by running one of the following commands sometime before hint: your next pull: hint: hint: git config pull.rebase false # merge hint: git config pull.rebase true # rebase hint: git config pull.ff only # fast-forward only hint: hint: You can replace "git config" with "git config --global" to set a default hint: preference for all repositories. You can also pass --rebase, --no-rebase, hint: or --ff-only on the command line to override the configured default per hint: invocation.In general we recommend setting
git config pull.rebase falseto merge the changes. This is the default behavior of git and is the most common way to resolve merge conflicts. However, if you are working on a project with many people and you want to keep the commit history clean, you can usegit config pull.rebase trueto rebase the changes. This will make it look like you made the changes directly on top of the latest commit. The last optiongit config pull.ff onlywill only allow you to pull changes that can be fast-forwarded. This is the most strict option and will not allow you to pull changes that have been made to the same lines of code as you have made changes to. -
Finally, commit the merge and try to push.
-
-
(Optional) The above exercises have focused on how to use git from the terminal, which I highly recommend learning. However, if you are using a proper editor they also have built-in support for version control. We recommend getting familiar with these features (here is a tutorial for VS Code).
🧠 Knowledge check
-
How do you know if a certain directory is a git repository?
Solution
You can check if there is a ".git" directory. Alternatively you can use the
git statuscommand. -
Explain what the file
gitignoreis used for?Solution
The file
gitignoreis used to tell git which files to ignore when doing agit add .command. This is useful for files that are not part of the codebase, but are needed for the code to run (e.g. data files) or files that contain sensitive information (e.g..envfiles that contain API keys and passwords). -
You have two branches - main and devel. What sequence of commands would you need to execute to make sure that devel is in sync with main?
-
What best practices are you familiar with regarding version control?
Solution
- Use a descriptive commit message
- Make each commit a logical unit
- Incorporate others' changes frequently
- Share your changes frequently
- Coordinate with your co-workers
- Don't commit generated files
That covers the basics of git to get you started. In the exercise folder you can find a git cheat sheet with the most useful commands for future reference. Finally, we want to point out another awesome feature of GitHub: in-browser editor. Sometimes you have a small edit that you want to make, but still would like to do this in an IDE/editor. Or you may be in the situation where you are working from a device other than your usual developer machine. GitHub has a built-in editor that can simply be enabled by changing any URL from
to
Try it out on your newly created repository.
🤖 AI-Assisted Code Exploration
As AI tools like ChatGPT, Claude, and Gemini become increasingly popular for code understanding and development, having your entire repository in a format that's easy to share with Large Language Models (LLMs) can be very helpful. These tools allow you to pack an entire repository into a single file that can be fed into AI systems for code review, documentation generation, refactoring suggestions, or learning about unfamiliar codebases.
Repomix is a powerful tool that packs your entire repository into a single AI-friendly file with support for multiple output formats and token counting. You can use it via CLI or through the web interface at repomix.com:
# Quick usage without installation (packs current directory)
npx repomix

# Pack a remote repository directly
npx repomix --remote https://github.com/username/repository
For a quick browser-based alternative, uithub.com lets you view any public GitHub repository
as raw text with token counts. Simply replace github.com with uithub.com in any repository URL.
Licensing and Responsible Use
When using these tools to explore and share code with AI systems, always ensure you have the proper licenses and permissions to use the code. Respect intellectual property rights and only share code that you have the right to analyze or that is under permissive open-source licenses.