![]()
Requests and APIs
Core Module
Before we can deploy our models we need to understand concepts such as APIs and requests. The core reason for this is that we need a new abstraction layer on top of our applications that are not Python-specific. While Python is the defacto language for machine learning, we cannot expect everybody else to use it and in particular, we cannot expect network protocols (both local and external) to be able to communicate with our Python programs out of the box. For this reason, we need to understand requests, in particular HTTP requests and how to create APIs that can interact with those requests.
Requests
When we talk about requests, we are essentially talking about the communication method used in client-server types of architectures. As shown in the image below, in this architecture, the client (user) is going to send requests to a server (our machine learning application) and the server will give a response. For example, the user may send a request to get the class of a specific image, which our application will do and then send back the response in terms of a label.
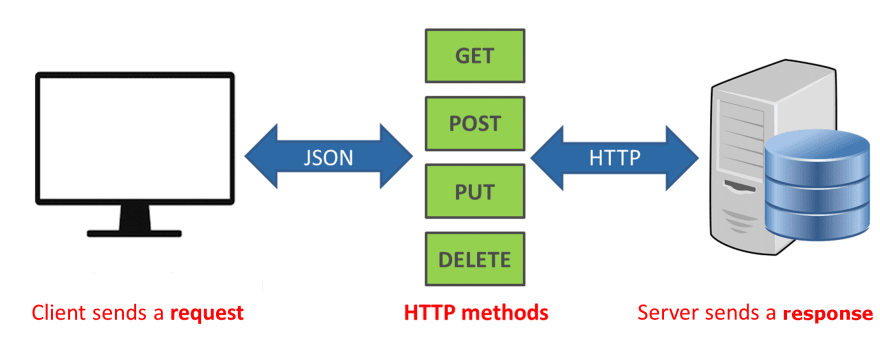
The common way of sending requests is called HTTP (Hypertext Transfer Protocol). It is essentially a specification of the intermediary transportation method between the client and server. An HTTP request essentially consists of two parts:
- A request URL: the location of the server we want to send our request to
- A request method: describing what action we want to perform on the server
The common request methods are (case sensitive):
- GET: get data from the server
- POST/PUT: send data to the server
- DELETE: delete data on the server
You can read more about the different methods in this HTTP request methods guide. For most machine learning applications, GET and POST are the core methods to remember. Additionally, if you want to read more about HTTP in general we highly recommend that you go over this comic strip protocol, but the TLDR is that it provides privacy, integrity and identification over the web.
❔ Exercises
We are going to do a couple of exercises on sending requests using the requests package to get familiar with the syntax.
-
Start by installing the `requests`` package.
-
Afterwards, create a small script and try to execute the code:
import requests
response = requests.get('https://api.github.com/this-api-should-not-exist')
print(response.status_code)
As you can see from the syntax, we are sending a request using the GET method. This code should return status code 404 (1). Take a look at this page that contains a list of status codes. Next, let's call a page that exists.
 If you do not get a status code of 404, it can either
be due to some firewall settings or the fact that many other students are doing the same exercise at the same
time and we are hitting GitHub's API rate limits. GitHub limits unauthenticated requests to 60 per hour per
IP address. When many students use the same network (e.g., DTU's network), you may see rate limit errors
like
If you do not get a status code of 404, it can either
be due to some firewall settings or the fact that many other students are doing the same exercise at the same
time and we are hitting GitHub's API rate limits. GitHub limits unauthenticated requests to 60 per hour per
IP address. When many students use the same network (e.g., DTU's network), you may see rate limit errors
like {"message":"API rate limit exceeded..."}. Don't worry - this is expected and we'll learn how to handle it with authentication in a later exercise. For now, it does not matter if you get a different status code.
What is the status code now and what does it mean? Status codes are important when you have an application that is interacting with a server and want to make sure that it does not fail, which can be done with simple
ifstatements on the status codes. -
Next, try to call the following
which gives back a payload. Essentially, payload refers to any additional data that is sent from the client to the server or vice-versa. Try looking at the
response.contentattribute. What is the type of this attribute? -
You should hopefully observe that the
.contentattribute is of typebytes. It is important to note that the standard way of sending payloads to encode them intobyteobjects. To get a more human-readable version of the response, we can convert it to JSON format.It is important to remember that a JSON object in Python is just a nested dictionary if you ever want to iterate over the object in some way.
-
When we use the GET method we can additionally provide a
paramsargument that specifies what we want the server to send back for a specific request URL:response = requests.get( 'https://api.github.com/search/repositories', params={'q': 'requests+language:python'}, )Before looking at
response.json()can you explain what the code does? You can try looking at this page for help. -
You may already have encountered in exercise 2 that GitHub's API has rate limits. Unauthenticated requests are limited to 60 per hour per IP address, while authenticated requests get 5,000 requests per hour. Let's learn how to authenticate our requests to avoid rate limit errors.
-
First, create a GitHub Personal Access Token (this is like a password for API access):
- Go to GitHub Settings > Developer settings > Personal access tokens > Tokens (classic)
- Click "Generate new token" > "Generate new token (classic)"
- Give it a descriptive name like "MLOps Course API Access"
- Select the
public_reposcope (this allows reading public repository information) - Set an expiration date (e.g., 90 days)
- Click "Generate token" at the bottom
- Important: Copy the token immediately - you won't be able to see it again!
-
Now try making an authenticated request. The secure way to use tokens is through environment variables:
import requests
import os

# Set your token as an environment variable first:
# export GITHUB_TOKEN='your_token_here'  # On Linux/Mac
# $env:GITHUB_TOKEN='your_token_here'    # On Windows PowerShell

token = os.getenv('GITHUB_TOKEN')
headers = {'Authorization': f'token {token}'}

response = requests.get('https://api.github.com/user', headers=headers)
print(response.status_code)
print(response.json())
What information does this endpoint return about your GitHub account?
-
You can check your current rate limit status with:
response = requests.get('https://api.github.com/rate_limit', headers=headers)
print(response.json())
Compare this to an unauthenticated request (without the
headersparameter). What differences do you see in the rate limits? -
Try repeating exercise 5 with authentication by adding the
headersparameter:response = requests.get( 'https://api.github.com/search/repositories', params={'q': 'requests+language:python'}, headers=headers )This authenticated request will count against your 5,000/hour limit instead of the 60/hour limit.
-
-
Sometimes the content of a page cannot be converted into JSON, because as already stated data is sent as bytes. Say that we want to download an image, which we can do in the following way:
Try calling
response.json(), what happens? Next, try callingresponse.content. To get the result in this case we would need to convert from bytes to an image: -
The
getmethod is the most useful method because it allows us to get data from the server. However, as stated in the beginning, multiple request methods exist, for example, the POST method for sending data to the server. Try executing:pload = {'username':'Olivia','password':'123'} response = requests.post('https://httpbin.org/post', data = pload)Investigate the response (this is an artificial example because we do not control the server).
-
Finally, we should also know that requests can be sent directly from the command line using the
curlcommand. Sometimes it is easier to send a request directly from the terminal and sometimes it is easier to do it from a script.-
Make sure you have
curlinstalled, or else find instructions for installing it. To check, callcurl --helpwith the documentation on curl. -
To execute
requests.get('https://api.github.com')using curl we would simply docurl -X GET "https://api.github.com" curl -X GET -I "https://api.github.com" # if you want the status codeTry it yourself.
-
Try to redo some of the exercises yourself using
curl.
-
That ends the intro session on requests. Do not worry if you are still not completely comfortable with sending
requests, we are going to return to how we do it in practice when we have created our API. If you want to
learn more about the requests package you can check out this tutorial and
if you want to see more examples of how to use curl you can check out
this page.
Creating APIs
Requests are all about being on the client side of our client-server architecture. We are now going to move on to the server side where we will be learning about writing the APIs that requests can interact with. An application programming interface (API) is essentially the way for the developer (you) to tell a user how to use the application that you have created. The API is an abstraction layer that allows the user to interact with our application in the way we want them to interact with it, without the user ever having to look at the code.
We can take the API from GitHub as an example https://api.github.com. This API allows any user to retrieve, integrate and send data to GitHub without ever having to visit their webpage. The API exposes multiple endpoints that have various functions:
- https://api.github.com/repos/OWNER/REPO/branches: check out the branches on a given repository
- https://api.github.com/search/code: search through GitHub for repositories
- https://api.github.com/repos/OWNER/REPO/actions/workflows: check the status of workflows for a given repository
and we could go on. However, there may be functionality that GitHub is not interested in users having access to and they may therefore choose not to have endpoints for specific features (1).
- Many companies provide public APIs to interact with their services/data. For a general list of
public APIs you can check out this page. For the Danes out there, you
can check out this list of public and private APIs from Danish companies and
organizations.
The particular kind of API we are going to work with is called REST API (or RESTful API). The REST API specifies specific constraints that a particular API needs to fulfill to be considered RESTful. You can read more about the six guiding principles behind REST API on this page, but one of the most important to have in mind is that the client-server architecture needs to be stateless. This means that whenever a request is sent to the server it needs to be self-contained (all information included) and the server cannot rely on any previously stored information from previous requests.
To implement APIs in practice we are going to use FastAPI. FastAPI is a modern, fast (high-performance), web framework for building APIs with Python 3.6+ based on standard Python type hints. FastAPI is only one of many frameworks for defining APIs. However, compared to other frameworks such as Flask and django it offers a sweet spot of being flexible enough to do what you want without having many additional (unnecessary) features.
❔ Exercises
The exercises below are a condensed version of this and this tutorial. If you ever need context for the exercises, we recommend trying to go through these. Additionally, we also provide this solution file that you can look through for help.
-
Install FastAPI.
This contains the functions, modules, and variables we are going to need to define our interface.
-
Additionally, also install
uvicornwhich is a package for defining low level server applications. -
Start by defining a small application like this in a file called
main.py:from fastapi import FastAPI app = FastAPI() @app.get("/") def read_root(): return {"Hello": "World"} @app.get("/items/{item_id}") def read_item(item_id: int): return {"item_id": item_id}Important here is the use of the
@app.getdecorator. What could this decorator refer to? Explain what the two functions are probably doing. -
Next lets launch our app. Since we called our script
main.pyand we inside the script initialized our API withapp = FastAPI, our application that we want to deploy can be referenced bymain:app:This will launch a server on this page:
http://localhost:8000/. As you will hopefully see, this page will return the content of therootfunction, like the image below. Remember to also check the output in your terminal as that will give info on when and how your application is being invoked.
-
What webpage should you open to get the server to return
1? -
Also checkout the pages:
http://localhost:8000/docsandhttp://localhost:8000/redoc. What do these pages show? -
The power of the
docsandredocpages is that they allow you to easily test your application with their simple UI. As shown in the image below, simply open the endpoint you want to test, click theTry it outbutton, input any values and execute it. It will return both the correspondingcurlcommand for invoking your endpoint, the corresponding URL and response of your application. Try it out.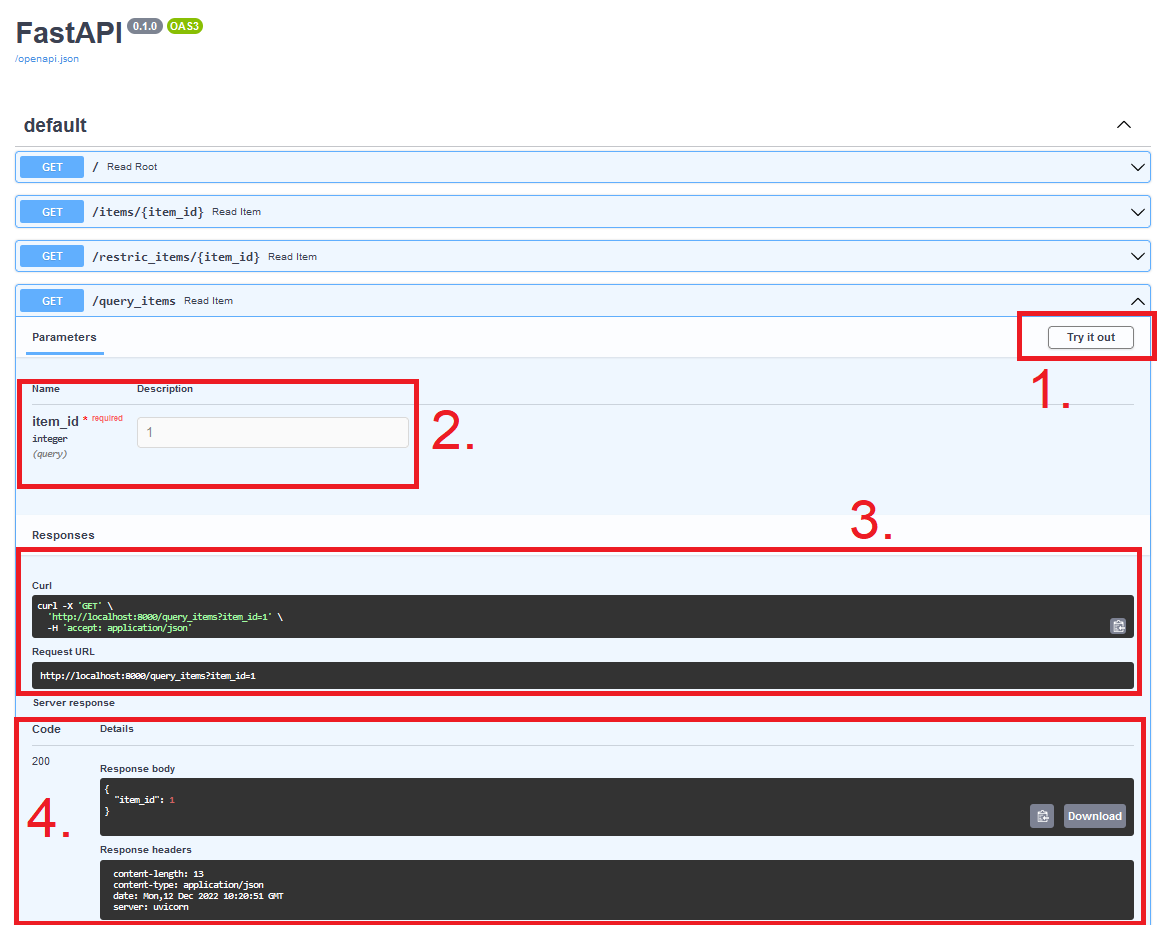
-
You can also checkout
http://localhost:8000/openapi.jsonto check out the schema that is generated which is essentially ajsonfile containing the overall specifications of your program. -
Try to access
http://localhost:8000/items/foo, what happens in this case? When you specify types in your API, FastAPI will automatically do type validation using pydantic, making sure users can only access your API with the correct types. Therefore, remember to include types in your applications!
-
-
With the fundamentals in place let's configure it a bit more:
-
Lets start by changing the root function to include a bit more info. In particular we are also interested in returning the status code so the end user can easily read that. Default status codes are included in the http built-in Python package:
from http import HTTPStatus

@app.get("/")
def root():
    """ Health check."""
    response = {
        "message": HTTPStatus.OK.phrase,
        "status-code": HTTPStatus.OK,
    }
    return response
Try to reload the app and see what is returned now. You should not have to re-launch the app because we initialized the app with the
--reloadargument. -
When we decorate our functions with
@app.get("/items/{item_id}"),item_idis what we call a path parameter because it is a parameter that is directly included in the path of our endpoint. We have already seen how we can restrict a path to a single type, but what if we want to restrict it to specific values? This is often the case if we are working with parameters of typestr. In this case we would need to define anenum:from enum import Enum class ItemEnum(Enum): alexnet = "alexnet" resnet = "resnet" lenet = "lenet" @app.get("/restric_items/{item_id}") def read_item(item_id: ItemEnum): return {"item_id": item_id}Add this API, reload and execute both a valid parameter and an invalid parameter.
-
In addition to path parameters we have query parameters. In the requests exercises we saw an example of this where we were calling https://api.github.com/search/code with the query
'q': 'requests+language:python'. Any parameter in FastAPI that is not a path parameter will be considered a query parameter:Add this API, reload and figure out how to pass in a query parameter.
-
We have until now worked with the
.getmethod, but let's also see an example of the.postmethod. As already described the POST request method is used for uploading data to the server. Here is a simple app that saves the username and password in a database (please never implement this in real life like this):database = {'username': [ ], 'password': [ ]} @app.post("/login/") def login(username: str, password: str): username_db = database['username'] password_db = database['password'] if username not in username_db and password not in password_db: with open('database.csv', "a") as file: file.write(f"{username}, {password} \n") username_db.append(username) password_db.append(password) return "login saved"Make sure you understand what the function does and then try to execute it a couple of times to see your database updating. It is important to note that we sometimes in the following exercises use the
.getmethod and sometimes the.postmethod. For our usage it does not really matter.
-
-
We are now moving on to figuring out how to provide different standard inputs like text, images, json to our APIs. It is important that you try out each example yourself and in particular look at the
curlcommands that are necessary to invoke each application.-
Here is a small application that takes a single text input.
@app.get("/text_model/")
def contains_email(data: str):
    regex = r'\b[A-Za-z0-9._%+-]+@[A-Za-z0-9.-]+\.[A-Z|a-z]{2,}\b'
    response = {
        "input": data,
        "message": HTTPStatus.OK.phrase,
        "status-code": HTTPStatus.OK,
        "is_email": re.fullmatch(regex, data) is not None
    }
    return response
What does the application do? Try it out yourself.
-
Let's say we wanted to extend the application to check for a specific email domain, either
gmailorhotmail. Assume that we want to feed this into our application as ajsonobject, e.g.Figure out how to alter the
dataparameter such that it takes in thejsonobject and make sure to extend the application to check if the email and domain also match. Hint: take a look at this page -
Let's move on to an application that requires a file input:
from fastapi import UploadFile, File
from typing import Optional

@app.post("/cv_model/")
async def cv_model(data: UploadFile = File(...)):
    with open('image.jpg', 'wb') as image:
        content = await data.read()
        image.write(content)
        image.close()

    response = {
        "input": data,
        "message": HTTPStatus.OK.phrase,
        "status-code": HTTPStatus.OK,
    }
    return response
A couple of new things are going on here: we use the specialized
UploadFileandFilebodies in our input definition. Additionally, we added theasync/awaitkeywords. Figure out what everything does and try to run the application (you can use any image file you like). -
The above application actually does not do anything. Let's add opencv as a package and resize the image. It can be done with the following three lines:
Figure out where to add them in the application and additionally add
handwas optional parameters, with a default value of 28. Try running the application where you specify everything and one more time where you leave outhandw. -
Finally, let's also figure out how to return a file from our application. You will need to add the following lines:
from fastapi.responses import FileResponse
cv2.imwrite('image_resize.jpg', res)
FileResponse('image_resize.jpg')
Figure out where to add them to the code and try running the application one more time to see that you get a file back with the resized image.
-
-
A common pattern in most applications is that we want some code to run on startup and some code to run on shutdown. FastAPI allows us to do this by controlling the lifespan of our application. This is done by implementing the
lifespanfunction. Look at the documentation for lifespan events and implement a small application that printsHelloon startup andGoodbyeon shutdown.Solution
Here is a simple example that will print
Helloon startup andGoodbyeon shutdown. -
Let's try to figure out how to use FastAPI in a machine learning context. Below is a script that downloads a
VisionEncoderDecoderfrom huggingface . The model can be used to create captions for a given image. Thus callingreturns a list of strings like
['a cat laying on a couch with a stuffed animal'](try this yourself). Create a FastAPI application that can do inference using this model, i.e., it should take in an image, preferably some optional hyperparameters (likemax_length) and should return a string (or list of strings) containing the generated caption.simple ML application
from transformers import VisionEncoderDecoderModel, ViTFeatureExtractor, AutoTokenizer
import torch
from PIL import Image

model = VisionEncoderDecoderModel.from_pretrained("nlpconnect/vit-gpt2-image-captioning")
feature_extractor = ViTFeatureExtractor.from_pretrained("nlpconnect/vit-gpt2-image-captioning")
tokenizer = AutoTokenizer.from_pretrained("nlpconnect/vit-gpt2-image-captioning")

device = torch.device("cuda" if torch.cuda.is_available() else "cpu")
model.to(device)

gen_kwargs = {"max_length": 16, "num_beams": 8, "num_return_sequences": 1}
def predict_step(image_paths):
    images = []
    for image_path in image_paths:
        i_image = Image.open(image_path)
        if i_image.mode != "RGB":
            i_image = i_image.convert(mode="RGB")

        images.append(i_image)
    pixel_values = feature_extractor(images=images, return_tensors="pt").pixel_values
    pixel_values = pixel_values.to(device)
    output_ids = model.generate(pixel_values, **gen_kwargs)
    preds = tokenizer.batch_decode(output_ids, skip_special_tokens=True)
    preds = [pred.strip() for pred in preds]
    return preds

if __name__ == "__main__":
    print(predict_step(['s7_deployment/exercise_files/my_cat.jpg']))
Solution
-
As the final step, we want to figure out how to include our FastAPI application in a docker container, as that will help us when we want to deploy in the cloud because docker as always can take care of the dependencies for our application. For the following set of exercises you can use any of the previous FastAPI applications as the base application for the container.
-
Start by creating a
requirement.txtfile for your application. You will at least needfastapianduvicornin the file and we always recommend that you are specific about the version you want to use. -
Next, create a
Dockerfilewith the following content:FROM python:3.11-slim WORKDIR /code COPY ./requirements.txt /code/requirements.txt RUN pip install --no-cache-dir --upgrade -r /code/requirements.txt COPY ./app /code/app CMD ["uvicorn", "app.main:app", "--host", "0.0.0.0", "--port", "80"]The above assumes that your file structure looks like this:
Hopefully, all these steps should look familiar if you already went through module M9, except for maybe the last line. However, this is just the standard way that we have run our FastAPI applications in the last couple of exercises, this time with some extra arguments regarding the ports we allow.
-
Next, build the corresponding docker image.
-
Finally, run the image such that a container is spun up that runs our application. The important part here is to remember to specify the
-pargument (p for port) which should be the same number as the port we have specified in the last line of our Dockerfile. -
Check that everything is working by going to the corresponding localhost page http://localhost/items/5?q=somequery.
-
This ends the module on APIs. If you want to go further in this direction we highly recommend that you check out bentoml which is an API standard that focuses solely on creating easy-to-understand APIs and services for ml-applications. Additionally, we also highly recommend checking out Postman which can help design, document and in particular test the API you are writing to make sure that it works as expected.