![]()
Data drifting
Core Module
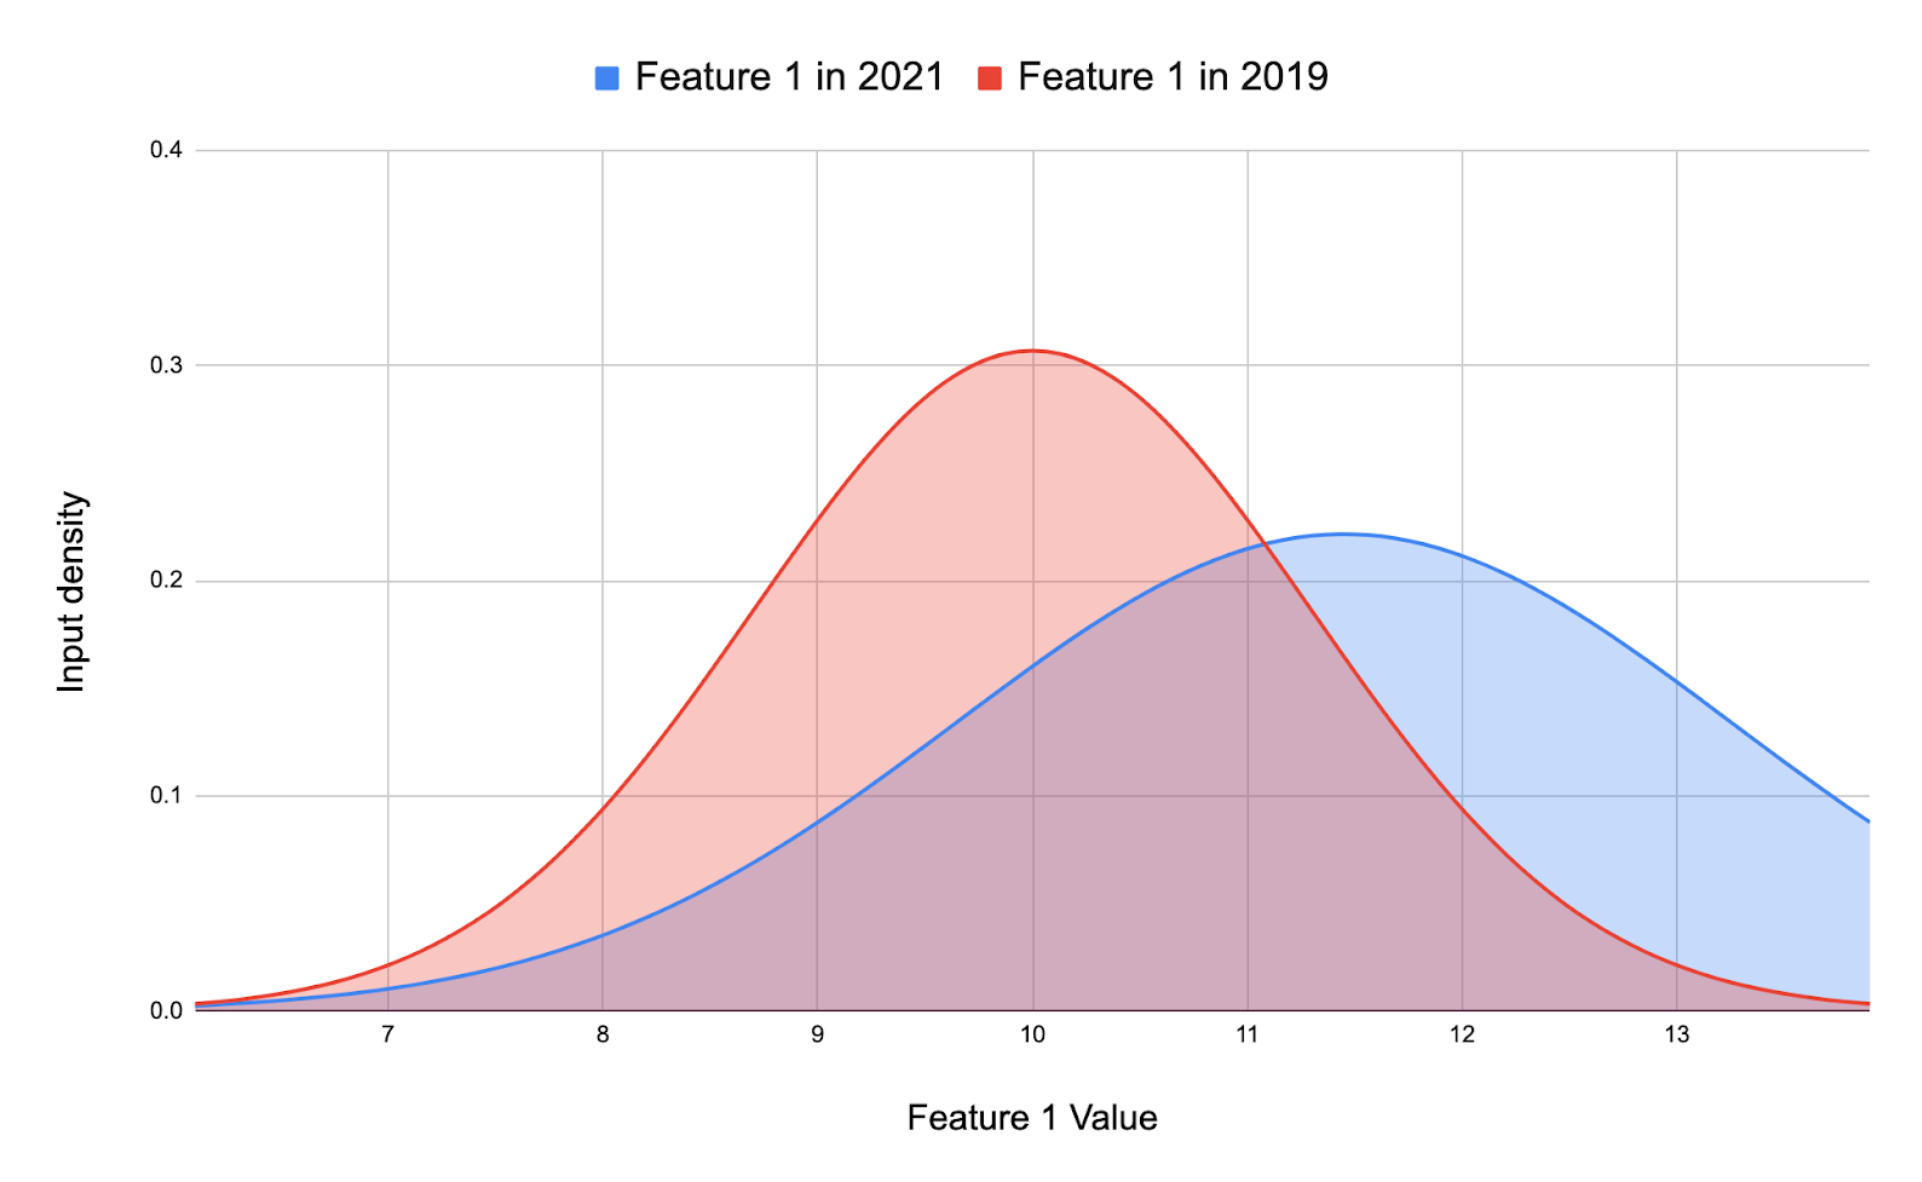
Data drifting is one of the core reasons why model accuracy degrades over time in production. For machine learning models, data drift is the change in model input data that leads to model performance degradation. In practical terms, this means that the model is receiving input that is outside the scope that it was trained on, as seen in the figure below. This shows that the underlying distribution of a particular feature has slowly been increasing in value over two years.
In some cases, it may be that if you normalize some feature in a better way that you are able to generalize your model better, but this is not always the case. The reason for such a drift is commonly some external factor that you essentially have no control over. That really only leaves you with one option: retrain your model on the newly received input features and deploy that model to production. This process is probably going to repeat over the lifetime of your application if you want to keep it up-to-date with the real world.
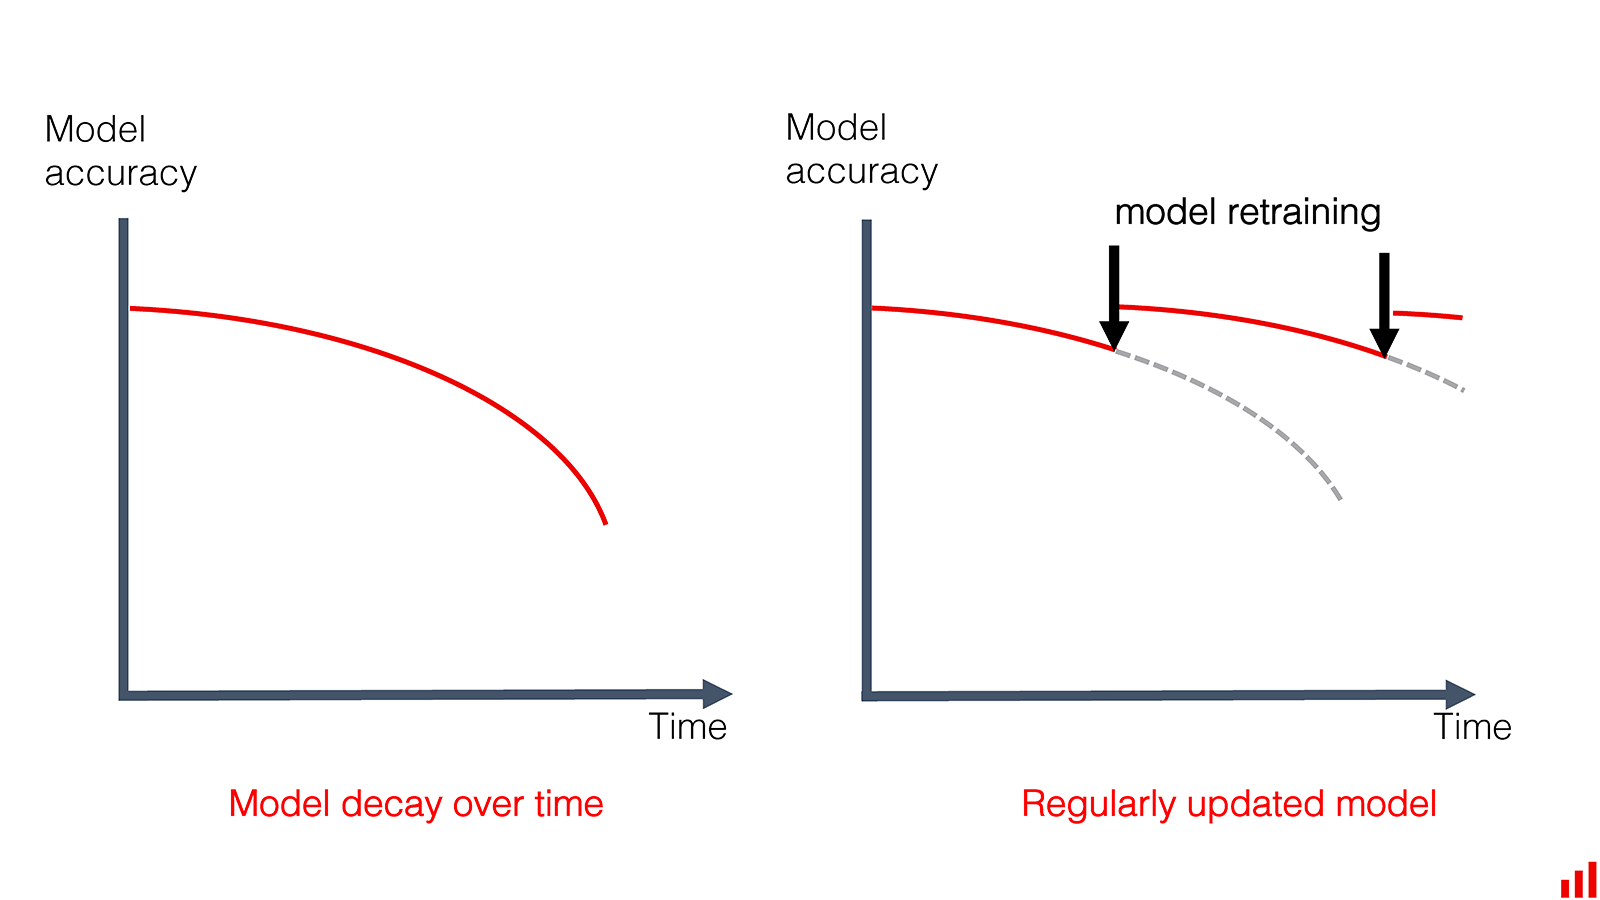
We have now come up with a solution to the data drift problem, but there is one important detail that we have not taken care of: When we should actually trigger the retraining? We do not want to wait around for our model performance to degrade, thus we need tools that can detect when we are seeing a drift in our data.
❔ Exercises
For these exercises we are going to use the framework Evidently ,developed by EvidentlyAI. Evidently currently supports detection for both regression and classification models. The exercises are in large part taken from the Evidently getting started guide and in general we recommend if you are in doubt about an exercise to look at the docs for the API and examples (their documentation can be a bit lacking sometimes, so you may also have to dive into the source code).
Additionally, we want to stress that data drift detection, concept drift detection, etc. is still an active field of research and so there exist multiple frameworks for doing this kind of detection. In addition to Evidently, we can also mention NannyML, WhyLogs and deepcheck.
-
Start by installing Evidently.
-
Hopefully you have already gone through session S7 on deployment. As part of the deployment exercises about GCP functions you should have developed an application that can classify the iris dataset. Your solution should look something like the script below:
Example GCP function for iris classification
Start by converting your GCP function into a FastAPI application. The appropriate
curlcommand should look something like this:curl -X 'POST' \ 'http://127.0.0.1:8000/iris_v1/?sepal_length=1.0&sepal_width=1.0&petal_length=1.0&petal_width=1.0' \ -H 'accept: application/json' \ -d ''and the response body should look like this:
Solution
-
Next we are going to add some functionality to our application. We need to add that the input for the user is saved to a database whenever our application is called. However, to not slow down the response to our user we want to implement this as a background task. A background task is a function that should be executed after the user has gotten their response. Implement a background task that saves the user input to a database implemented as a simple
.csvfile. You can read more about background tasks in the FastAPI background tasks tutorial. The header of the database should look something like this:time, sepal_length, sepal_width, petal_length, petal_width, prediction 2022-12-28 17:24:34.045649, 1.0, 1.0, 1.0, 1.0, 1 2022-12-28 17:24:44.026432, 2.0, 2.0, 2.0, 2.0, 1 ...Thus both input, timestamp and predicted value should be saved.
Solution
-
Call your API a number of times to generate some dummy data in the database.
-
-
Create a new
data_drift.pyfile where we are going to implement the data drifting detection and reporting. Start by adding both the real iris data and your generated dummy data as pandas dataframes.import pandas as pd from sklearn import datasets reference_data = datasets.load_iris(as_frame=True).frame current_data = pd.read_csv('prediction_database.csv')If done correctly you will most likely end up with two dataframes that look like
# reference_data sepal length (cm) sepal width (cm) petal length (cm) petal width (cm) target 0 5.1 3.5 1.4 0.2 0 1 4.9 3.0 1.4 0.2 0 ... 148 6.2 3.4 5.4 2.3 2 149 5.9 3.0 5.1 1.8 2 [150 rows x 5 columns] # current_data time sepal_length sepal_width petal_length petal_width prediction 2022-12-28 17:24:34.045649 1.0 1.0 1.0 1.0 1 ... 2022-12-28 17:24:34.045649 1.0 1.0 1.0 1.0 1 [10 rows x 5 columns]Standardize the dataframes such that they have the same column names and drop the time column from the
current_datadataframe.Solution
import pandas as pd from sklearn import datasets reference_data = datasets.load_iris(as_frame=True).frame reference_data = reference_data.rename( columns={ 'sepal length (cm)': 'sepal_length', 'sepal width (cm)': 'sepal_width', 'petal length (cm)': 'petal_length', 'petal width (cm)': 'petal_width', 'target': 'target' } ) current_data = pd.read_csv('prediction_database.csv') current_data = current_data.drop(columns=['time'])-
Add the following code to the
data_drift.pyfile to create a report on the data drift:from evidently.legacy.report import Report from evidently.legacy.metric_preset import DataDriftPreset report = Report(metrics=[DataDriftPreset()]) snapshot = report.run(reference_data=reference_data, current_data=current_data) snapshot.save_html('report.html')Open the generated
.htmlpage. What does it say about your data? Has it drifted? Make sure to poke around to understand what the different plots are actually showing. -
Data drifting is not the only kind of reporting evidently can make. We can also get reports on data quality. Look through evidently's documentation and add the preset that has to do with data quality to the report. Try adding a few
Nanvalues to yourcurrent_dataand re-run the report. Checkout the report and go over the generated plots and make sure that it picked up on the missing values you just added. -
Another important kind of drift is called target drift, where the distribution of the target values has changed. If your training data was balanced, and you are now seeing a lot of one class being predicted this may indicate that your model is not performing as expected or that external factors have changed, which means that you should retrain your model. Find the preset that checks for target drift, add it to the report and re-run the analysis.
-
-
Evidently reports are meant for debugging, exploration and reporting of results. However, if we want to integrate evidently functionality into our already developed pipelines, either as a simple script, as part of a GitHub action workflow or something else, we need to be able to extract the results in a more programmatic way. This can be done using their
TestandTestSuitesclasses. Implement a simple test that checks if there are any missing values in our dataset and print the results to the console.Solution
Using the
.as_dict()method on aTestSuitewe can programmatically extract the results of the test. In particular the returned dictionary contains a keysummarythat contains a keyall_passedthat isTrueif all tests passed andFalseotherwise.from evidently.legacy.test_suite import TestSuite from evidently.legacy.tests import TestNumberOfMissingValues data_test = TestSuite(tests=[TestNumberOfMissingValues()]) data_test.run(reference_data=reference_data, current_data=current_data) result = data_test.as_dict() print(result) print("All tests passed: ", result['summary']['all_passed'])- Take a look at this colab notebook
that contains all the tests implemented in Evidently. Pick 5 tests of your choice, where at least 1 fails by
default and implement them as a
TestSuite. Then try changing the arguments of the test so they better fit your use case and get them all passing.
- Take a look at this colab notebook
that contains all the tests implemented in Evidently. Pick 5 tests of your choice, where at least 1 fails by
default and implement them as a
-
(Optional) When doing monitoring in practice, we are not always interested in running on all the data collected from our API, maybe only the last
Nentries or maybe just from the last hour of observations. Since we are already logging the timestamps of when our API is called we can use that for filtering. Implement a simple filter that- Takes an integer
nand returns the lastnentries in our database - Takes an integer
tthat filters out observations older thanthours
Solution
import pandas as pd def filter_data(data: pd.Dataframe, n: int | None = None, t: int | None = None) -> pd.Dataframe: if n is not None: return data.tail(n) if t is not None: df['time'] = pd.to_datetime(df['time']) # Ensure the 'time' column is a datetime object one_hour_ago = datetime.now() - timedelta(hours=t) return df[df['time'] > one_hour_ago] return data - Takes an integer
-
Evidently by default only supports structured data, e.g., tabular data (so does nearly every other framework). Thus, the question then becomes how we can extend unstructured data such as images or text? The solution is to extract structured features from the data which we can then run the analysis on.
-
For images the simple solution would be to flatten the images and consider each pixel a feature, however this does not work in practice because changes in the individual pixels do not really tell us anything about the image. Instead, we should derive some features such as:
- Average brightness
- Contrast of an image
- Image sharpness
- ...
These are all numbers that can make up a feature vector for a given image. Try doing this yourself, for example by extracting such features from the MNIST and FashionMNIST datasets, and check if you can detect a drift between the two sets.
Solution
-
(Optional) For text a common approach is to extract some higher-level embedding such as the very classical GLOVE embedding. Try following this tutorial to understand how drift detection is done on text.
-
Instead of manually specifying the features, let's take a deep learning-based approach to getting features from unstructured data. To do this let's consider the CLIP model, which is a state-of-the-art model for connecting text to images, i.e., image captioning. For our purpose this is perfect because we can use the model to get abstract feature embeddings for both images and text. Implement a simple script that extracts features from an image and a text using CLIP. We recommend using the Huggingface implementation for doing this. What is the size of the feature vector?
Solution
Both
img_featuresandtext_featuresfor the standard CLIP model are a(512,)abstract feature embedding. We cannot interpret these features directly, but they should be able to tell us something about our data distribution. -
Run your CLIP script on two different datasets, for example CIFAR10 and SVHN for images or IMDB movie review and Amazon review for text. Then run the data drift detection on the extracted features. What do you see? Does the data drift?
-
-
(Optional) If we have multiple applications and want to run monitoring for each application we often also want the monitoring to be a deployed application (that only we can access). Implement a
/monitoringendpoint that does all the reporting we just went through such that you have two endpoints:http://127.0.0.1:8000/predict/?sepal_length=1.0&sepal_width=1.0&petal_length=1.0&petal_width=1.0 # user endpoint http://127.0.0.1:8000/monitoring/ # monitoring endpointOur monitoring endpoint should return an HTML page either showing an Evidently report or test suite. Try implementing this endpoint.
Solution
Data drift in the Cloud
In the next section we are going to look at how we can incorporate the data drifting in our cloud environment. In particular, we are going to be looking at how we can deploy a monitoring application that will run on a schedule and then report those statistics directly back into GCP for us to study.
❔ Exercises
In this set of exercises we are going to deploy a machine learning model for sentiment analysis trained on Google Play Store Reviews. The model's task is to predict if a user's review is positive, neutral or negative in sentiment. We are then going to deploy a monitoring service that will check if the distribution of the reviews has drifted over time. This may be useful if we are seeing a decrease in the number of positive reviews over time, which may indicate that our application is not performing as expected.
We have already created downloaded the training data, created a training script and trained a model for you. The training data and the trained model are available to download from the following Google Drive folder, which can be quickly downloaded by running the following commands (which uses the gdown Python package):
And the training script can be seen below. You are free to retrain the model yourself, but it takes about 30 mins to train using a GPU. Overall the model achieves around 74% accuracy on a held-out test set. We recommend that you scroll through the files to get an understanding of what is going on.
Training script for sentiment analysis model
| sentiment_classifier.py | |
|---|---|
1 2 3 4 5 6 7 8 9 10 11 12 13 14 15 16 17 18 19 20 21 22 23 24 25 26 27 28 29 30 31 32 33 34 35 36 37 38 39 40 41 42 43 44 45 46 47 48 49 50 51 52 53 54 55 56 57 58 59 60 61 62 63 64 65 66 67 68 69 70 71 72 73 74 75 76 77 78 79 80 81 82 83 84 85 86 87 88 89 90 91 92 93 94 95 96 97 98 99 100 101 102 103 104 105 106 107 108 109 110 111 112 113 114 115 116 117 118 119 120 121 122 123 124 125 126 127 128 129 130 131 132 133 134 135 136 137 138 139 140 141 142 143 144 145 146 147 148 149 150 151 152 153 154 155 156 157 158 159 160 161 162 163 164 165 166 167 168 169 170 171 172 173 174 175 176 177 178 179 180 181 182 183 184 185 186 187 188 189 190 191 192 193 194 195 196 197 198 199 200 201 202 203 204 205 206 207 | |
-
To begin let's start by uploading the training data and model to a GCP bucket. Upload to a new GCP bucket called
gcp_monitoring_exercise(or something similar). Upload the training data and the trained model to the bucket.Solution
This can be done by running the following commands or by manually uploading the files to the bucket using the GCP console.
-
Next we need to create a FastAPI application that takes a review as input and returns the predicted sentiment of the review. We provide a starting point for the application in the file below that should be able to run as is.
Starting point for sentiment analysis API
-
Confirm that you can run the application by running the following command in the terminal
You need the model file saved in the same directory as the application to run it. Write a small
client.pyscript that calls the application with a review and prints the predicted sentiment. Try executing the script in another terminal (while theuvicornserver is running) to confirm that the application is working. -
Next, we need to extend the application in two ways. First, instead of loading the model from our local computer, it should load from the bucket we just uploaded the model to. Second, we need to save the request data and the predicted label to the cloud. Normally this would best be suited in a database, but we are going to just save to the same bucket as the model. We just need to make sure each request is saved under a unique name (e.g., the time and date of the request). Implement both of these functionalities in the application. To interact with GCP buckets in Python you should install the
google-cloud-storagepackage if you have not already done so.Solution
sentiment_api.py 1 2 3 4 5 6 7 8 9 10 11 12 13 14 15 16 17 18 19 20 21 22 23 24 25 26 27 28 29 30 31 32 33 34 35 36 37 38 39 40 41 42 43 44 45 46 47 48 49 50 51 52 53 54 55 56 57 58 59 60 61 62 63 64 65 66 67 68 69 70 71 72 73 74 75 76 77 78 79 80 81 82 83 84 85 86 87 88 89 90 91 92 93 94 95 96 97 98 99 100 101 102 103 104 105 106 107 108 109 110 111 112 113 114 115 116 117 118 119 120 121 122 123 124 125 126 127 128
import datetime import json import os from contextlib import asynccontextmanager import torch import torch.nn as nn from fastapi import BackgroundTasks, FastAPI, HTTPException from google.cloud import storage from pydantic import BaseModel from transformers import BertModel, BertTokenizer # Define model and device configuration BUCKET_NAME = "gcp_monitoring_exercise" MODEL_NAME = "bert-base-cased" MODEL_FILE_NAME = "bert_sentiment_model.pt" device = torch.device("cuda" if torch.cuda.is_available() else "cpu") class ReviewInput(BaseModel): """Define input data structure for the endpoint.""" review: str class PredictionOutput(BaseModel): """Define output data structure for the endpoint.""" sentiment: str class SentimentClassifier(nn.Module): """Sentiment Classifier class. Combines BERT model with a dropout and linear layer.""" def __init__(self, n_classes, model_name=MODEL_NAME): super().__init__() self.bert = BertModel.from_pretrained(model_name) self.drop = nn.Dropout(p=0.3) self.out = nn.Linear(self.bert.config.hidden_size, n_classes) def forward(self, input_ids, attention_mask): """Forward pass of the model.""" output = self.bert(input_ids=input_ids, attention_mask=attention_mask) output = self.drop(output[1]) return self.out(output) @asynccontextmanager async def lifespan(app: FastAPI): """Load the model and tokenizer when the app starts and clean up when the app stops.""" global model, tokenizer, class_names if "bert_sentiment_model.pt" not in os.listdir(): download_model_from_gcp() # Download the model from GCP model = SentimentClassifier(n_classes=3) model.load_state_dict(torch.load("bert_sentiment_model.pt", map_location=device)) model = model.to(device) model.eval() tokenizer = BertTokenizer.from_pretrained(MODEL_NAME) class_names = ["negative", "neutral", "positive"] print("Model and tokenizer loaded successfully") yield del model, tokenizer # Initialize FastAPI app app = FastAPI(lifespan=lifespan) def download_model_from_gcp(): """Download the model from GCP bucket.""" client = storage.Client() bucket = client.bucket(BUCKET_NAME) blob = bucket.blob(MODEL_FILE_NAME) blob.download_to_filename(MODEL_FILE_NAME) print(f"Model {MODEL_FILE_NAME} downloaded from GCP bucket {BUCKET_NAME}.") # Save prediction results to GCP def save_prediction_to_gcp(review: str, outputs: list[float], sentiment: str): """Save the prediction results to GCP bucket.""" client = storage.Client() bucket = client.bucket(BUCKET_NAME) time = datetime.datetime.now(tz=datetime.UTC) # Prepare prediction data data = { "review": review, "sentiment": sentiment, "probability": outputs, "timestamp": datetime.datetime.now(tz=datetime.UTC).isoformat(), } blob = bucket.blob(f"prediction_{time}.json") blob.upload_from_string(json.dumps(data)) print("Prediction saved to GCP bucket.") # Prediction endpoint @app.post("/predict", response_model=PredictionOutput) async def predict_sentiment(review_input: ReviewInput, background_tasks: BackgroundTasks): """Predict sentiment of the input text.""" try: # Encode input text encoding = tokenizer.encode_plus( review_input.review, add_special_tokens=True, max_length=160, return_token_type_ids=False, padding="max_length", return_attention_mask=True, return_tensors="pt", ) input_ids = encoding["input_ids"].to(device) attention_mask = encoding["attention_mask"].to(device) # Model prediction with torch.no_grad(): outputs: torch.Tensor = model(input_ids, attention_mask) _, prediction = torch.max(outputs, dim=1) sentiment = class_names[prediction] background_tasks.add_task(save_prediction_to_gcp, review_input.review, outputs.softmax(-1).tolist(), sentiment) return PredictionOutput(sentiment=sentiment) except Exception as e: raise HTTPException(status_code=500, detail=str(e)) from e -
You should confirm that the application is working locally before moving on. You can do this by running the following command in the terminal
And use the same
client.pyscript as before to confirm that the application is working. You should also check that the data is saved to the bucket. -
Write a small Dockerfile that containerizes the application
Solution
sentiment_api.dockerfilepy which can be built by running the following command
-
Deploy the container to cloud run and confirm that the application still runs as expected.
Solution
The following four commands should be able to deploy the application to GCP cloud run. Make sure to replace
<location>,<project-id>and<repo-name>with the appropriate values.gcloud artifacts repositories create <repo-name> --repository-format=docker --location=<location> docker tag sentiment_api:latest <location>-docker.pkg.dev/<project-id>/<repo-name>/sentiment_api:latest docker push <location>-docker.pkg.dev/<project-id>/<repo-name>/sentiment_api:latest gcloud run deploy sentiment-api \ --image <location>-docker.pkg.dev/<project-id>/<repo-name>/sentiment_api:latest \ --region <region> --allow-unauthenticated -
Make sure that the application still works by trying to send a couple of requests to the deployed application and make sure that the request/response data is correctly saved to the bucket.
-
-
We now have a working application that we are ready to monitor for data drift in real time. We therefore now need to write a FastAPI application that takes in the training data and the predicted data and runs evidently to check if the data or the labels have drifted. Furthermore, we again provide a starting point for the application below.
Look over the script and make sure you know what kind of features we are going to monitor.
Solution
The provided starting script makes use of two presets from evidently: TextOverviewPreset and TargetDriftPreset. The first preset extracts descriptive text statistics (like number of words, average word length etc.) and runs data drift detection on these and the second preset runs target drift detection on the predicted labels.
-
The script is missing one key function to work:
fetch_latest_data(n: int)which should fetch the latestnpredictions. Implement this function in the script.Solution
sentiment_monitoring.py 1 2 3 4 5 6 7 8 9 10 11 12 13 14 15 16 17 18 19 20 21 22 23 24 25 26 27 28 29 30 31 32 33 34 35 36 37 38 39 40 41 42 43 44 45 46 47 48 49 50 51 52 53 54 55 56 57 58 59 60 61 62 63 64 65 66 67 68 69 70 71 72 73 74 75 76 77 78 79 80 81 82 83 84 85 86 87 88 89 90 91 92 93 94 95 96 97 98 99 100 101 102 103 104 105 106 107 108 109
import json import os from pathlib import Path import anyio import nltk import pandas as pd from evidently.legacy.metric_preset import TargetDriftPreset, TextEvals from evidently.legacy.report import Report from fastapi import FastAPI from fastapi.responses import HTMLResponse from google.cloud import storage nltk.download("words") nltk.download("wordnet") nltk.download("omw-1.4") BUCKET_NAME = "gcp_monitoring_exercise" def to_sentiment(rating): """Convert rating to sentiment class.""" rating = int(rating) if rating <= 2: return 0 # Negative if rating == 3: return 1 # Neutral return 2 # Positive def sentiment_to_numeric(sentiment: str) -> int: """Convert sentiment class to numeric.""" if sentiment == "negative": return 0 if sentiment == "neutral": return 1 return 2 def run_analysis(reference_data: pd.DataFrame, current_data: pd.DataFrame) -> None: """Run the analysis and return the report.""" text_overview_report = Report(metrics=[TextEvals(column_name="content"), TargetDriftPreset(columns=["sentiment"])]) text_overview_report.run(reference_data=reference_data, current_data=current_data) text_overview_report.save("text_overview_report.html") def lifespan(app: FastAPI): """Load the data and class names before the application starts.""" global training_data, class_names training_data = pd.read_csv("reviews.csv") training_data["sentiment"] = training_data.score.apply(to_sentiment) training_data["target"] = training_data["sentiment"] # evidently expects the target column to be named "target" class_names = ["negative", "neutral", "positive"] yield del training_data, class_names app = FastAPI(lifespan=lifespan) def load_latest_files(directory: Path, n: int) -> pd.DataFrame: """Load the N latest prediction files from the directory.""" # Download the latest prediction files from the GCP bucket download_files(n=n) # Get all prediction files in the directory files = directory.glob("prediction_*.json") # Sort files based on when they where created files = sorted(files, key=os.path.getmtime) # Get the N latest files latest_files = files[-n:] # Load or process the files as needed reviews, sentiment = [], [] for file in latest_files: with file.open() as f: data = json.load(f) reviews.append(data["review"]) sentiment.append(sentiment_to_numeric(data["sentiment"])) dataframe = pd.DataFrame({"content": reviews, "sentiment": sentiment}) dataframe["target"] = dataframe["sentiment"] return dataframe def download_files(n: int = 5) -> None: """Download the N latest prediction files from the GCP bucket.""" bucket = storage.Client().bucket(BUCKET_NAME) blobs = bucket.list_blobs(prefix="prediction_") blobs.sort(key=lambda x: x.updated, reverse=True) latest_blobs = blobs[:n] for blob in latest_blobs: blob.download_to_filename(blob.name) @app.get("/report", response_class=HTMLResponse) async def get_report(n: int = 5): """Generate and return the report.""" prediction_data = load_latest_files(Path("."), n=n) run_analysis(training_data, prediction_data) async with await anyio.open_file("monitoring.html", encoding="utf-8") as f: html_content = f.read() return HTMLResponse(content=html_content, status_code=200) -
Test out the script locally. This can be done by downloading a couple of the request/response data points from the bucket and running the script on this data.
-
Write a Dockerfile that containerizes the monitoring application.
-
Deploy the monitoring application to cloud run and confirm that the application returns a monitoring report when asked for it.
Solution
docker tag sentiment_monitoring:latest \
    <location>-docker.pkg.dev/<project-id>/<repo-name>/sentiment_monitoring:latest
docker push <location>-docker.pkg.dev/<project-id>/<repo-name>/sentiment_monitoring:latest
gcloud run deploy sentiment-monitoring \
    --image <location>-docker.pkg.dev/<project-id>/<repo-name>/sentiment_monitoring:latest \
    --region <region> --allow-unauthenticated
-
-
We are now finally ready to test our services. Since we need to observe some long-term behavior this part may take some time to run depending on how exactly you have configured things. Below we have implemented a client script that is meant to call our service.
Client script for sentiment analysis model
-
What does the client script do?
Solution
The client script will iteratively call our deployed sentiment analysis service every
wait_timeseconds. In each iteration it:- Randomly samples a review from a list of positive, neutral and negative reviews
- Randomly adds negative phrases to the review. Each review is added if a randomly uniform number is lower than probability `negative_probability=min(count / args.max_iterations, 1.0), meaning that it becomes more and more likely that the negative phrases are added as the number of iterations increases.
- Sends the review to the sentiment analysis service and saves the response to a file.
-
Run the client script for 1,000 iterations. What happens to the distribution of the reviews over time? Does the data drift?
-
That ends the module on detection of data drifting, data quality, etc. We have a couple of final points to make before we end the module:
-
Monitoring of machine learning applications is an extremely hard discipline because it is not clear-cut when we should actually respond to feature/targets beginning to drift and when it is probably fine letting the system run as is. It comes down to the individual application what kinds of rules should be implemented.
-
The cloud setup we have developed is very simple and not meant for production. In a real-world scenario we would not have deployed our monitoring application on an endpoint that generates a report, but rather have it return the test results in a JSON format that can be ingested into more complex monitoring systems where we can show how drift scores evolve over time. You will learn more about this in the next module.
-
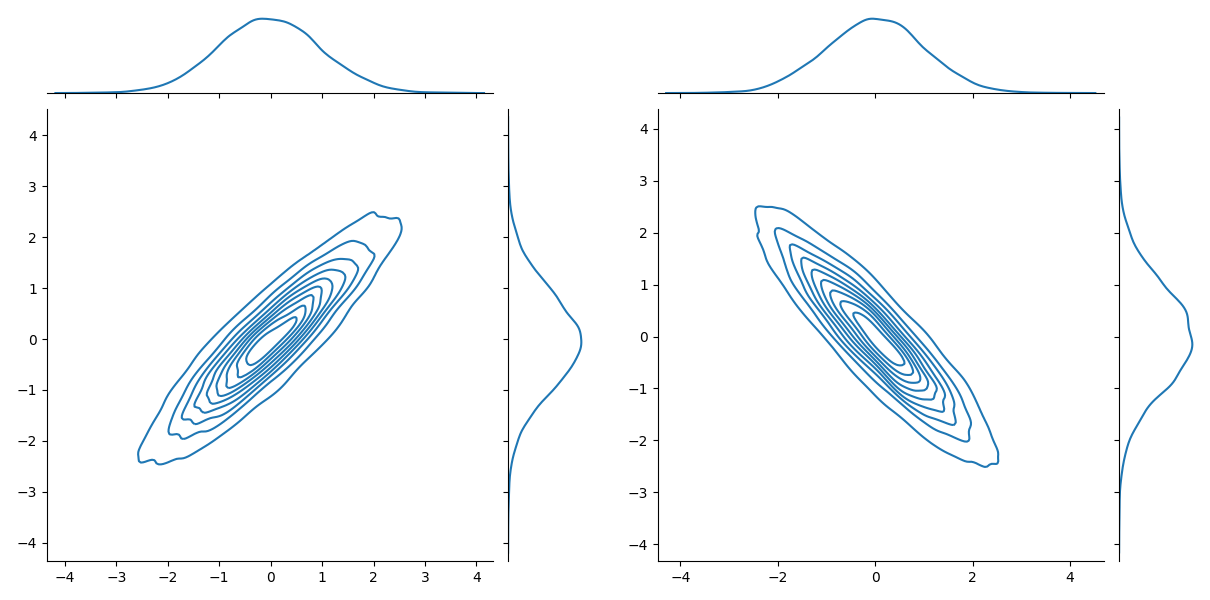
The tools presented here are in no way comprehensive and are especially limited in one way: they only consider the marginal data distribution. Every analysis that we've done has been on the distribution per feature (the marginal distribution), however as the image below shows it is possible for data to have drifted to another distribution with the marginal being approximately the same.
There are methods such as Maximum Mean Discrepancy (MMD) tests that are able to do testing on multivariate distributions, which you are free to dive into. The general recommendation is to just always consider multiple features when making decisions. In this course we will just always recommend considering multiple features when making decisions regarding your deployed applications.
Finally, we want to stress that monitoring is a very active field of research and that there are many more tools and frameworks that can be used for monitoring.