![]()
![]()
Cloud deployment
Core Module
We are now returning to using the cloud. In this module, you should have gone through the steps of having your code in your GitHub repository to automatically build into a docker container, store that, store data and pull it all together to make a training run. After the training is completed you should hopefully have a file stored in the cloud with your trained model weights.
Today's exercises will be about serving those model weights to an end user. We focus on two different ways of deploying our model: Google cloud functions and Google cloud run. Both services are serverless, meaning that you do not have to manage the server that runs your code.
Cloud Functions
Google Cloud Functions is the most simple way that we can deploy our code to the cloud. As stated above, it is a serverless service, meaning that you do not have to worry about the underlying infrastructure. You just write your code and deploy it. The service is great for small applications that can be encapsulated in a single script.
❔ Exercises
-
Go to the start page of
Cloud Functions. It can be found in the sidebar on the homepage or you can just search for it. Activate the service in the cloud console or use the following command: -
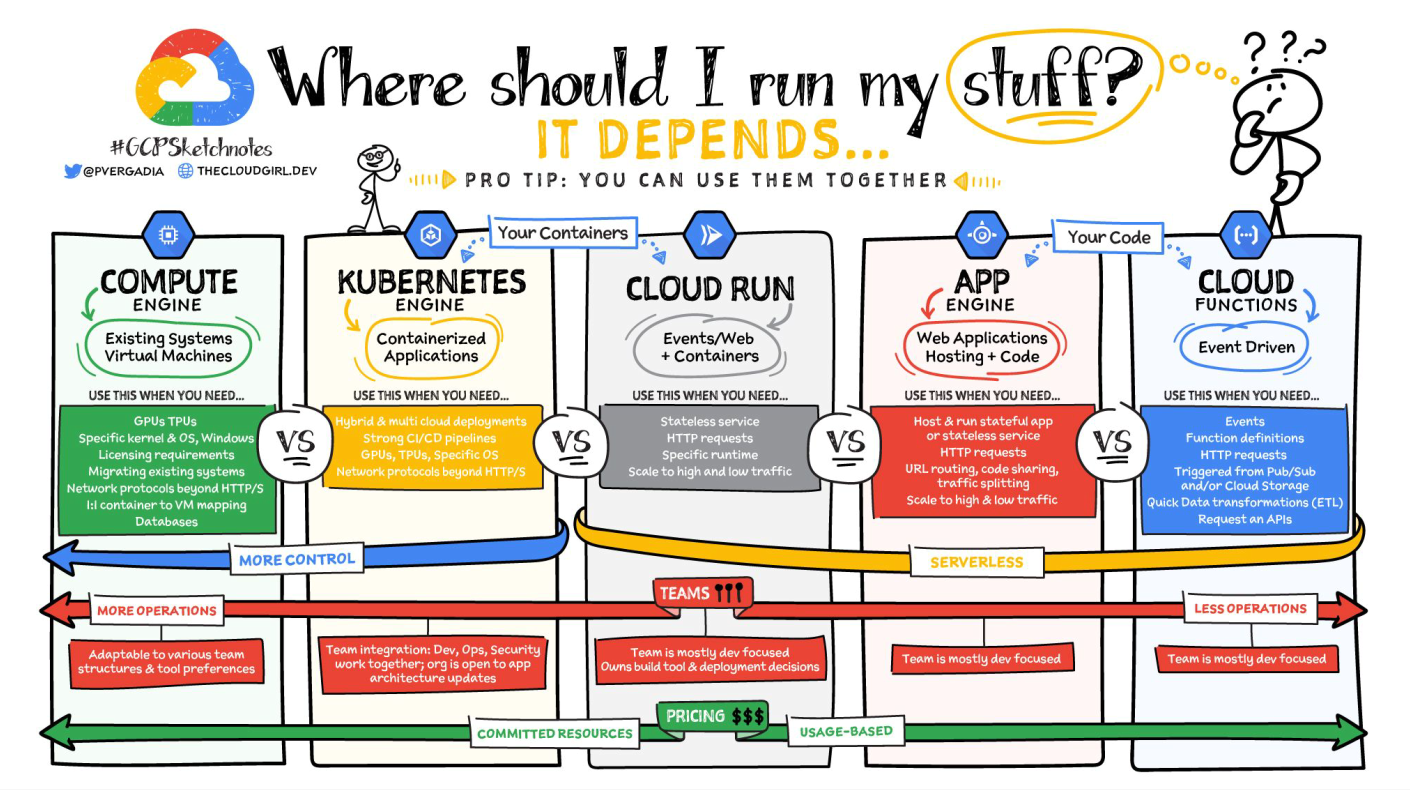
Click the
Create Functionbutton which should take you to a screen like the image below. Make sure it is a 2nd Gen function, give it a name, set the server region to somewhere close by and change the authentication policy toAllow unauthenticated invocationsso we can access it directly from a browser. Remember to note down the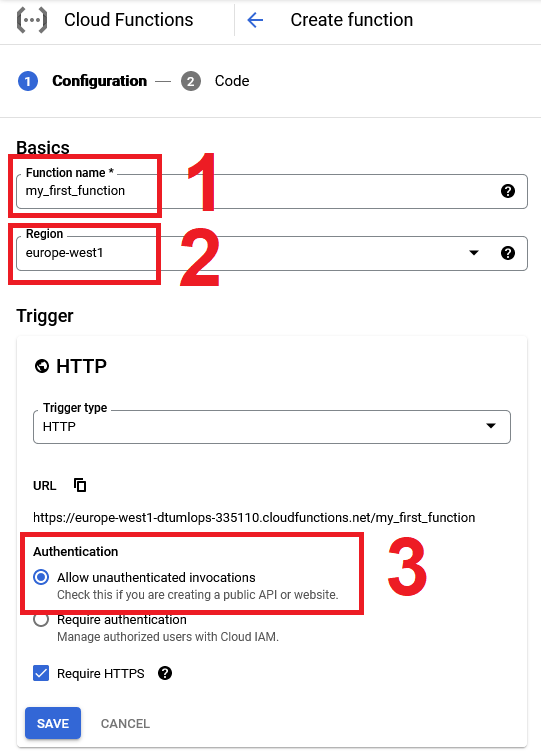
-
On the next page, for
Runtimepick thePython 3.11option (or newer). This will make the inline editor show both amain.pyandrequirements.pyfile. Look over them and try to understand what they do. Be sure to take a look at the functions-framework which is a needed requirement of any Cloud function.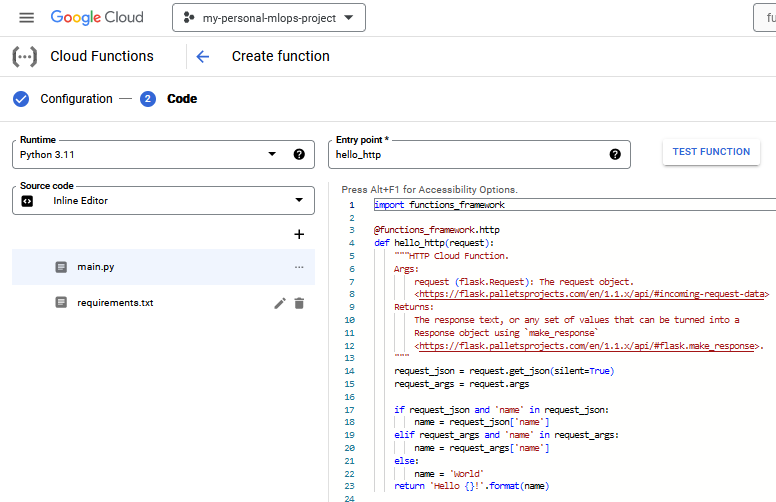
After you have looked over the files, click the
Deploybutton.Solution
The
functions-frameworkis a lightweight, open-source framework for turning Python functions into HTTP functions. Any function that you deploy to Cloud Functions must be wrapped in the@functions_framework.httpdecorator. -
Afterwards, the function should begin to deploy. When it is done, you should see ✅. Now let's test it by going to the
Testingtab.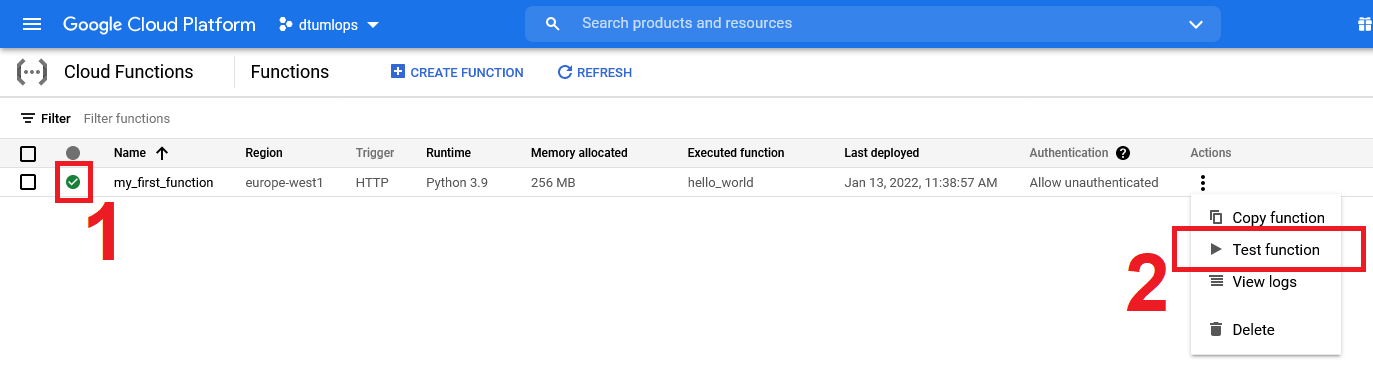
-
If you know what the application does, it should come as no surprise that it can run without any input. We therefore just send an empty request by clicking the
Test The Functionbutton. Does the function return the output you expected? Wait for the logs to show up. What do they show?-
What should the
Triggering eventlook like in the testing prompt for the program to respond withTry it out.
-
Go to the trigger tab and go to the URL for the application. Execute the API a couple of times. How can you change the URL to make the application respond with the same output as above?
-
Click on the metrics tab. You should hopefully see it being populated with a few data points. Identify what each panel is showing.
Solution
- Invocations/Second: The number of times the function is invoked per second
- Execution time (ms): The time it takes for the function to execute in milliseconds
- Memory usage (MB): The memory usage of the function in MB
- Instance count (instances): The number of instances that are running the function
-
Check out the logs tab. You should see that your application has already been invoked multiple times. Also, try to execute this command in a terminal:
-
-
Next, we are going to create our own application that takes some input so we can try to send it requests. We provide a very simple script to get started.
Simple script
-
Figure out what the script does and run the script. This should create a file with a trained model.
Solution
The file trains a simple KNN model on the iris dataset and saves it to a file called
model.pkl. -
Next, create a storage bucket and upload the model file to the bucket. Try to do this using the
gsutilcommand and check afterward that the file is in the bucket. -
Create a new cloud function with the same initial settings as the first one, e.g.
Python 3.11andHTTP. Then implement in themain.pyfile code that:- Loads the model from the bucket
- Takes a request with a list of integers as input
- Returns the prediction of the model
In addition to writing the
main.pyfile, you also need to fill out therequirements.txtfile. You need at least three packages to run the application. Remember to also change theEntry pointto the name of your function. If your deployment fails, try to go to theLogs Explorerpage ingcpwhich can help you identify why.Solution
The main script should look something like this:
And the requirement file should look like this:
Make sure that you are using the same version of
scikit-learnas when you trained the model. Otherwise when trying to load the model you will most likely get an error. -
When you have successfully deployed the model, try to make predictions with it. What should the request look like?
Solution
It depends on how exactly you have chosen to implement
main.py. But for the provided solution, the payload should look like this:with the corresponding
curlcommand:
-
-
Let's try to figure out how to do the above deployment using
gcloudinstead of the console UI. The relevant command is gcloud functions deploy. For this function to work you will need to put themain.pyandrequirements.txtin a separate folder. Try to execute the command to successfully deploy the function. -
(Optional) You can finally try to redo the exercises by deploying a PyTorch application. You will essentially need to go through the same steps as the sklearn example, including uploading a trained model to storage and writing a cloud function that loads it and returns some output. You are free to choose whatever PyTorch model you want.
Cloud Run
Cloud functions are great for simple deployments that can be encapsulated in a single script with only simple requirements. However, they do not scale with more advanced applications that may depend on multiple programming languages. We are already familiar with how we can deal with this through containers, and Cloud Run is the corresponding service in GCP for deploying containers.
❔ Exercises
-
We are going to start locally by developing a small app that we can deploy. We provide two small examples to choose from: first is a small FastAPI app consisting of a single Python script and a docker file. The second is a small Streamlit app (which you can learn more about in this module) consisting of a single docker file. You can choose which one you want to work with.
Simple FastAPI app
simple_fastapi_app.py Simple Streamlit app
-
Start by going over the files belonging to your chosen app and understand what they do.
-
Next, build the docker image belonging to the app.
-
Next tag and push the image to your artifact registry.
docker tag gcp_test_app <region>-docker.pkg.dev/<project-id>/<registry-name>/gcp_test_app:latest
docker push <region>-docker.pkg.dev/<project-id>/<registry-name>/gcp_test_app:latest
Afterward, check that your artifact registry contains the pushed image.
-
-
Next, go to
Cloud Runin the cloud console and enable the service or use the following command: -
Click the
Create Servicebutton which should bring you to a page similar to the one below.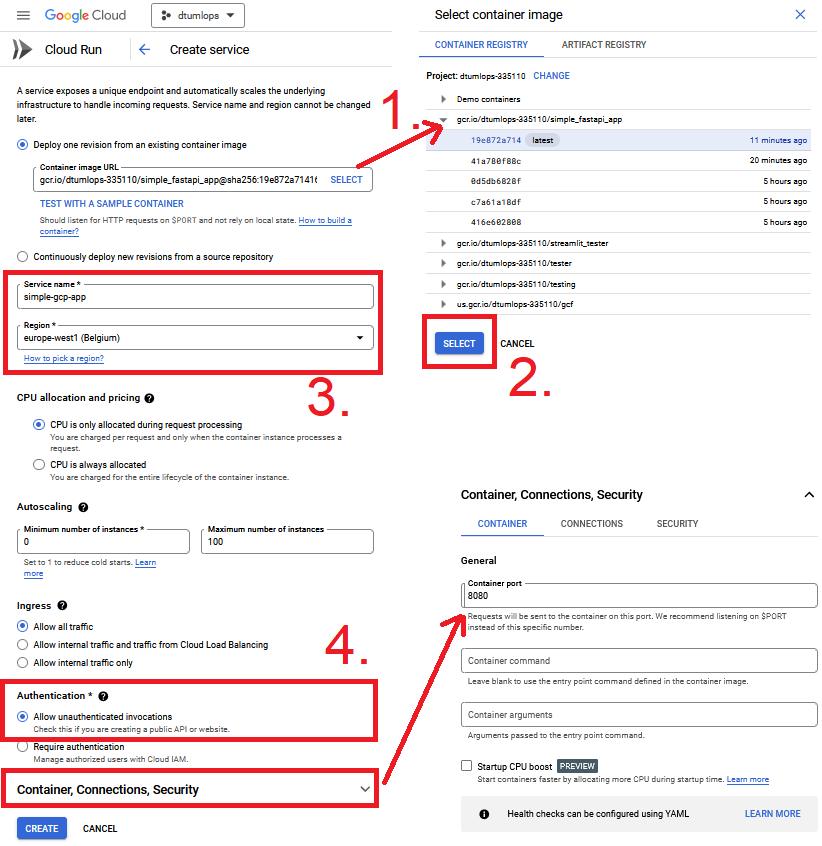
Do the following:
-
Click the select button, which will bring up all built containers, and pick the one you want to deploy. In the future, you probably want to choose the Continuously deploy new revisions from a source repository such that a new version is always deployed when a new container is built.
-
Hereafter, give the service a name and select the region. We recommend choosing a region close to you.
-
Set the authentication method to Allow unauthenticated invocations such that we can call it without providing credentials. In the future, you may only set that authenticated invocations are allowed.
-
Expand the Container, Connections, Security tab and edit the port such that it matches the port exposed in your chosen application. If your docker file exposes the env variable
$PORTyou can set the port to anything.
Finally, click the create button and wait for the service to be deployed (may take some time).
Common problems
If you get an error saying The user-provided container failed to start and listen on the port defined by the PORT environment variable. there are two common reasons for this:
-
You need to add an
EXPOSEstatement in your docker container:and make sure that your application is also listening on that port. If you hard code the port in your application (as in the above code) it is best to set it 8080 which is the default port for cloud run. Alternatively, a better approach is to set it to the
$PORTenvironment variable which is set by cloud run and can be accessed in your application:If you do this and then want to run locally you can run it as:
-
If you are serving a large machine-learning model, it may also be that your deployed container is running out of memory. You can try to increase the memory of the container by going to the Edit container and the Resources tab and increasing the memory.
-
-
If you manage to deploy the service you should see an image like this:
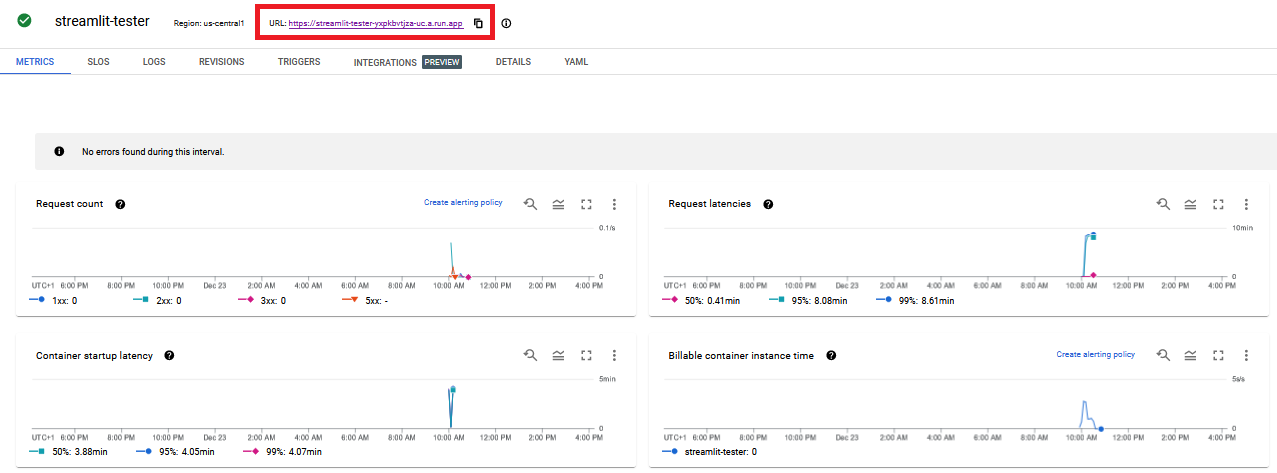
You can now access your application by clicking the URL. This will access the root of your application, so you may need to add
/or/<path>to the URL depending on how the app works. -
Everything we just did in the console UI we can also do with gcloud run deploy. How would you do that?
Solution
The command should look something like this
gcloud run deploy <service-name> \
    --image <image-name>:<image-tag> --platform managed --region <region> --allow-unauthenticated
where you need to replace
<service-name>with the name of your service,<image-name>with the name of your image and<region>with the region you want to deploy to. The--allow-unauthenticatedflag is optional but is needed if you want to access the service without providing credentials. -
After deploying using the command line, make sure that the service is up and running by using these two commands:
-
Instead of deploying our docker container using the UI or command line, which is a manual operation, we can do it continuously by using the
cloudbuild.yamlfile we learned about in the previous section. This is called continuous deployment, and it is a way to automate the deployment process.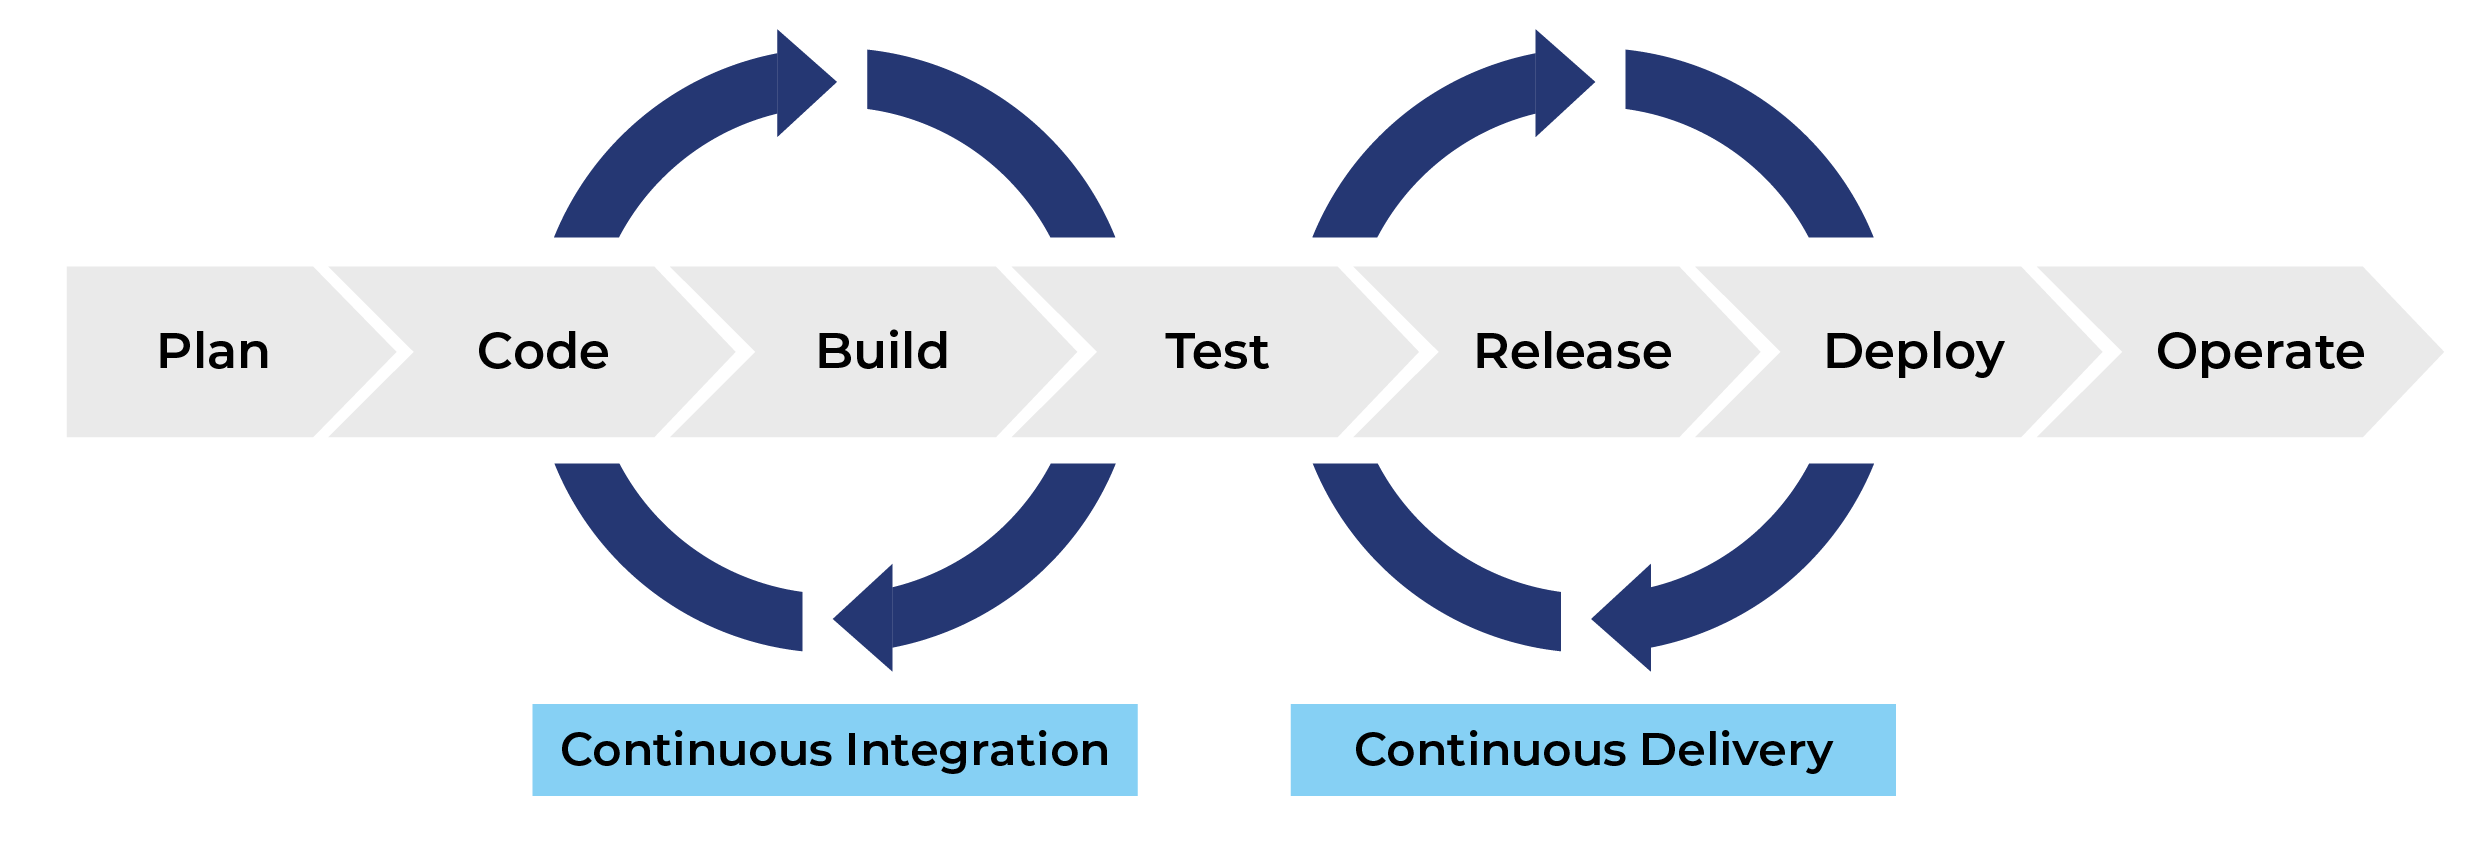
Image credit Let's revise the
cloudbuild.yamlfile from the artifact registry exercises in this module which will build and push a specified docker image.cloudbuild.yaml
Add a third step to the
cloudbuild.yamlfile that deploys the container image to Cloud Run. The relevant service you need to use is called'gcr.io/cloud-builders/gcloud'and the command is'gcloud run deploy'. Afterwards, reuse the trigger you created in the previous module or create a new one to build and deploy the container image continuously. Confirm that this works by making a change to your application and pushing it to GitHub and see if the application is updated continuously.Solution
The full
cloudbuild.yamlfile should look like this:steps: - name: 'gcr.io/cloud-builders/docker' id: 'Build container image' args: [ 'build', '.', '-t', 'europe-west1-docker.pkg.dev/$PROJECT_ID/<registry-name>/<image-name>', '-f', '<path-to-dockerfile>' ] - name: 'gcr.io/cloud-builders/docker' id: 'Push container image' args: [ 'push', 'europe-west1-docker.pkg.dev/$PROJECT_ID/<registry-name>/<image-name>' ] - name: 'gcr.io/cloud-builders/gcloud' id: 'Deploy to Cloud Run' args: [ 'run', 'deploy', '<service-name>', '--image', 'europe-west1-docker.pkg.dev/$PROJECT_ID/<registry-name>/<image-name>', '--region', 'europe-west1', '--platform', 'managed', # optional argument if you want to inject secrets as environment variables '--update-secrets=<env-name-in-container>=<secret-name-in-secrets-manager>:latest' ] options: logging: CLOUD_LOGGING_ONLY -
(Optional) A common pattern when using cloud run is that your application need access to some storage during operations, either for reading or writing a file. This could be reading in a model checkpoint on startup and then writing some statistics during runtime. The easiest way to do this is to mount a storage bucket to your container.
-
Consider the following application that reads and writes for a folder
FOLDER = "/gcs/<bucket-name>/".Simple FastAPI app with storage
Replace the
<bucket-name>in the folder path with a bucket you have created. Then write a small dockerfile and deploy the application to cloud run.Solution
The dockerfile should look like this:
and the deployment command should look like this:
-
If you then try to access either the
/upload/or/files/endpoints you should see that the application at this point is unable to read or write to the folder location, because it is not mounted to the container yet. Mounting a volume can either be done though the command line or through the UI. You can read how to do in the cloud storage volume mounts guide. Add a volume to your cloud run service and try to access the endpoints again making sure you can read and write.Solution
If you are using the UI, follow the instructions in the link above. If you are using the command line, the command should look like this:
gcloud run services update SERVICE \
    --add-volume name=<volume-name>,type=cloud-storage,bucket=<bucket-name> \
    --add-volume-mount volume=<volume-name>,mount-path="/gcs/<bucket-name>"
The
<volume-name>you can choose arbitrarily, but the<bucket-name>should be the name of the bucket you want to mount. And the<mount-path>should be the path you are reading from/writing to inside your application.
-
🧠 Knowledge check
-
In the previous module on using the cloud you learned about the Secrets Manager in GCP. How can you use this service in combination with Cloud Run?
Solution
In the cloud console, secrets can be set in the Container(s), Volumes, Networking, Security tab under the Variables & Secrets section, see image below.
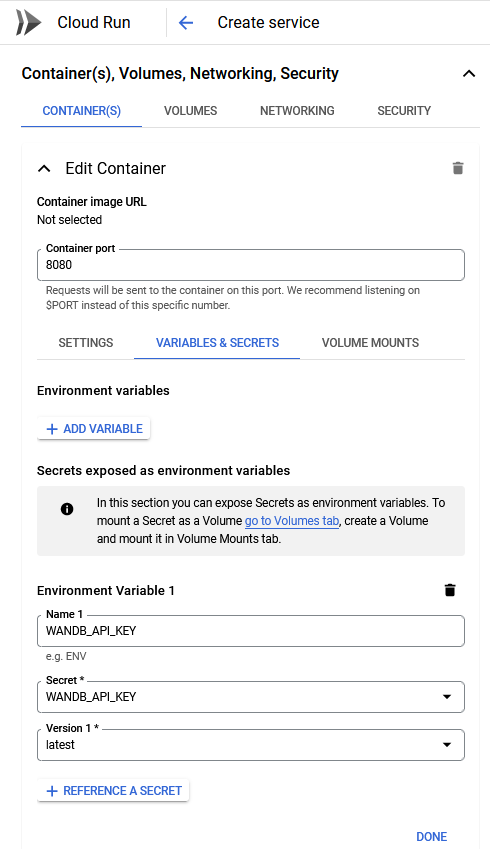
In the
gcloudcommand, you can set the secret by using the--update-secretsflag.
That ends the exercises on deployment. The exercises above are just a small taste of what deployment has to offer. In both sections, we have explicitly chosen to work with serverless deployments. But what if you wanted to do the opposite, i.e., being the one in charge of the management of the cluster that handles the deployed services? If you are interested in taking deployment to the next level, you should get started on Kubernetes which is the de-facto open-source container orchestration platform that is used in production environments. If you want to deep dive we recommend starting with the AI Platform Pipelines documentation, which describes how to make pipelines that are a necessary component before you start to create your own Kubernetes cluster.