![]()
Unit testing
Core Module
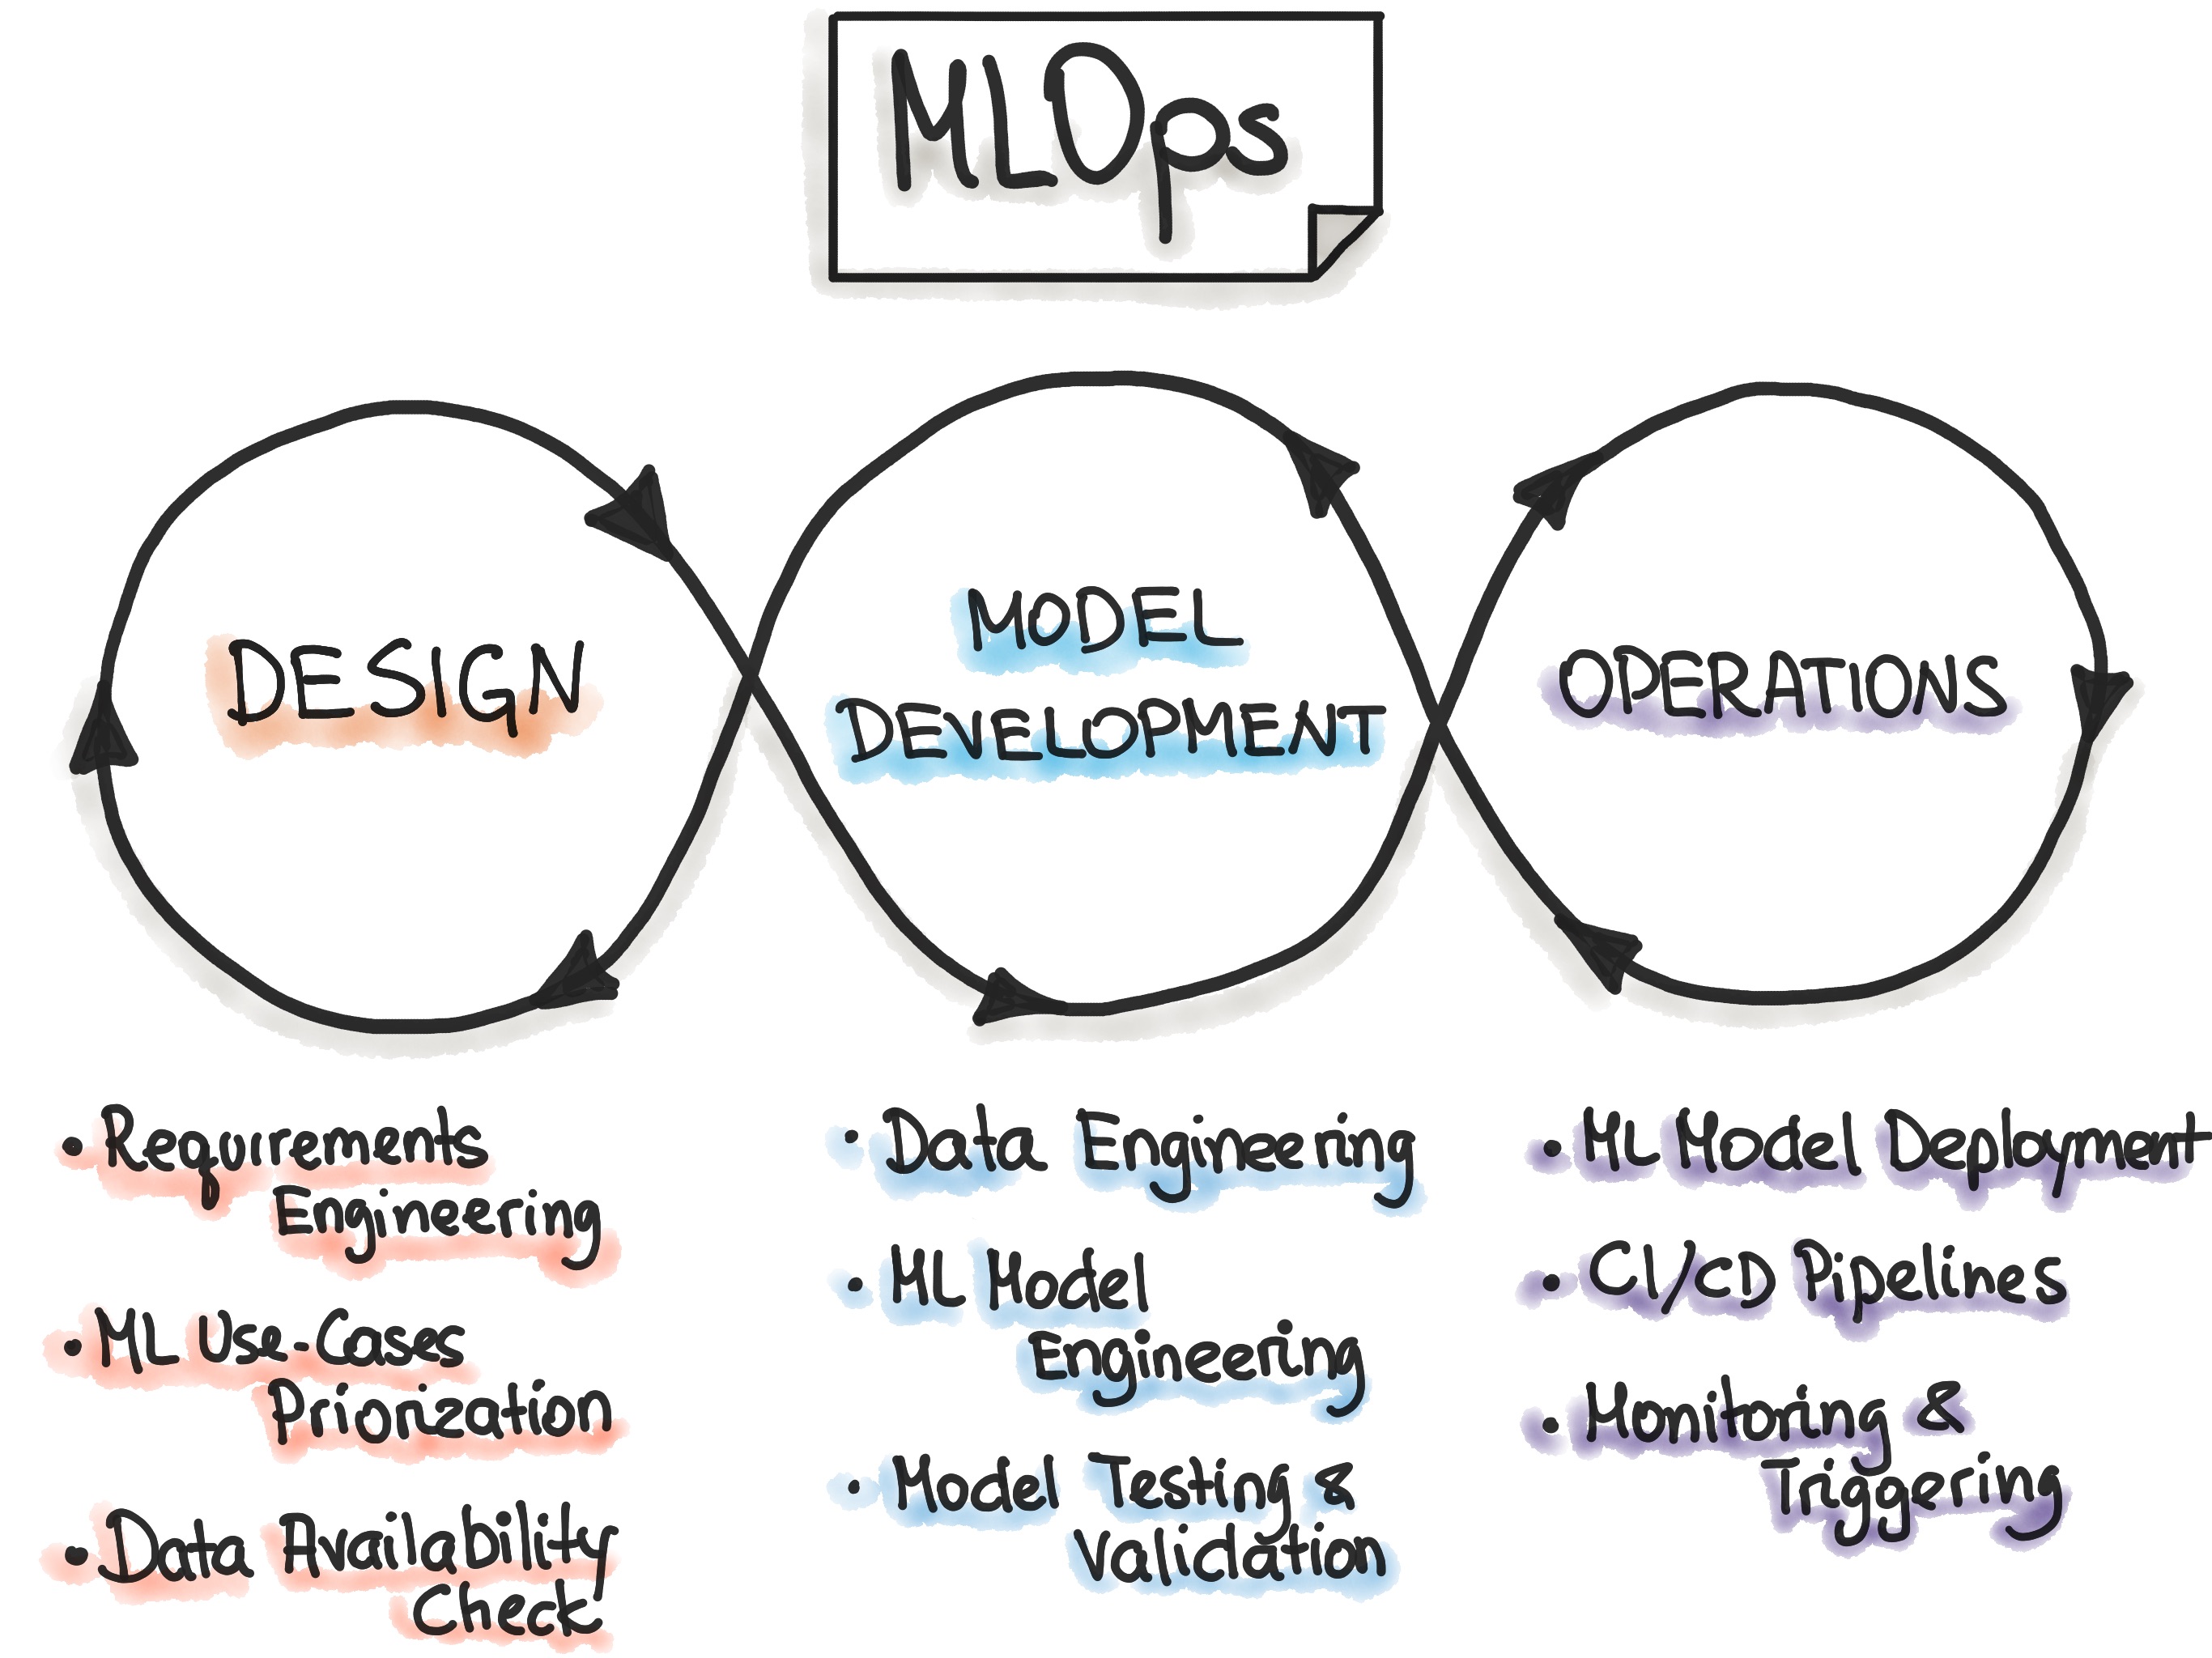
What often comes to mind for many developers when discussing continuous integration (CI) is code testing. Continuous integration should ensure that whenever a codebase is updated it is automatically tested such that if bugs have been introduced in the codebase they will be caught early on. If you look at the MLOps cycle, continuous integration is one of the cornerstones of the operations part. However, it should be noted that applying continuous integration does not magically ensure that your code does not crash. Continuous integration is only as strong as the tests that are automatically executed. Continuous integration simply structures and automates this.
Quote
Continuous Integration doesn’t get rid of bugs, but it does make them dramatically easier to find and remove.
Martin Fowler, Chief Scientist, ThoughtWorks

The kind of tests we are going to look at are called unit tests. Unit testing refers to the practice of writing tests that test individual parts of your code base to test for correctness. By unit, you can therefore think of a function, module or in general any object. By writing tests in this way it should be very easy to isolate which part of the code broke after an update to the code base. Another way to test your code base would be through integration testing which is equally important but we are not going to focus on it in this course.
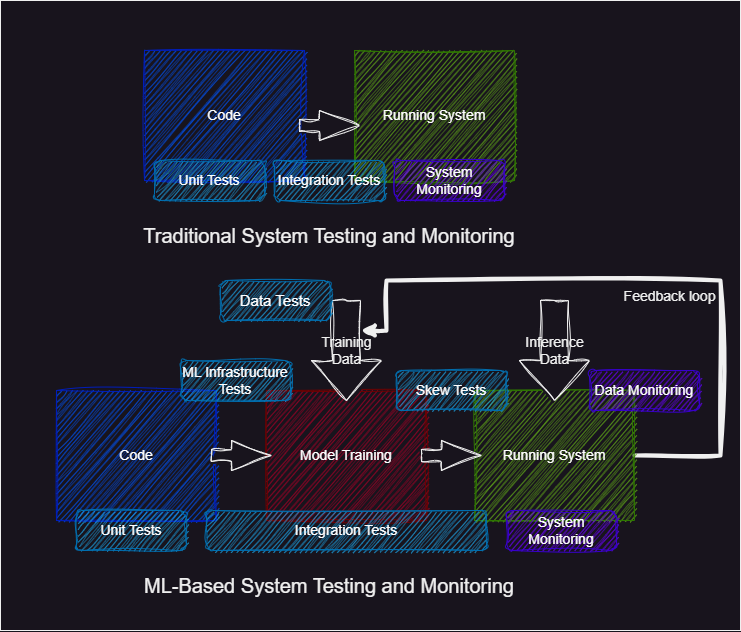
Unit tests (and integration tests) are not a unique concept to MLOps but are a core concept of DevOps. However, it is important to note that testing machine learning-based systems is much more difficult than traditional systems. The reason for this is that machine learning systems depend on data that influences the state of our system. For this reason, we not only need unit tests and integration tests of our code but also need data testing, infrastructure testing and more monitoring to check that we stay within the data distribution we are training on (more on this in module M25 on data drifting). This added complexity is illustrated in the figure below.
Pytest
Before we can begin to automate testing of our code base we of course need to write the tests first. It is both a hard
and tedious task to do but arguably the most important aspect of continuous integration. Python offers a couple of
different libraries for writing tests. We are going to use pytest.
❔ Exercises
The following exercises should be applied to your MNIST repository
-
The first part of doing continuous integration is writing the unit tests. We do not expect you to cover every part of the code you have developed but try to at least write tests that cover two files. Start by creating a
testsfolder. -
Read the getting started guide for pytest which is the testing framework that we are going to use.
-
Install pytest:
Consider adding
pytestto arequirements_dev.txtfile, as it is a development tool. -
Write some tests. Below are some guidelines on some tests that should be implemented, but you are of course free to implement more tests. You can at any point check if your tests are passing by typing in a terminal:
When you implement a test you need to follow two standards, for
pytestto be able to find your tests. First, any files created (except__init__.py) should always start withtest_*.py. Secondly, any test implemented needs to be wrapped into a function that again needs to start withtest_*:# this will be found and executed by pytest def test_something(): ... # this will not be found and executed by pytest def something_to_test(): ...-
Start by creating a
tests/__init__.pyfile and fill in the following:import os _TEST_ROOT = os.path.dirname(__file__) # root of test folder _PROJECT_ROOT = os.path.dirname(_TEST_ROOT) # root of project _PATH_DATA = os.path.join(_PROJECT_ROOT, "data") # root of dataThese can help you refer to your data files during testing. For example, in another test file, I could write
which then contains the root path to my data.
-
Data testing: In a file called
tests/test_data.pyimplement at least a test that checks that data gets correctly loaded. By this, we mean that you should checkdef test_data(): dataset = MNIST(...) assert len(dataset) == N_train for training and N_test for test assert that each datapoint has shape [1,28,28] or [784] depending on how you choose to format assert that all labels are representedwhere
N_trainshould be either 30,000 or 50,000 depending on if you are just using the first subset of the corrupted MNIST data or also including the second subset.N_testshould be 5,000.Solution
from my_project.data import corrupt_mnist def test_data(): train, test = corrupt_mnist() assert len(train) == 30000 assert len(test) == 5000 for dataset in [train, test]: for x, y in dataset: assert x.shape == (1, 28, 28) assert y in range(10) train_targets = torch.unique(train.tensors[1]) assert (train_targets == torch.arange(0,10)).all() test_targets = torch.unique(test.tensors[1]) assert (test_targets == torch.arange(0,10)).all() -
Model testing: In a file called
tests/test_model.pyimplement at least a test that checks for a given input with shape X that the output of the model has shape Y. -
Training testing: In a file called
tests/test_training.pyimplement at least one test that asserts something about your training script. You are here given free rein as to what should be tested but try to test something that risks being broken when developing the code. -
Good code raises errors and gives out warnings in appropriate places. This is often in the case of some invalid combination of inputs to your script. For example, your model could check for the size of the input given to it (see code below) to make sure it corresponds to what you are expecting. Not implementing such errors would still result in PyTorch failing at a later point due to shape errors. However, these custom errors will probably make more sense to the end user. Implement at least one raised error or warning somewhere in your code and use either
pytest.raisesorpytest.warnsto check that they are correctly raised/warned. As inspiration, the following implementsValueErrorin code belonging to the model:# src/models/model.py def forward(self, x: Tensor): if x.ndim != 4: raise ValueError('Expected input to a 4D tensor') if x.shape[1] != 1 or x.shape[2] != 28 or x.shape[3] != 28: raise ValueError('Expected each sample to have shape [1, 28, 28]')Solution
The above example would be captured by a test looking something like this:
# tests/test_model.py import pytest from my_project.model import MyAwesomeModel def test_error_on_wrong_shape(): model = MyAwesomeModel() with pytest.raises(ValueError, match='Expected input to a 4D tensor'): model(torch.randn(1,2,3)) with pytest.raises(ValueError, match='Expected each sample to have shape [1, 28, 28]'): model(torch.randn(1,1,28,29)) -
A test is only as good as the error message it gives, and by default,
assertwill only report that the check failed. However, we can help ourselves and others by adding strings afterassertlikeAdd such comments to the assert statements you just wrote in the previous exercises.
-
The tests that involve checking anything that has to do with our data will of course fail if the data is not present. To future-proof our code, we can take advantage of the
pytest.mark.skipifdecorator. Use this decorator to skip your data tests if the corresponding data files do not exist. It should look something like this:import os.path @pytest.mark.skipif(not os.path.exists(file_path), reason="Data files not found") def test_something_about_data(): ...You can read more about skipping tests in the pytest skipping documentation
-
-
After writing the different tests, make sure that they are passing locally.
-
We often want to check a function/module for various input arguments. In this case, you could write the same test over and over again for different inputs, but
pytestalso has built-in support for this with the use of the pytest.mark.parametrize decorator. Implement a parametrized test and make sure that it runs for different inputs. -
There is no way of measuring how good the test you have written is. However, what we can measure is the code coverage. Code coverage refers to the percentage of your codebase that gets run when all your tests are executed. Having a high coverage at least means that all your code will run when executed.
-
Install coverage.
Consider adding
coverageto arequirements_dev.txtfile, as it is a development tool. -
Instead of running your tests directly with
pytest, now do: -
To get a simple coverage report simply type
which will give you the percentage of cover in each of your files and also mark which lines are not covered.
-
Finally, try to increase the coverage by writing a new test that runs some of the lines in your codebase that are not covered yet.
-
Often
coveragereports the code coverage on files that we do not want to get code coverage for, for example your test file. Figure out how to configurecoverageto exclude some files.Solution
You need to set the
omitoption. This can either be done when runningcoverage runorcoverage reportsuch as:As an alternative you can specify this in your
pyproject.tomlfile:
-
🧠 Knowledge check
-
Assuming you have a code coverage of 100%, would you expect that no bugs are present in your code?
Solution
No, code coverage is not a guarantee that your code is bug-free. It is just a measure of how many lines of code are run when your tests are executed. Therefore, there may still be some corner case that is not covered by your tests and will result in a bug. However, having a high code coverage is a good indicator that you have tested your code.
-
Consider the following code:
@pytest.mark.parametrize("network_size", [10, 100, 1000])
@pytest.mark.parametrize("device", ["cpu", "cuda"])
class MyTestClass:
    @pytest.mark.parametrize("network_type", ["alexnet", "squeezenet", "vgg", "resnet"])
    @pytest.mark.parametrize("precision", [torch.half, torch.float, torch.double])
    def test_network1(self, network_size, device, network_type, precision):
        if device == "cuda" and not torch.cuda.is_available():
            pytest.skip("Test requires cuda")
        model = MyModelClass(network_size, network_type).to(device=device, dtype=precision)
        ...

    @pytest.mark.parametrize("add_dropout", [True, False])
    def test_network2(self, network_size, device, add_dropout):
        if device == "cuda" and not torch.cuda.is_available():
            pytest.skip("Test requires cuda")
        model = MyModelClass2(network_size, add_dropout).to(device)
        ...
How many tests are executed when running the above code?
Solution
The answer depends on whether or not we are running on a GPU-enabled machine. The
test_network1has 4 parameters,network_size, device, network_type, precision, that respectively can take on3, 2, 4, 3values, meaning that in total that test will run3x2x4x3=72times with different parameters on a GPU-enabled machine and 36 on a machine without a GPU. A similar calculation can be done fortest_network2, which only has three factorsnetwork_size, device, add_dropoutthat result in3x2x2=12tests on a GPU-enabled machine and 6 on a machine without a GPU. In total, that means 84 tests would run on a machine with a GPU and 42 on a machine without a GPU.
That covers the basics of writing unit tests for Python code. We want to note that pytest of course is not the only
framework for doing this. Python has a built-in framework called
unittest for doing this also (but pytest offers slightly more
features). Another open-source framework that you could choose to check out is
hypothesis, which can help catch errors in corner cases of your
code. In addition to writing unit tests it is also highly recommended to test code that you include in your
docstrings belonging to your functions and modules to make sure that any code that is in your documentation is also
correct. For such testing, we highly recommend using the built-in Python framework
doctest.