![]()
Continuous Machine Learning
The continuous integration we have looked at until now is what we can consider "classical" continuous integration, which has its roots in DevOps and not MLOps. While the tests that we have written and the containers we have developed in the previous session have been about machine learning, everything we have done translates completely to how it would be done if we had developed any other application that did not include machine learning.
In this session, we are now going to change gears and look at continuous machine learning (CML). As the name may suggest we are now focusing on automating actual machine learning processes. The reason for doing this is the same as with continuous integration, namely that we often have a bunch of checks that we want our newly trained model to pass before we trust it to be ready for deployment. Writing unit tests ensures that the code that we use for training our model is not broken, but there exist other failure modes of a machine learning pipeline:
- Did I train on the correct data?
- Did my model converge at all?
- Did a metric that I care about improve?
- Did I overfit?
- Did I underfit?
- ...
All these questions are questions that we can answer by writing tests that are specific to machine learning. In this session, we are going to look at how we can begin to use GitHub Actions to automate these tests.
MLOps maturity model
Before getting started with the exercises, let's first take a side step and look at what is called the MLOps maturity model. The reason here is to get a better understanding of when continuous machine learning is relevant. The main idea behind the MLOps maturity model is to help organizations understand where they are in their machine learning operations journey and what the next logical steps are. The model is divided into five stages:
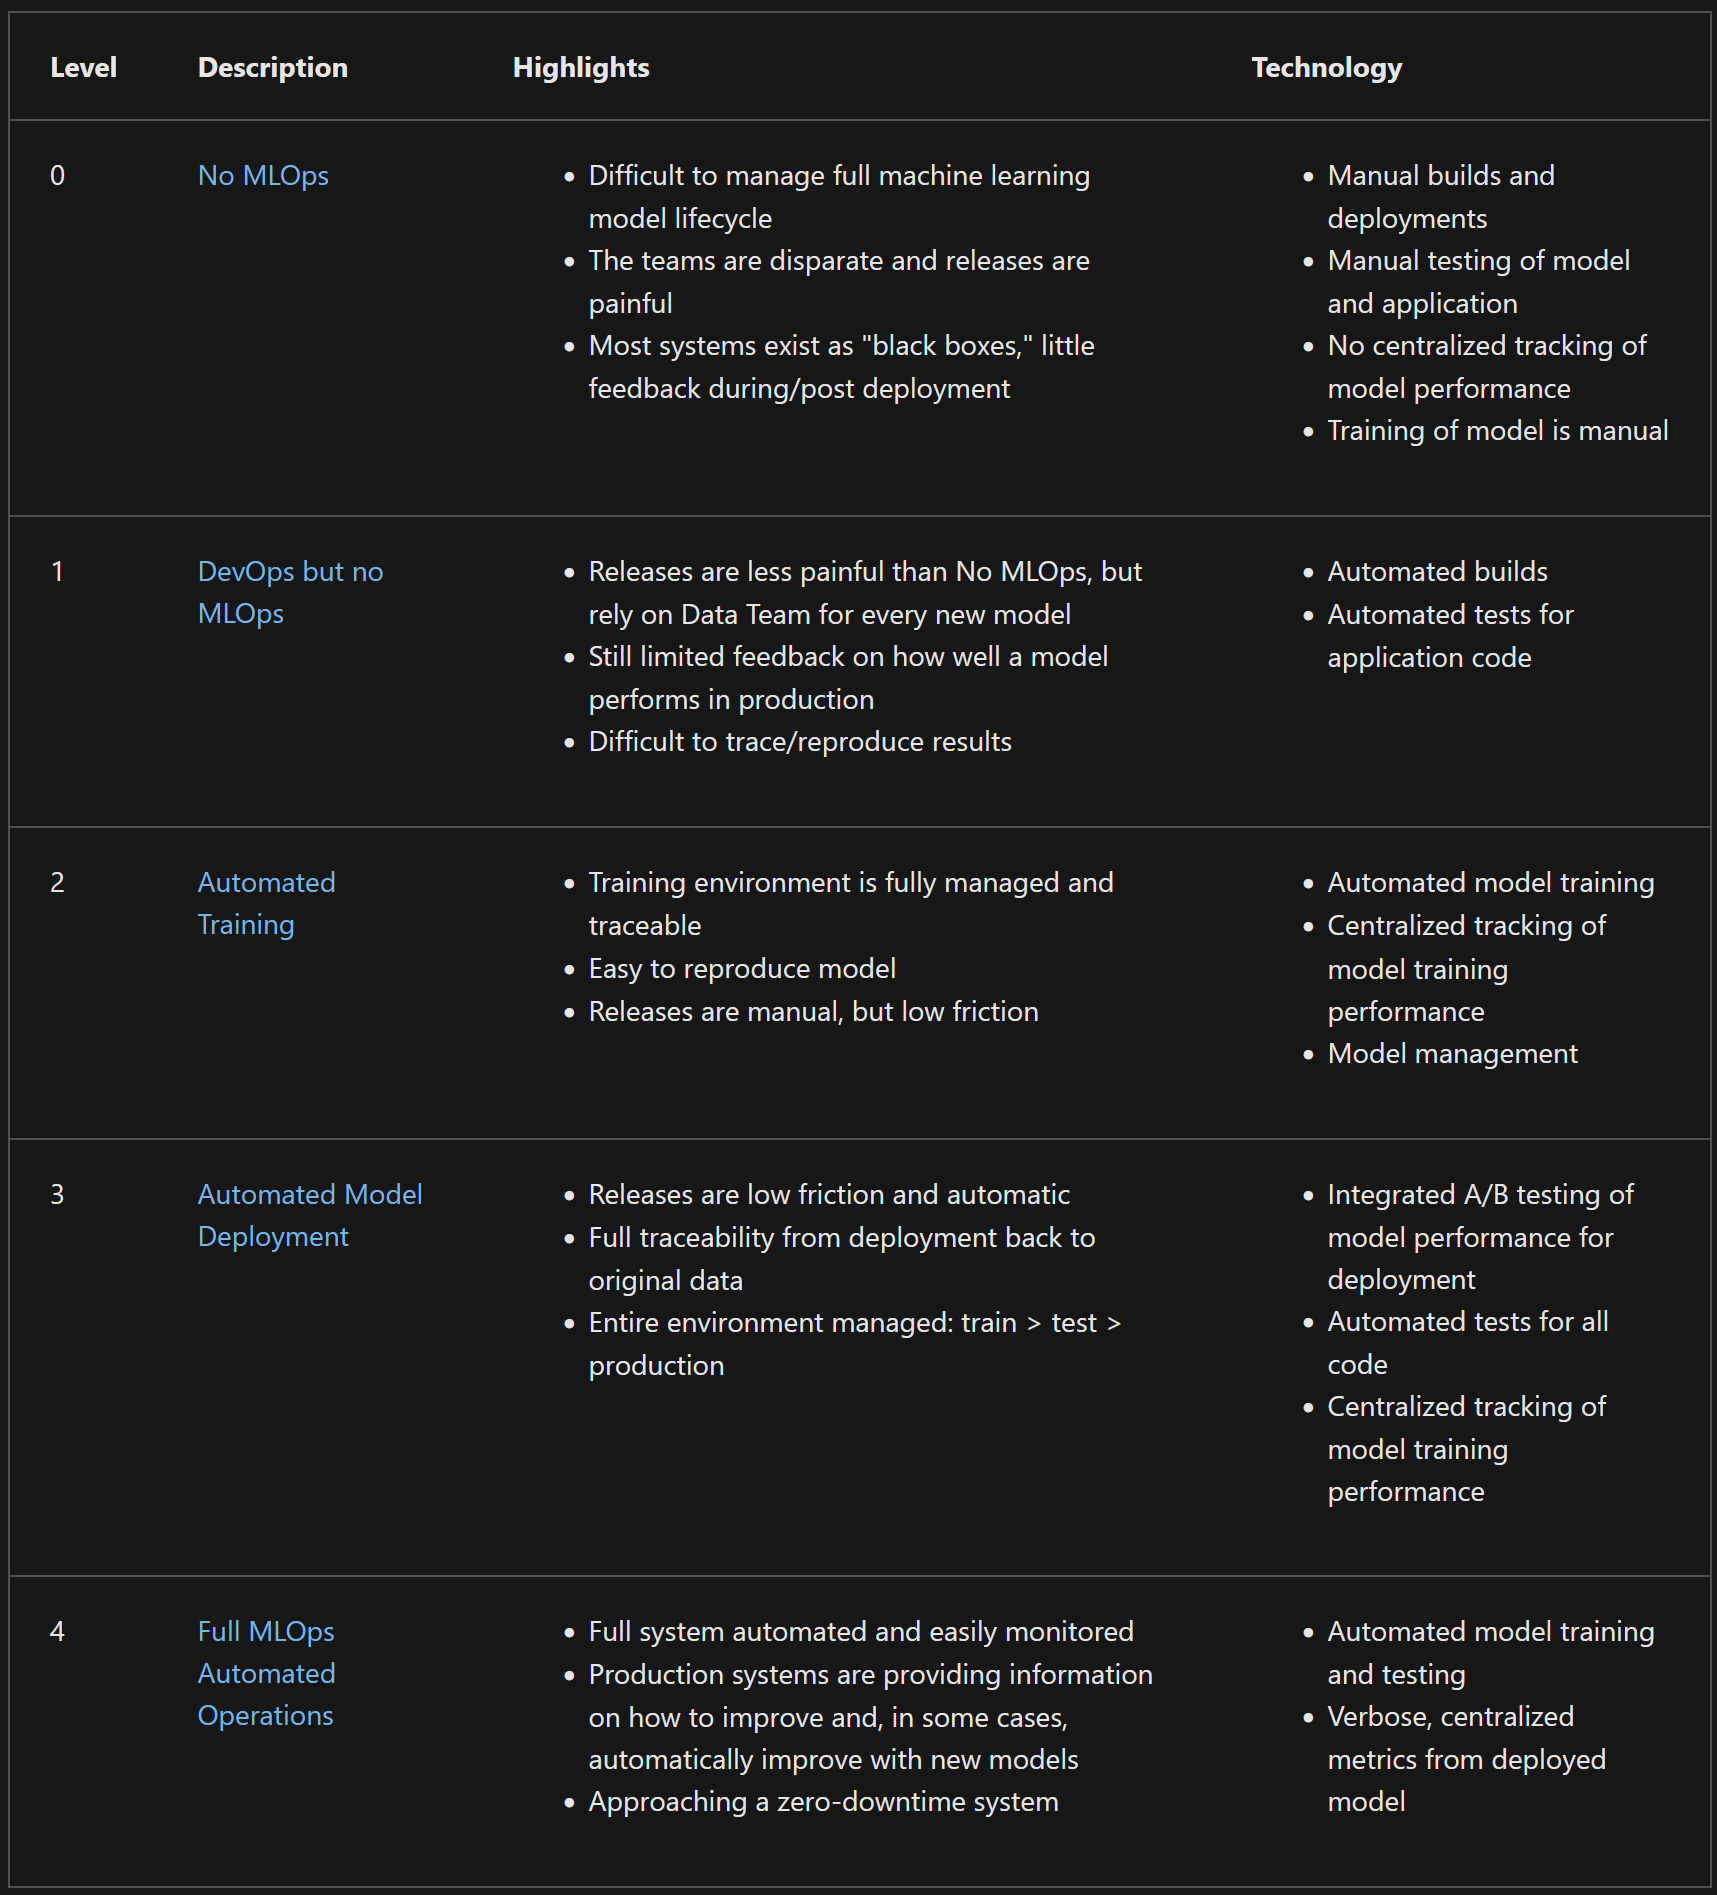
Level 0-
At this level, organizations are doing machine learning in an ad-hoc manner. There is no standardization, no version control, no testing, and no monitoring.
Level 1-
At this level, organizations have started to implement DevOps practices in their machine learning workflows. They have started to use version control and maybe basic continuous integration practices.
Level 2-
At this level, organizations have started to standardize the training process and tackle the problem of creating reproducible experiments. Centralization of model artifacts and metadata is common at this level. They have started to implement model versioning and model registry practices.
Level 3-
At this level, organizations have started to implement continuous integration and continuous deployment practices. They have started to automate the testing of their models and have started to monitor their models in production.
Level 4-
At this level, organizations have started to implement continuous machine learning practices. They have started to automate the training, evaluation, and deployment of their models. They have started to implement automated retraining and model updates.
The MLOps maturity model tells us that continuous machine learning is the highest form of maturity in MLOps. It is the stage where we have automated the entire machine learning pipeline and the cases we will be going through in the exercises are therefore some of the last steps in the MLOps maturity model.
❔ Exercises
In the following exercises, we are going to look at two different cases where we can use continuous machine learning. The first one is a simple case where we are automatically going to trigger some workflow (like model training) whenever we make changes to our data. This is a very common use case in machine learning where we have a data pipeline that is continuously updating our data. The second case is connected to staging and deploying models. In this case, we are going to look at how we can automatically do further processing of our model whenever we push a new model to our repository.
-
For the first set of exercises, we are going to rely on the
cmlframework by iterative.ai, which is a framework that is built on top of GitHub actions. The figure below describes the overall process using thecmlframework. It should be clear that it is the very same process that we go through in the other continuous integration sessions:push code->trigger GitHub actions->do stuff. The new part in this session is that we are only going to trigger whenever data changes.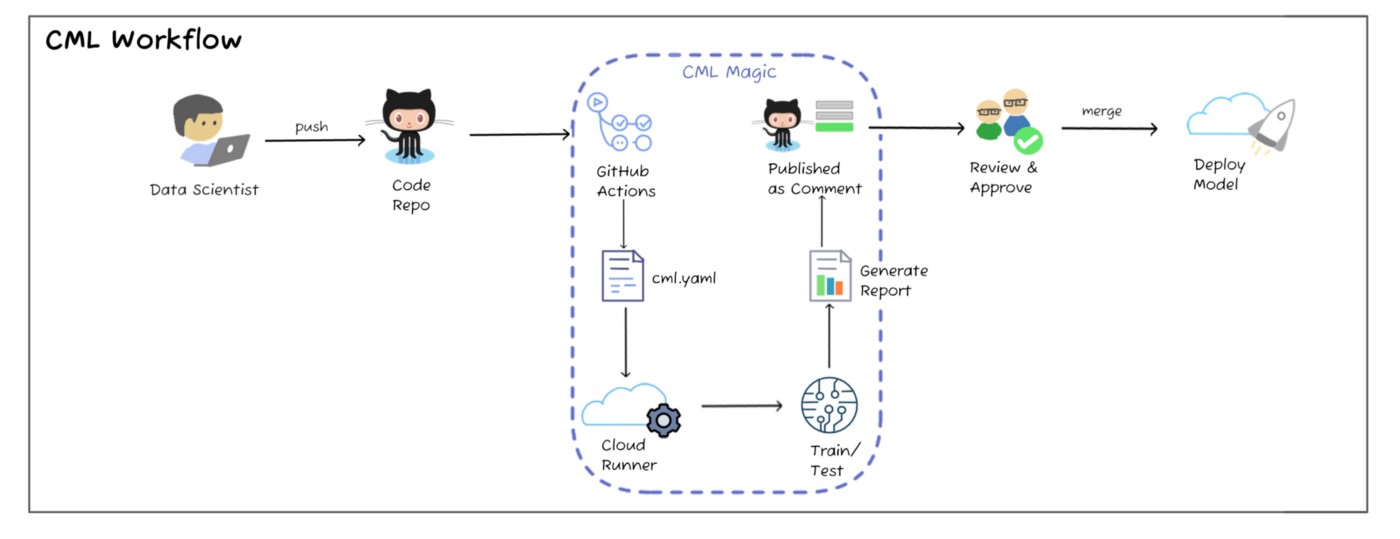
Image credit -
If you have not already created a dataset class for the corrupted MNIST data, start by doing that. Essentially, it is a class that should inherit from
torch.utils.data.Datasetand should have__getitem__and__len__.Solution
-
Then let's create a function that can report basic statistics such as the number of training samples, number of test samples and generate figures of sample images in the dataset and distribution of classes in the dataset. This function should be called
dataset_statisticsand should take a path to the dataset as input.Solution
-
Next, we are going to implement a GitHub actions workflow that only activates when we make changes to our data. Create a new workflow file (call it
cml_data.yaml) and make sure it only activates on push/pull-request events whendata/changes. Relevant documentationSolution
The secret is to use the
pathskeyword in the workflow file. We here specify that the workflow should only trigger when the.dvcfolder or any file with the.dvcextension changes, which is the case when we update our data and calldvc add data/. -
The next step is to implement steps in our workflow that do something when data changes. This is the reason why we created the
dataset_statisticsfunction. Implement a workflow that:- Checks out the code
- Sets up Python
- Installs dependencies
- Downloads the data
- Runs the
dataset_statisticsfunction on the data
Solution
This solution assumes that data is stored in a GCP bucket and that the credentials are stored in a secret called
GCP_SA_KEY. If this is not the case for you, you need to adjust the workflow accordingly with the correct way to pull the data.jobs: run_data_checker: runs-on: ubuntu-latest steps: - name: Checkout code uses: actions/checkout@v5 - name: Set up Python uses: actions/setup-python@v5 with: python-version: 3.11 cache: 'pip' cache-dependency-path: setup.py - name: Install dependencies run: | make dev_requirements pip list - name: Auth with GCP uses: google-github-actions/auth@v2 with: credentials_json: ${{ secrets.GCP_SA_KEY }} - name: Pull data run: | dvc pull --no-run-cache - name: Check data statistics run: | python dataset_statistics.py -
Let's make sure that the workflow works as expected for now. Create a new branch and either add or remove a file in the
data/folder. Then runto commit the changes to data. Open a pull request with the branch and make sure that the workflow activates and runs as expected.
-
Let's now add the
cmlframework such that we can comment the results of thedataset_statisticsfunction in the pull request automatically. Look at the getting started guide for help on how to do this. You will need to write all the content of thedataset_statisticsfunction to a file calledreport.mdand then use thecml comment createcommand to create a comment in the pull request with the content of the file.Solution
jobs: dataset_statistics: runs-on: ubuntu-latest steps: # ...all the previous steps - name: Check data statistics & generate report run: | python src/example_mlops/data.py > data_statistics.md echo '' >> data_statistics.md echo '' >> data_statistics.md echo '' >> data_statistics.md - name: Setup cml uses: iterative/setup-cml@v2 - name: Comment on PR env: REPO_TOKEN: ${{ secrets.GITHUB_TOKEN }} run: | cml comment create data_statistics.md --watermark-title="Data Checker" # (1)! The
The --watermark-titleflag is used to watermark the comment created bycml. It is to make sure that no new comments are created every time the workflow runs.
-
Make sure that the workflow works as expected. You should see a comment created by
github-actions (bot)like this if you have done everything correctly: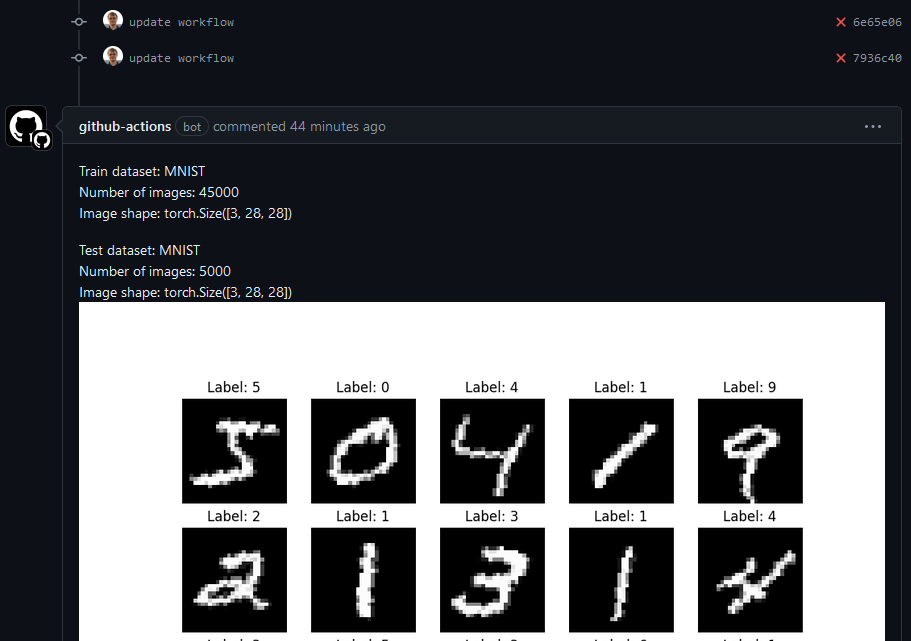
-
(Optional) Feel free to add more checks to the workflow. For example, you could add a check that runs a small baseline model on the updated data and checks that the model converges. This is a very common sanity check that is done in machine learning pipelines.
-
-
For the second set of exercises, we are going to look at how to automatically run further testing of our models whenever we add them to our model registry. For that reason, do not continue with this set of exercises before you have completed the exercises on the model registry in this module.
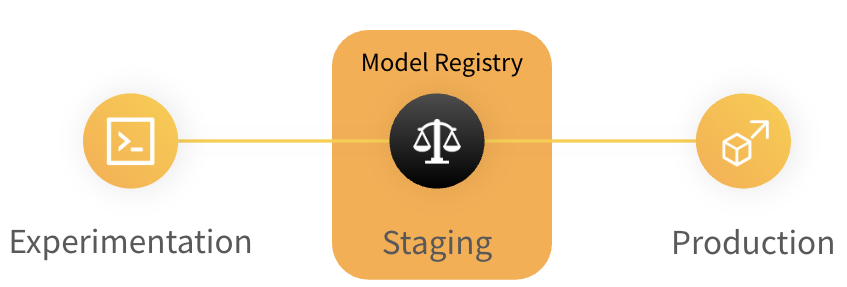
The model registry is in general a repository of a team's trained models where ML practitioners publish candidates for production and share them with others. Figure from wandb. Wandb updates their interface regularly
The interface of wandb is updated regularly. Therefore, it is possible that some of the screenshots and precise instructions are slightly out of date. However, the overall process should still be the same.
-
The first step is in our weights and bias account to create a team. Some of these more advanced features are only available for teams, however every user is allowed to create one team for free. Go to your weights and bias account and create a team (the option should be on the left side of the UI). Give a team name and select W&B cloud storage.
-
Now we need to generate a personal access token that can link our weights and bias account to our GitHub account. Go to this page and generate a new token. You can also find the page by clicking your profile icon in the upper right corner of GitHub and selecting
Settings, thenDeveloper settings, thenPersonal access tokensand finally choose eitherTokens (classic)orFine-grained tokens(which is the safer option, which is also what the link points to).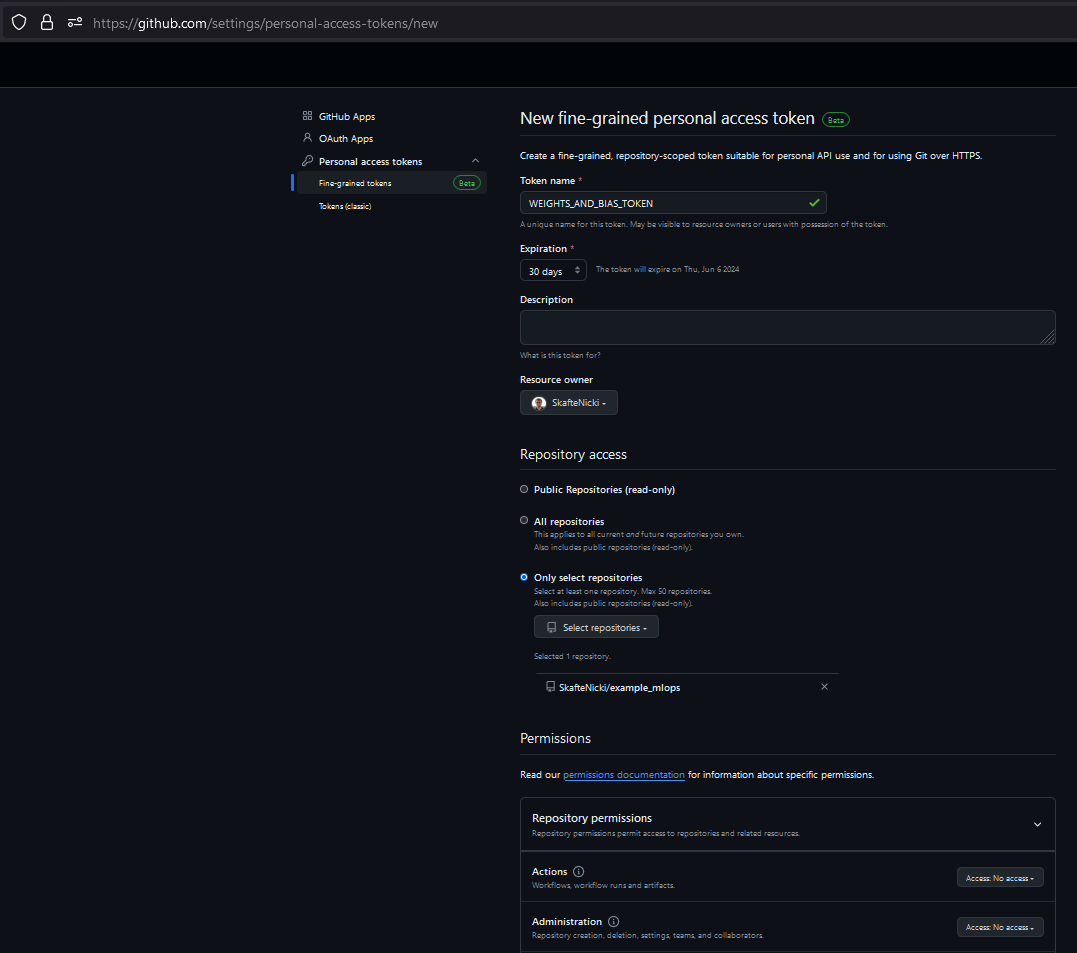
Give it a name, set what repositories it should have access to and select the permissions you want it to have. In our case if you choose to create a
Fine-grained tokenthen it needs access to thecontents:writepermission. If you chooseTokens (classic)then it needs access to therepopermission. After you have created the token, copy it and save it somewhere safe. -
Go to the settings of your newly created team: https://wandb.ai/teamname/settings and scroll down to the
Team secretssection. Here add the token you just created as a secret with the nameGITHUB_ACTIONS_TOKEN. WANDB will now be able to use this token to trigger actions in your repository. -
On the same settings page, scroll down to the
Webhookssettings. Click theNew webhookbutton in fill in the following information:- Name:
github_actions_dispatch - URL:
https://api.github.com/repos/<owner>/<repo>/dispatches - Access token:
GITHUB_ACTIONS_TOKEN - Secret: leave empty
Here you need to replace
<owner>and<repo>with your own information. The/dispatchesendpoint is a special endpoint that all GitHub action workflows can listen to. Thus, if you ever want to set up a webhook in some other framework that should trigger a GitHub action, you can use this endpoint. - Name:
-
Next, navigate to your model registry. It should hopefully contain at least one registry with at least one model registered. If not, go back to the previous module and do that.
-
When you have a model in your registry, click on the
View detailsbutton. Then click theNew automationbutton. On the first page, select that you want to trigger the automation when an alias is added to a model version, set that alias tostagingand select the action type to beWebhook. On the next page, select thegithub_actions_dispatchwebhook that you just created and add this as the payload:{ "event_type": "staged_model", "client_payload": { "event_author": "${event_author}", "artifact_version": "${artifact_version}", "artifact_version_string": "${artifact_version_string}", "artifact_collection_name": "${artifact_collection_name}", "project_name": "${project_name}", "entity_name": "${entity_name}" } }Finally, on the next page give the automation a name and click
Create automation.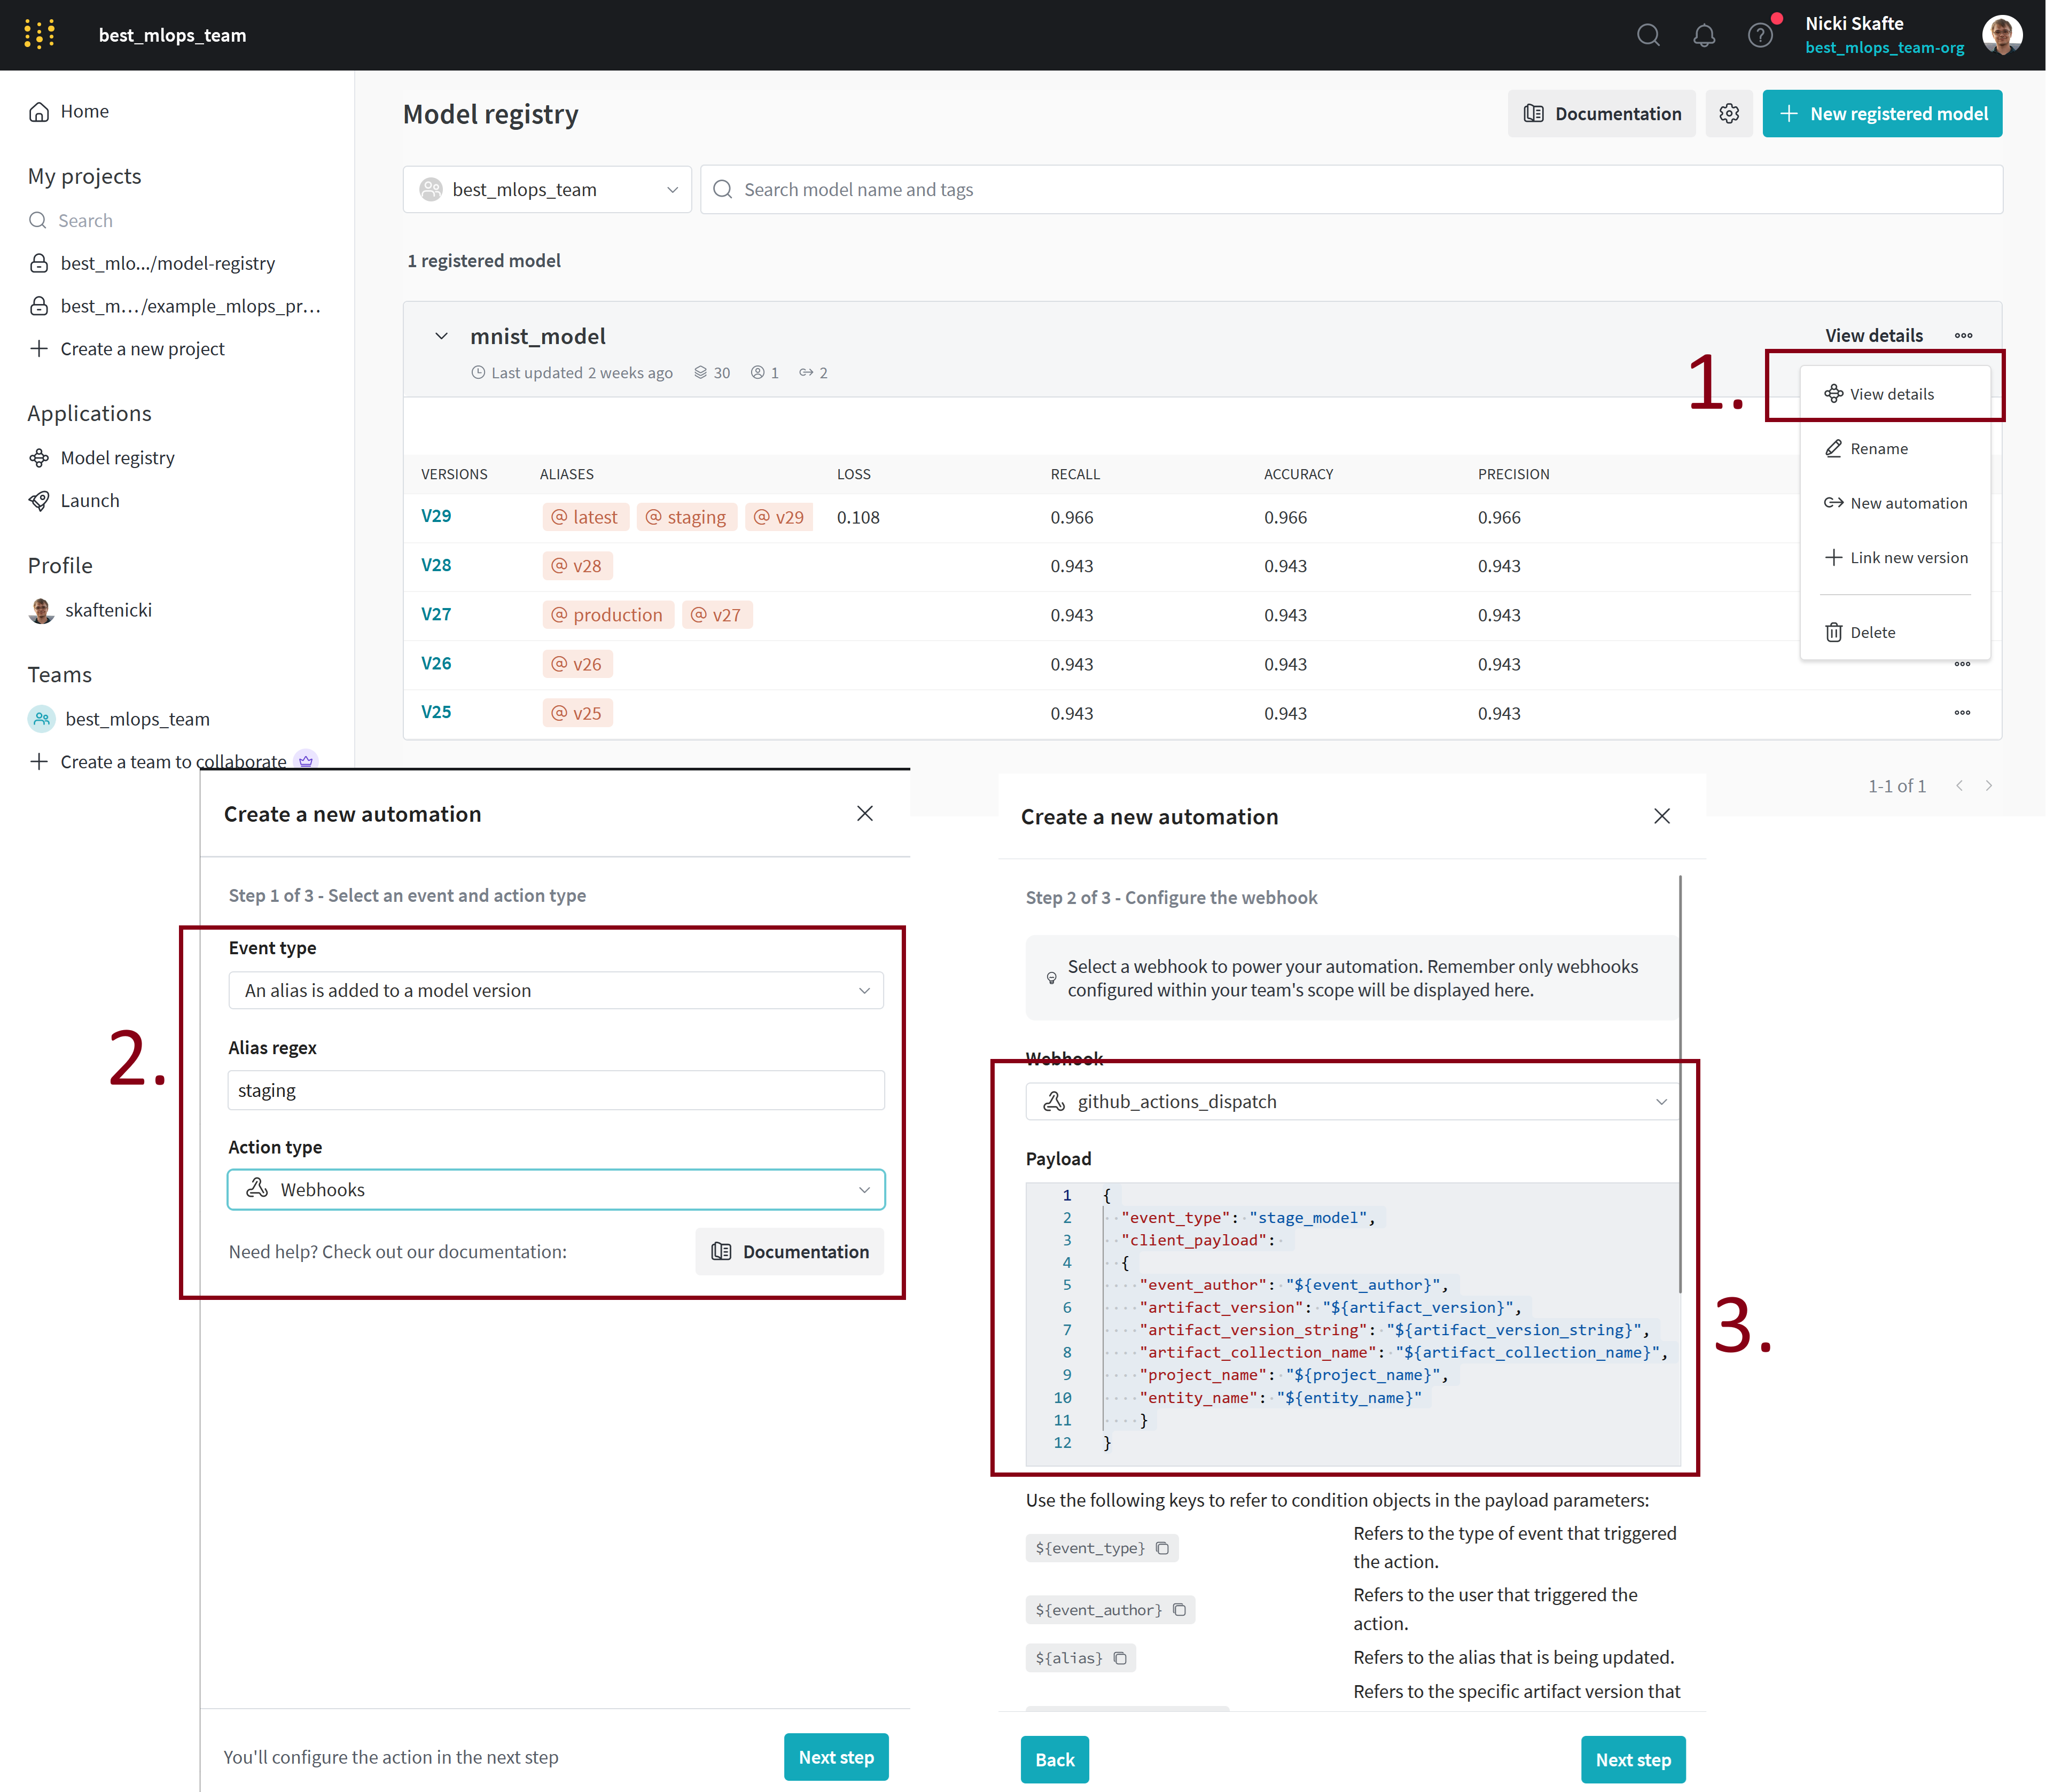
Make sure you understand overall what is happening here.
Solution
The automation is set up to trigger a webhook whenever the alias
stagingis added to a model version. The webhook is set up to trigger a GitHub action workflow that listens to the/dispatchesendpoint and has the event typestaged_model. The payload that is sent to the webhook contains information about the model that was staged. -
We are now ready to create the
GitHub actions workflowthat listens to the/dispatchesendpoint and triggers whenever a model is staged. Create a new workflow file (calledstage_model.yaml) and make sure it only activates on thestaged_modelevent. Hint: relevant documentationSolution
Do note that the
repository_dispatchevent will only trigger a workflow run if the workflow file exists on the default branch. Therefore, if you are testing this on a branch, you need to push the workflow file to the default branch. -
Next, we need to implement the steps in our workflow that do something when a model is staged. The payload that is sent to the webhook contains information about the model that was staged. Implement a workflow that:
- Identifies the model that was staged
- Sets an environment variable with the corresponding artifact path
- Outputs the model name
Solution
jobs: identify_event: runs-on: ubuntu-latest outputs: model_name: ${{ steps.set_output.outputs.model_name }} steps: - name: Check event type run: | echo "Event type: repository_dispatch" echo "Payload Data: ${{ toJson(github.event.client_payload) }}" - name: Setting model environment variable and output id: set_output run: | echo "model_name=${{ github.event.client_payload.artifact_version_string }}" >> $GITHUB_OUTPUT -
We now need to write a script that can be executed on our staged model. In this case, we are going to run some performance tests on it to check that it is fast enough for deployment. Therefore, do the following:
-
In a
tests/performancetestsfolder, create a new file calledtest_model.py. -
Implement a test that loads the model from a wandb artifact path e.g.
/ / : and runs it on a random input. Importantly, the artifact path should be read from an environment variable called MODEL_NAME. -
The test should assert that the model can do 100 predictions in less than X amount of time.
Solution
In this solution we assume that 4 environment variables are set:
WANDB_API,WANDB_ENTITY,WANDB_PROJECTandMODEL_NAME. -
-
Let's now add another job that calls the script we just wrote. It needs to:
- Set the correct environment variables
- Checkout the code
- Setup Python
- Install dependencies
- Run the test
which is very similar to the kind of jobs we have written before.
Solution
jobs: identify_event: ... test_model: runs-on: ubuntu-latest needs: identify_event env: WANDB_API_KEY: ${{ secrets.WANDB_API_KEY }} WANDB_ENTITY: ${{ secrets.WANDB_ENTITY }} WANDB_PROJECT: ${{ secrets.WANDB_PROJECT }} MODEL_NAME: ${{ needs.identify_event.outputs.model_name }} steps: - name: Echo model name run: | echo "Model name: $MODEL_NAME" - name: Checkout code uses: actions/checkout@v5 - name: Set up Python uses: actions/setup-python@v5 with: python-version: 3.11 cache: 'pip' cache-dependency-path: setup.py - name: Install dependencies run: | pip install -r requirements.txt pip list - name: Test model run: | pytest tests/performancetests/test_model.py -
Finally, we are going to assume in this setup that if the model gets this far then it is ready for deployment. We are therefore going to add a final job that will add a new alias to the model called
production. Here is some relevant Python code that can be used to add the alias:import typer import os import wandb def link_model(artifact_path: str, aliases: list[str] = ["staging"]) -> None: """ Stage a specific model to the model registry. Args: artifact_path: Path to the artifact to stage. Should be of the format "entity/project/artifact_name:version". aliases: List of aliases to link the artifact with. Example: model_management link-model entity/project/artifact_name:version -a staging -a best """ if artifact_path == "": typer.echo("No artifact path provided. Exiting.") return api = wandb.Api( api_key=os.getenv("WANDB_API_KEY"), overrides={"entity": os.getenv("WANDB_ENTITY"), "project": os.getenv("WANDB_PROJECT")}, ) _, _, artifact_name_version = artifact_path.split("/") artifact_name, _ = artifact_name_version.split(":") artifact = api.artifact(artifact_path) artifact.link(target_path=f"{os.getenv('WANDB_ENTITY')}/model-registry/{artifact_name}", aliases=aliases) artifact.save() typer.echo(f"Artifact {artifact_path} linked to {aliases}") if __name__ == "__main__": typer.run(link_model)For example, you can run this script with the following command:
Implement a final job that calls this script and adds the
productionalias to the model.Solution
jobs: identify_event: ... test_model: ... add_production_alias: runs-on: ubuntu-latest needs: identify_event env: WANDB_API_KEY: ${{ secrets.WANDB_API_KEY }} WANDB_ENTITY: ${{ secrets.WANDB_ENTITY }} WANDB_PROJECT: ${{ secrets.WANDB_PROJECT }} MODEL_NAME: ${{ needs.identify_event.outputs.model_name }} steps: - name: Echo model name run: | echo "Model name: $MODEL_NAME" - name: Checkout code uses: actions/checkout@v5 - name: Set up Python uses: actions/setup-python@v5 with: python-version: 3.11 cache: 'pip' cache-dependency-path: setup.py - name: Install dependencies run: | pip install -r requirements.txt pip list - name: Add production alias run: | python link_model.py $MODEL_NAME -a production -
Finally, make sure the workflow works as expected. To try it out again and again for testing purposes, you can just manually add and then delete the
stagingalias to any model version in the model registry. -
(Optional) Consider adding more checks to the workflow. For example, you could add a step that checks if the model is too large for deployment, runs some further evaluation scripts, or checks if the model is robust to adversarial attacks. Only the imagination sets the limits here.
-
-
(Optional) If you have gotten this far, consider combining principles from the two exercises. Here is an idea: we use the workflow from the second exercise to trigger a workflow that checks a staged model for performance. We then use the
cmlframework to automatically create a pull request e.g. usecml pr createinstead ofcml comment createto create a pull request with the results of the performance test. Then if we are happy with the performance, we can then approve that pull request and the production alias is added to the model. This is a better workflow because it allows for human intervention before the model is deployed.
🧠 Knowledge check
-
What is the difference between continuous integration and continuous machine learning?
Solution
There are three key differences between continuous integration and continuous machine learning:
- Scope: CI focuses on integrating and testing software code, while CML encompasses the entire lifecycle of machine learning models, including data handling, model training, evaluation, deployment, and monitoring.
- Automation Focus: CI automates code testing and integration, whereas CML automates the training, evaluation, deployment, and monitoring of machine learning models.
- Feedback Mechanisms: CI primarily uses automated tests to provide feedback on code quality. CML uses performance metrics from deployed models to provide feedback and trigger retraining or model updates.
-
Imagine you get hired in the pharmaceutical industry and are asked to develop a machine learning pipeline that can automatically determine which drugs are safe and which are not. What level of the MLOps maturity model would you strive to reach?
Solution
There is really no right or wrong answer here, but in most cases we would actually not aim for level 4. The reason is that the consequences of a bad model in this case can be severe. Therefore, we would probably not want automated retraining and model updates, which is what level 4 is about. Instead, we would probably aim for level 3 where we have automated testing and monitoring of our models but there is still human oversight in the process.
This ends the module on continuous machine learning. As we have hopefully convinced you, it is only the imagination that sets the limits for what you can use GitHub actions for in your machine learning pipeline. However, we do want to stress that it is important that human oversight is always present in the process. Automation is great, but it should never replace human judgement. This is especially true in machine learning where the consequences of a bad model can be severe if it is used in critical decision making.
Finally, if you have completed the exercises on using the cloud consider checking out the cml runner lunch command that allows you to run your workflows on cloud resources instead of the GitHub action runners.