![]()
The command line
Core Module

The command line (also commonly known as the terminal) provides a text-based interface for interacting with your computer. It originated in an era before graphical user interfaces became standard. While Linux users are often familiar with the terminal, Mac and Windows users may encounter it less frequently. However, a basic understanding of the command line is valuable for improving workflow, especially in MLOps. Many MLOps tools lack graphical interfaces, making terminal interaction necessary. Furthermore, working effectively in cloud environments, which we will cover later in the course, often requires using the command line.
Note that if you're already a terminal wizard then feel free to skip the exercises below. They are very elementary.
The anatomy of the command line
Regardless of the operating system, all command lines look more or less the same:

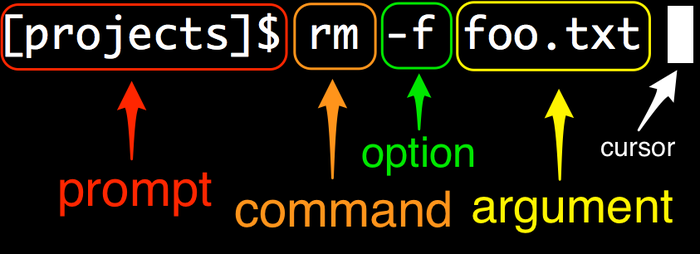
As the image illustrates, executing a command involves several components:
- The prompt is the part where you type your commands. It usually contains the name of the current directory you
are in, followed by some kind of symbol:
$,>,:are the usual ones. It can also contain other information, such as in the case of the above image, which also shows the currentcondaenvironment. - The command is the actual command you want to execute. For example,
lsorcd. - The options (or flags) modify the command's behavior. They often start with a hyphen (
-) or double hyphen (--). For example,-linls -l. - The arguments specify what the command should operate on. For example,
figuresinls -l figures.
Generally, options are optional modifiers, while arguments provide the necessary inputs for the command.
❔ Exercises
We have put a cheat sheet in the exercise files folder belonging to this session that gives a quick overview of the different commands that can be executed in the command line.
Windows users
We highly recommend that you install Windows Subsystem for Linux (WSL). This will install a full Linux system on your Windows machine. Please follow this guide. Remember to run commands from an elevated (as administrator) Windows Command Prompt. You can in general complete all exercises in the course from a normal Windows Command Prompt, but some are easier to do if you run from WSL.
If you decide to run in WSL, you need to remember that you now have two different systems, and installing a package
on one system does not mean that it is installed on the other. For example, if you install pip in WSL, you
need to install it again in Windows if you want to use it there.
If you decide to not run in WSL, please always work in a Windows Command Prompt and not Powershell.
-
Start by opening a terminal.
-
To navigate inside a terminal, we rely on the
cdcommand andpwdcommand. Make sure you know how to go back and forth in your file system. (1) Your terminal should support
tab completion which can help finish commands for you!
Your terminal should support
tab completion which can help finish commands for you!
-
The
lscommand is important when we want to inspect the content of a folder. Try to use the command, and also try it with the additional option-l. What does it show? -
Make sure to familiarize yourself with the
which,echo,cat,wget,less, andtopcommands. Also, familiarize yourself with the>operator (used for output redirection). You are likely to use some of these commands and concepts throughout the course or in your future career. For Windows users, these commands may have different names (e.g.,wherecorresponds towhich). -
It is also important that you know how to edit a file through the terminal. Most systems should have the
nanoeditor installed; otherwise, try to figure out which one is installed on your system.-
Type
nanoin the terminal. -
Write the following text in the script
-
Save the script as a
.pyfile and try to execute it usingpython <filename>.py. -
Afterwards, try to edit the file through the terminal (change
Hello worldto something else).
-
-
All terminals come with a programming language. The most common system is called
bash, which can come in handy when you're able to write simple programs in bash. For example, if you want to execute multiple Python programs sequentially, this can be done through a bash script.Windows users
Bash is not part of Windows, so you need to run this part through WSL. If you did not install WSL, you can skip this part or as an alternative do the exercises in Powershell, which is the native Windows scripting language (not recommended).
-
Write a bash script (in
nano) and try executing it: -
Change the bash script to call the Python program you just wrote.
-
Try to Google how to write a simple for-loop that executes the Python script 10 times in a row.
-
-
A trick you may need throughout this course is setting environment variables. An environment variable is just a dynamically named value that may alter the way running processes behave on a computer. The syntax for setting an environment variable depends on your operating system:
-
Try to set an environment variable and print it out.
-
To use an environment variable in a Python program, you can use the
os.environfunction from theosmodule. Write a Python program that prints out the environment variable you just set. -
If you have a collection of environment variables, these can be stored in a file called
.env. The file is formatted as follows:To load the environment variables from the file, you can use the
python-dotenvpackage. Install it withpip install python-dotenvoruv add python-dotenvand then try to load the environment variables from the file and print them out.
-
🧠 Knowledge check
-
Here is one command from later in the course when we will be working in the cloud
gcloud compute instances create-with-container instance-1 \
    --container-image=gcr.io/<project-id>/gcp_vm_tester
    --zone=europe-west1-b
Identify the command, options, and arguments.
Solution
- The command is
gcloud compute instances create-with-container. - The options are
--container-image=gcr.io/<project-id>/gcp_vm_testerand--zone=europe-west1-b. - The arguments are
instance-1.
The tricky part of this example is that commands can have subcommands, which are also commands. In this case,
computeis a subcommand togcloud,instancesis a subcommand tocompute, andcreate-with-containeris a subcommand toinstances. - The command is
-
Two common options that nearly all commands have are
-hand-V. What does each of them do?Solution
The
-h(or--help) option prints the help message for the command, including subcommands and arguments. Try it out by executingpython -h.
The-V(or--version) option prints the version of the installed program. Try it out by executingpython --version.
This concludes the module on the command line. Don't worry if you're not yet fully comfortable; we will use the command line extensively throughout the course, providing ample opportunity for practice. If you want to spend additional time on this topic, we highly recommend watching this video for a more in-depth introduction.
If you are interested in personalizing your command line, you can check out the starship project, which allows you to customize your command line with a lot of different options.