![]()
Code organization
Core Module
With a basic understanding of version control, it is now time to really begin filling up our code repository. However, the question then remains: how to organize our code? As developers, we tend to not think about code organization that much. It is instead something that is just dynamically created as we may need it. However, maybe we should spend some time initially getting organized with the chance of this making our code easier to develop and maintain in the long run. If we do not spend time organizing our code, we may end up with a mess of code that is hard to understand or maintain
Big Ball of Mud
A Big Ball of Mud is a haphazardly structured, sprawling, sloppy, duct-tape-and-baling-wire, spaghetti-code
jungle. These systems show unmistakable signs of unregulated growth, and repeated, expedient repair. Information
is shared promiscuously among distant elements of the system, often to the point where nearly all the important
information becomes global or duplicated.
The overall structure of the system may never have been well defined.
If it was, it may have eroded beyond recognition. Programmers with a shred of architectural sensibility shun these
quagmires. Only those who are unconcerned about architecture, and, perhaps, are comfortable with the inertia of
the day-to-day chore of patching the holes in these failing dikes, are content to work on such systems.
Brian Foote and Joseph Yoder, Big Ball of Mud. Fourth Conference on Patterns Languages of Programs
(PLoP '97/EuroPLoP '97) Monticello, Illinois, September 1997
We are here going to focus on the organization of data science projects and machine learning projects. The core difference these kinds of projects introduce compared to more traditional systems is data. The key to modern machine learning is without a doubt the vast amounts of data that we have access to today. It is therefore not unreasonable that data should influence our choice of code structure. If we had another kind of application, then the layout of our codebase should probably be different.
Cookiecutter
We are in this course going to use the tool cookiecutter, which is a tool for creating projects from project templates. A project template is in short just an overall structure for how you want your folders, files, etc. to be organized from the beginning. For this course we are going to be using a custom MLOps template. The template is essentially a fork of the cookiecutter data science template that has been used for a couple of years in the course, but specialized a bit more towards MLOps instead of general data science.
We are not going to argue that this template is better than every other template; it is just a
standardized way of creating project structures for machine learning projects. By standardized we mean that if two
people are using cookiecutter with the same template, the layout of their code follows some specific rules,
enabling them to understand each other's code faster. Code organization is therefore not only to make the
code easier for you to maintain but also for others to read and understand.
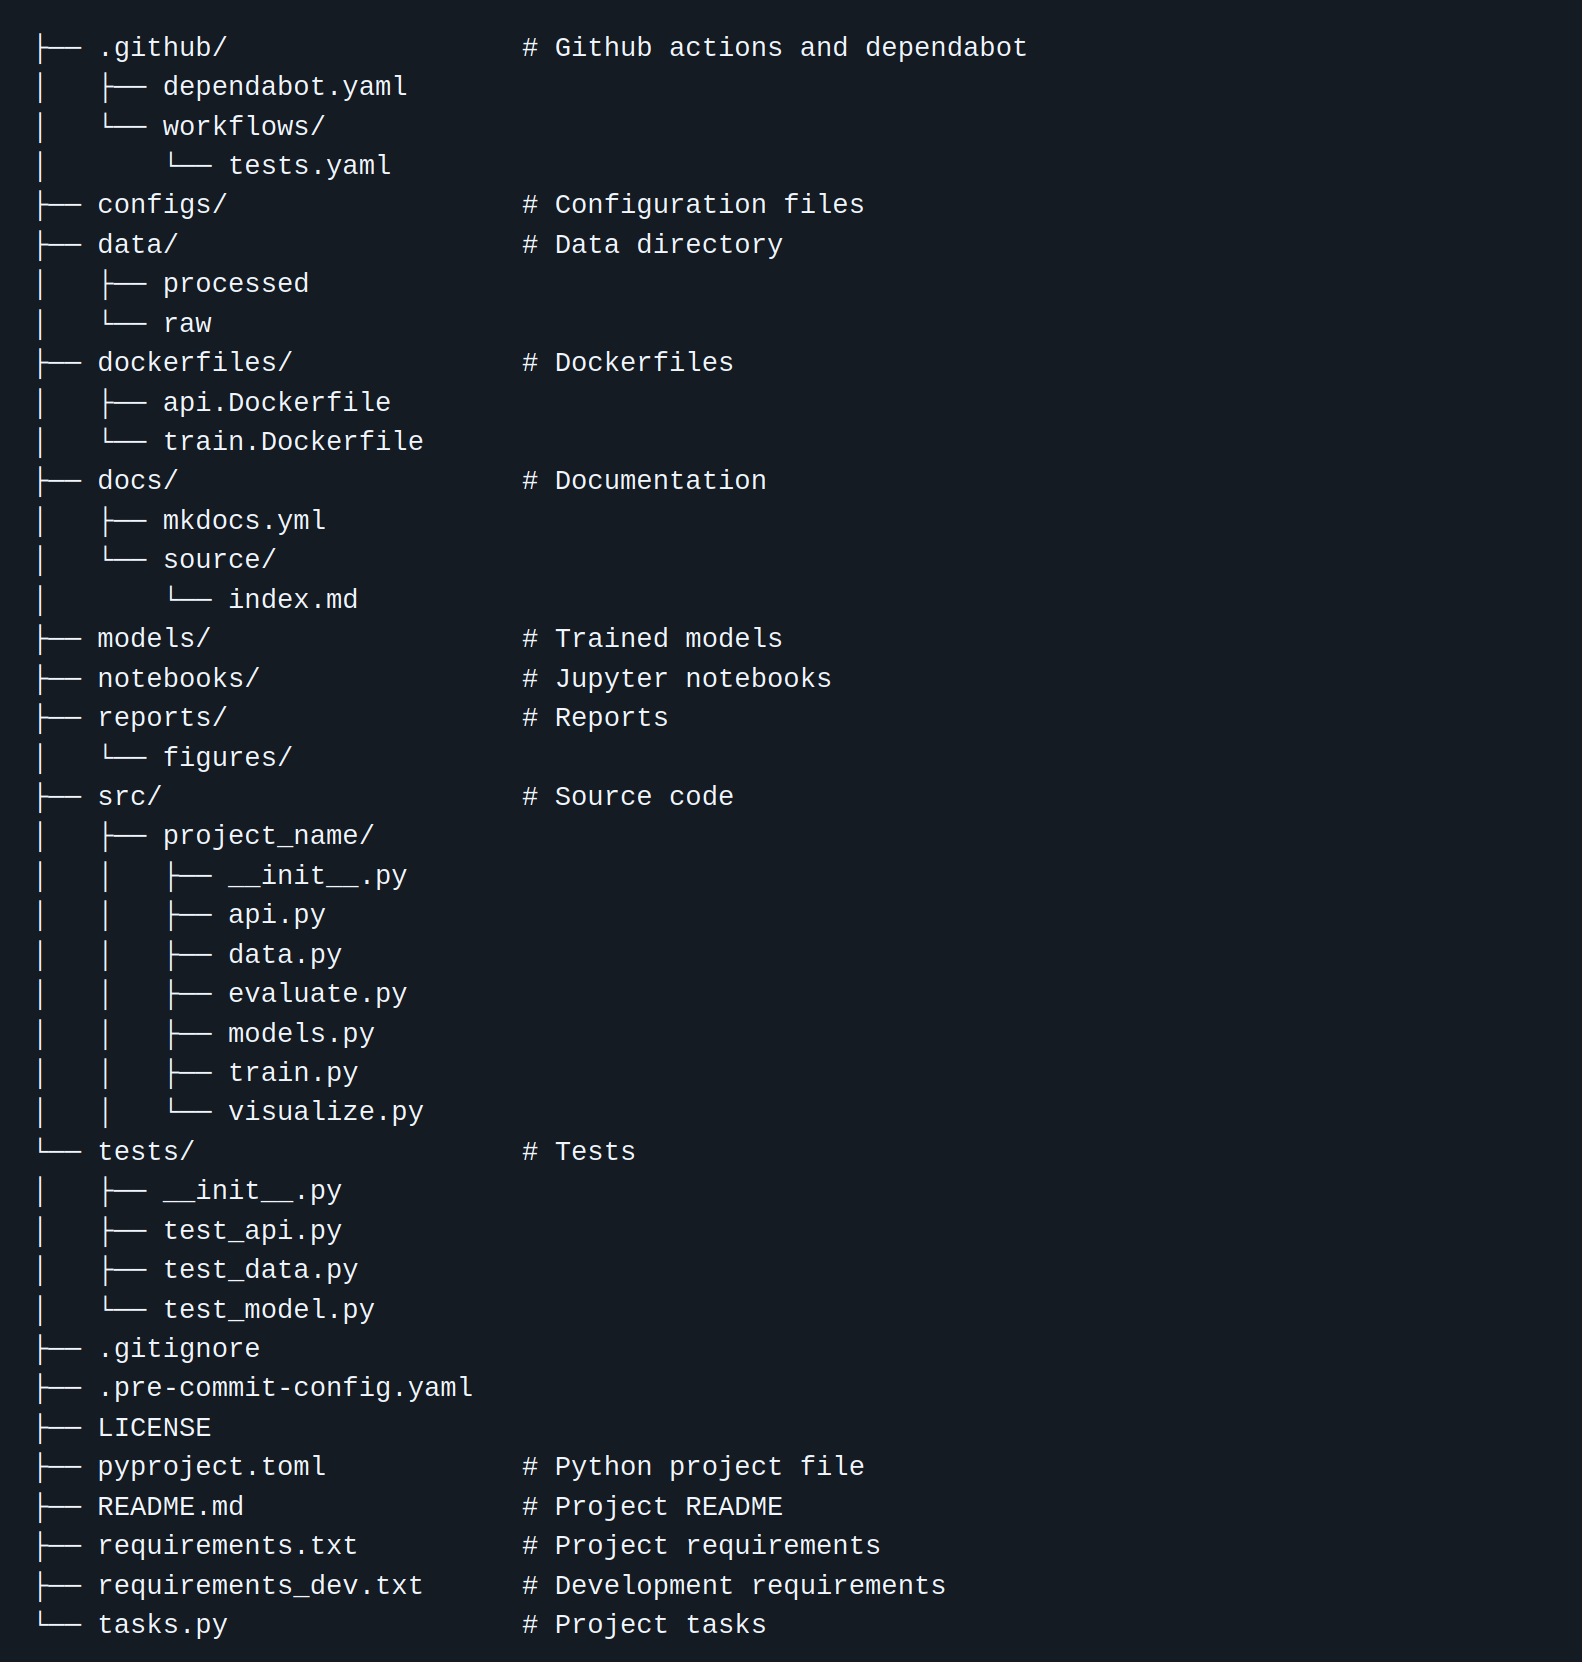
Shown below is the default code structure of cookiecutter for data science projects.
What is important to keep in mind when using a template is that it is precisely a template. By definition, a template is a guide to making something. Therefore, not all parts of a template may be important for your project at hand. Your job is to pick the parts from the template that are useful for organizing your machine learning project and add the parts that are missing.
Python projects
While the same template in principle could be used regardless of what language we were using for our machine learning or data science application, there are certain considerations to take into account based on what language we are using. Python is the dominant language for machine learning and data science currently, which is why we in this section are focusing on some special files you will need for your Python projects.
The first file you may or may not know about is the __init__.py file. In Python the __init__.py file is used to mark
a directory as a Python package. Therefore, as a bare minimum, any Python package should look something like this:
The second file to focus on is the pyproject.toml. This file is important for actually converting your code into a
Python project. Essentially, whenever you run pip install, pip is in charge of both downloading the package you want
but also in charge of installing it. For pip to be able to install a package it needs instructions on what part of
the code it should install and how to install it. This is the job of the pyproject.toml file.
Below we have both added a description of the structure of the pyproject.toml file but also setup.py + setup.cfg
which is the "old" way of providing project instructions regarding Python projects. However, you may still encounter
a lot of projects using setup.py + setup.cfg, so it is good to at least know about them.
pyproject.toml is the new standardized way of describing project metadata in a declarative way, introduced in
PEP 621. It is written in toml format which is easy to
read. At the very least your pyproject.toml file should include the [build-system] and [project] sections:
[build-system]
requires = ["setuptools", "wheel"]
build-backend = "setuptools.build_meta"

[project]
name = "my-package-name"
version = "0.1.0"
authors = [{name = "EM", email = "me@em.com"}]
description = "Something cool here."
requires-python = ">=3.8"
dynamic = ["dependencies"]

[tool.setuptools.dynamic]
dependencies = {file = ["requirements.txt"]}
The [build-system] informs pip/python that to build this Python project it needs the two packages
setuptools and wheel and that it should call the
setuptools.build_meta function to actually build the
project. The [project] section essentially contains metadata regarding the package, what it's called, etc. for if
we ever want to publish it to PyPI.
For specifying dependencies of your project you have two options. Either you specify them in a requirements.txt
file and put that as a dynamic field in pyproject.toml as shown above. Alternatively, you can add a dependencies
field under the [project] header like this (similar to how uv does it):
The improvement over setup.py + setup.cfg is that pyproject.toml also allows for metadata from other tools to
be specified in it, essentially making sure you only need a single file for your project. For example, in the next
[module M7 on good coding practices] you will learn about the tool ruff and how it can help format your code. If
we want to configure ruff for our project we can do that directly in pyproject.toml by adding additional
headers:
To read more about how to specify pyproject.toml this
page
is a good place to start.
setup.py is the original way to describe how a Python package should be built. The most basic setup.py file
will look like this:
from setuptools import setup
from pip.req import parse_requirements
requirements = [str(ir.req) for ir in parse_requirements("requirements.txt")]
setup(
    name="my-package-name",
    version="0.1.0",
    author="EM",
    description="Something cool here."
    install_requires=requirements,
)
Essentially, it is the exact same meta information as in pyproject.toml, just written directly in Python
syntax instead of toml. Because there was a desire to separate this meta information into its own file, the
setup.cfg file was created which can contain the exact same information as setup.py just in a declarative
config.
[metadata]
name = my-package-name
version = 0.1.0
author = EM
description = "Something cool here."
# ...
This non-standardized way of providing meta information regarding a package was essentially what led to the
creation of pyproject.toml.
Regardless of what way a project is configured, after creating the above files, the correct way to install them would be the same
Developer mode in Python
The -e is short for --editable mode also called
developer mode. Since we will
continuously be iterating on our package this is the preferred way to install our package, because that means
that we do not have to run pip install every time we make a change. Essentially, in developer mode changes in
the Python source code can immediately take place without requiring a new installation.
TLDR: uv takes care of this for you when you run uv sync.
uv distinguishes between a project being an
application or being a library/package. The
core difference is if the project was created using uv init --app or uv init --lib with --app being the
default. The core difference is that applications are not installed as packages, while libraries/packages are.
Concreatly this comes down to these lines in the pyproject.toml file being added or not:
After running this your code should be available to import as from project_name import ... like any other Python
package you use. This is the most essential information you need to know about creating Python packages.
❔ Exercises
After having installed cookiecutter and created your first template project (exercise 1 and 2 below), the remaining exercises are intended to be used on the simple CNN MNIST classifier from yesterday's exercise, with the goal of forcing it into this structure. You are not required to fill out every folder and file in the project structure, but try to at least follow the steps in the exercises. Whenever you need to run a file I recommend always doing so from the root directory e.g.
In this way paths (for saving and loading files) are always relative to the root, and it is in general easier to wrap your head around where files are located.
-
Install the cookiecutter framework
-
Start a new project using this template, which is specialized for this course (1).
- If you feel like the template can be improved in some way, feel free to either open an issue with the proposed improvement or directly send a pull request to the repository 😄.
You do this by running the cookiecutter command using the template URL:
Valid project names
When asked for a project name you should follow the PEP8 guidelines for naming packages. This means that the name should be all lowercase and if you want to separate words, you should use underscores. For example
my_projectis a valid name, whileMyProjectis not. Additionally, the package name cannot start with a number.Flat-layout vs. src-layout
There are two common choices on how layout your source directory. The first is called src-layout where the source code is always placed in a
src/<project_name>folder and the second is called flat-layout where the source code is just placed in a<project_name>folder. The template we are using in this course uses the src-layout, but there are pros and cons to both. -
After having created your new project, the first step is to also create a corresponding virtual environment and install any needed requirements. If you have a virtual environment from yesterday feel free to use that. Otherwise, create a new one. Then install the project in that environment.
-
Start by filling out the
src/<project_name>/data.pyfile. When this file runs, it should take the raw data, e.g. the corrupted MNIST files from yesterday (../data/corruptmnist), which now should be located in adata/rawfolder and process them into a single tensor, normalize the tensor and save this intermediate representation to thedata/processedfolder. By normalization here we refer to making sure the images have mean 0 and standard deviation 1.Solution
-
This template comes with
tasks.py, which uses the invoke framework to define project tasks. You can learn more about the framework in the last optional module in today's session. However, for now just know thattasks.pyis a file that can be used to specify common tasks that you want to run in your project. It is similar toMakefiles if you are familiar with them. Try out some of the pre-defined tasks:In general, we recommend that you add commands to the
tasks.pyfile as you move along in the course. -
Transfer your model file
model.pyinto thesrc/<project_name>/model.pyfile. When you call the script, e.g.it should print out the model architecture and number of parameters in the model.
Solution
This is the CNN solution from yesterday and it may differ from the model architecture you have created.
-
Transfer the relevant parts of the
main.pyscript to thesrc/<project-name>/train.pyscript, i.e. the parts that have to do with training the model. In addition, make sure it also does the following two things when run:- Saves the trained model to the
modelsfolder - Saves some statistics/visualizations from training to the
reports/figuresfolder. This could be a simple
Solution
- Transfer the remaining parts of the
main.pyscript into thesrc/<project-name>/evaluate.pyscript, i.e. the parts that have to do with evaluating the model. When run, it should load the model from themodelsfolder and print out the accuracy of the model on the test set.
Solution
- Saves the trained model to the
-
Fill out the file
src/<project-name>/visualize.pywith this (as minimum, feel free to add more visualizations)- Loads a pre-trained network.
- Extracts some intermediate representation of the data (your training set) from your CNN. This could be the features just before the final classification layer.
- Visualize features in 2D space using t-SNE to do the dimensionality reduction.
- Save the visualization to a file in the
reports/figures/folder.
Solution
The solution here depends a bit on the choice of model. However, in most cases the last layer in the model will be a fully connected layer, which we assume is named
fc. The easiest way to get the features before this layer is to replace the layer withtorch.nn.Identitywhich essentially does nothing (see the highlighted line below). Alternatively, if you implemented everything intorch.nn.Sequentialyou can just remove the last layer from theSequentialobject:model = model[:-1].- Make sure to update the
README.mdfile with a short description of how your scripts should be run.
-
Finally, make sure to update the
requirements.txtfile with any packages that are necessary for running your code (see this set of exercises for help). -
(Optional) Feel free to create more files/visualizations (what about investigating/exploring the data distribution?).
-
(Optional) Let's say that you are not satisfied with the template I have recommended that you use, which is completely fine. What should you then do? You should of course create your own template! This is actually not that hard to do.
-
Just as a starting point I would recommend that you fork either the mlops template which you have already been using or alternatively fork the data science template.
-
After forking the template, clone it locally and let's start modifying it. The first step is changing the
cookiecutter.jsonfile. For the MLOps template it looks like this:{ "repo_name": "repo_name", "project_name": "project_name", "author_name": "Your name (or your organization/company/team)", "description": "A short description of the project.", "python_version": "3.11", "open_source_license": ["No license file", "MIT", "BSD-3-Clause"], }Simply add a new line to the JSON file with the name of the variable you want to add and the default value you want it to have.
-
The actual template is located in the
{{ cookiecutter.project_name }}folder.cookiecutterworks by replacing everywhere that it sees{{ cookiecutter.<variable_name> }}with the value of the variable. Therefore, if you want to add a new file to the template, just add it to the{{ cookiecutter.project_name }}folder and make sure to add the{{ cookiecutter.<variable_name> }}where you want the variable to be replaced. -
After you have made the changes you want to the template, you should test it locally. Just run
And it should create a new folder using the default values of the
cookiecutter.jsonfile. -
Finally, make sure to push any changes you made to the template to GitHub, so that you in the future can use it by simply running
-
🧠 Knowledge check
-
Starting completely from scratch, what are the steps needed to create a new GitHub repository and push a specific template to it as the very first commit?
Solution
-
Create a completely barebone repository, either using the GitHub UI or if you have the GitHub CLI installed (not
git) you can run -
Run
cookiecutterwith the template you want to use.The name of the folder created by
cookiecuttershould be the same as theyou just used. -
Run the following sequence of commands.
That's it. The template should now have been pushed to the repository as the first commit.
-
That ends the module on code structure and cookiecutter. We again want to stress the point of using cookiecutter
is not about following one specific template, but instead just to use any template for organizing your code. What often
happens in a team is that multiple templates are needed in different stages of the development phase or for different
product types because they share a common structure, while still having some specifics. Keeping templates up-to-date
then becomes critical such that no team member is using an outdated template. If you ever end up in this situation, we
highly recommend to checkout cruft that works alongside cookiecutter to not only
make projects but also update existing ones as the template evolves. Cruft additionally also has template validation
capabilities to ensure projects match the latest version of a template.