![]()
Data Version Control
Core Module
Warning
Since August 2024, Google has changed their policy for the Google Drive API. This means that the proceduce for setting up DVC with Google Drive has changed. The following exercises therefore need extra authentication to work. You therefore have three options:
-
Skip these exercises for now. We are going to revisit DVC later in the course when we get access to a more permanent storage solution in this module.
-
Follow the instructions below to authenticate DVC with Google Drive. As a starting point read the following GitHub issue and then follow the instructions here. for setting up a custom Google Cloud project.
-
Another alternative is that you can use a local remote storage instead of Google Drive. If you are a DTU student, this could be the DTU HPC system. Assuming you have access to DTU HPC via SSH, you can more or less follow the steps below but instead of adding Google Drive as remote storage, you can add a local remote via SSH.
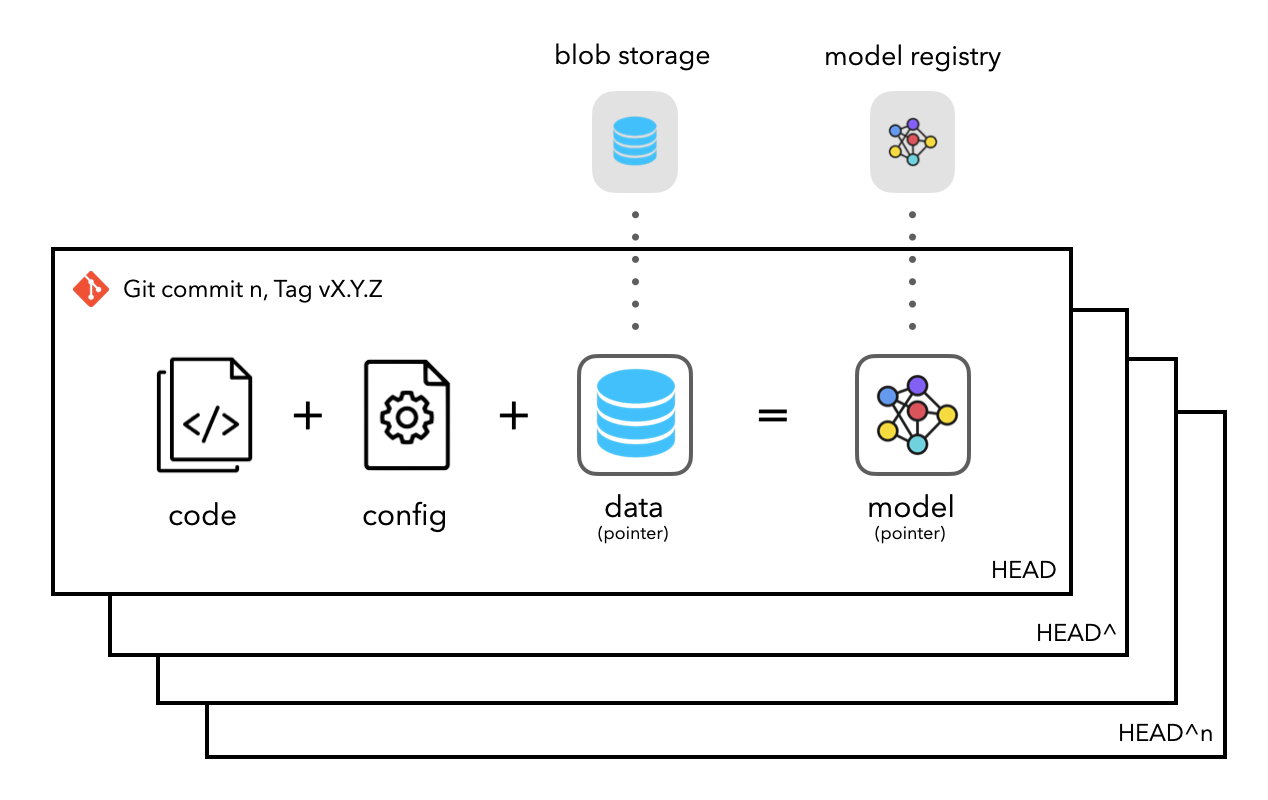
In this module, we are going to return to version control. However, this time we are going to focus on version control of data. The reason we need to separate between standard version control and data version control comes down to one problem: size.
Classic version control was developed to keep track of code files, which are all simple text files. Even a codebase that contains 1000+ files with millions of lines of code can probably be stored in less than a single gigabyte (GB). On the other hand, the size of data can be drastically bigger. As most machine learning algorithms only get better with the more data that you feed them, we are seeing models today that are being trained on petabytes of data (1.000.000 GB).
Because this is an important concept there exist a couple of frameworks that have specialized in versioning data such as DVC, DAGsHub, Hub, Modelstore and ModelDB. Regardless of the framework, they all implement more or less the same concept: instead of storing the actual data files or in general storing any large artifact files, we instead store a pointer to these large flies. We then version control the point instead of the artifact.
We are in this course going to use DVC provided by iterative.ai, as they also provide tools
for automating machine learning, which we are going to focus on later.
DVC: What is it?
DVC (Data Version Control) is simply an extension of git to not only take versioning data but also models and
experiments in general. But how does it deal with these large data files? Essentially, DVC will just keep track of a
small metafile that will then point to some remote location where your original data is stored. Metafiles
essentially work as placeholders for your data files. Your large data files are then stored in some remote location such
as Google Drive or an S3 bucket from Amazon.
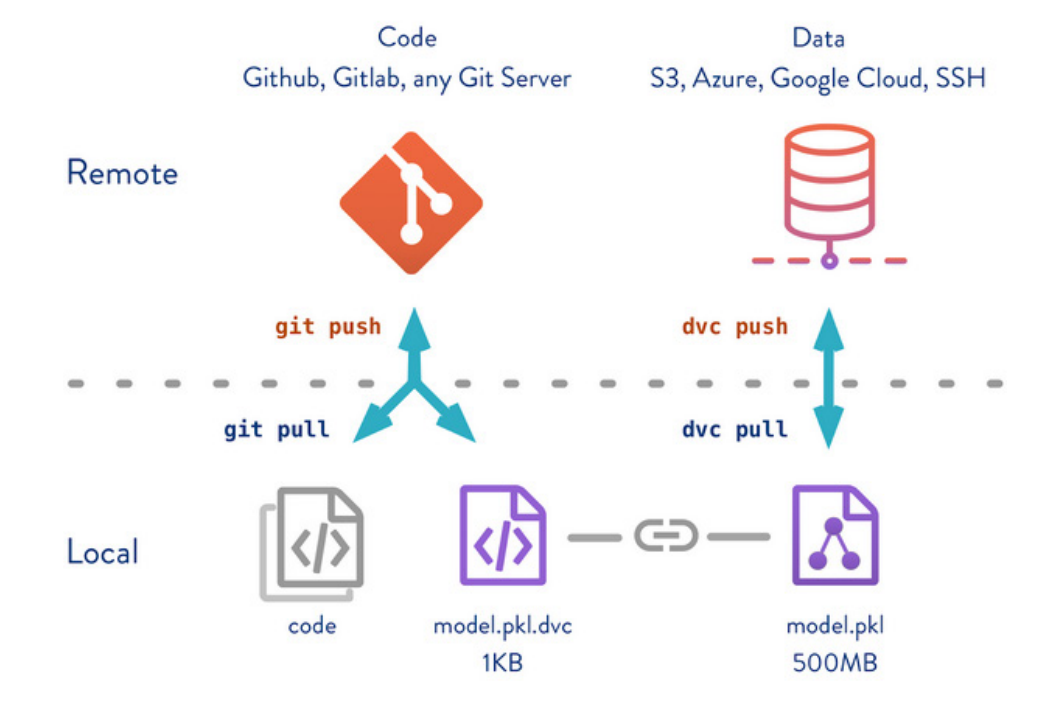
As the figure shows, we now have two remote locations: one for code and one for data. We use git pull/push for the
code and dvc pull/push for the data. The key concept is the connection between the data file model.pkl which is
fairly large and its respective metafile model.pkl.dvc which is very small. The large file is stored in the data
remote and the metafile is stored in the code remote.
❔ Exercises
If in doubt about some exercises, we recommend checking out the documentation for DVC as it contains excellent tutorials.
-
For these exercises, we are going to use Google Drive as a remote storage solution for our data. If you do not already have a Google account, please create one (we are going to use it again in later exercises). Please make sure that you at least have 1 GB of free space.
-
Next, install DVC and the Google Drive extension
If you installed DVC via pip and plan to use cloud services as remote storage, you might need to install these optional dependencies:
[s3],[azure],[gdrive],[gs],[oss],[ssh]. Alternatively, use[all]to include them all. If you encounter that the installation fails, we recommend that you start by updating pip and then trying to updatedvc:If this does not work for you, it is most likely due to a problem with
pygit2and in that case we recommend that you follow the instructions in the pygit2 installation guide. -
In your MNIST repository run the following command from the terminal:
This will set up
dvcfor this repository (similar to howgit initwill initialize a git repository). These files should be committed using standardgitto your repository. -
Go to your Google Drive and create a new folder called
dtu_mlops_data. Then copy the unique identifier belonging to that folder as shown in the figure below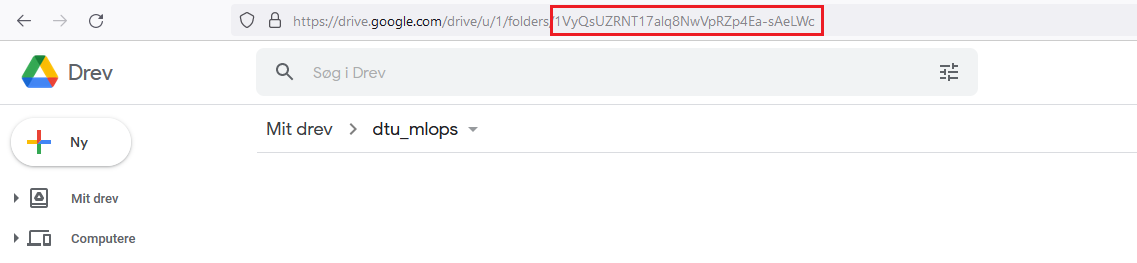
Using this identifier, add it as remote storage.
-
Check the content of the file
.dvc/config. Does it contain a pointer to your remote storage? Afterwards, make sure to add this file to the next commit we are going to make: -
Call the
dvc addcommand on your data files exactly like you would add a file withgit(you do not need to add every file by itself as you can directly add thedata/folder). Doing this should create a human-readable file with the extension.dvc. This is the metafile as explained earlier that will serve as a placeholder for your data. If you are on Windows and this step fails you may need to installpywin32. At the same time, thedatafolder should have been added to the.gitignorefile that marks which files should not be tracked by git. Confirm that this is correct. -
Now we are going to add, commit and tag the metafiles, so we can restore to this stage later on. Commit and tag the files, which should look something like this:
-
Finally, push your data to the remote storage using
dvc push. You will be asked to authenticate, which involves copy-pasting the code in the link prompted. Check out your Google Drive folder. You will see that the data is not in a recognizable format anymore due to the way thatdvcpacks and tracks the data. The boring detail is thatdvcconverts the data into content-addressable storage which makes data much faster to get. Finally, make sure that your data is not stored in your GitHub repository.After authenticating the first time, DVC should be set up without having to authenticate again. If you for some reason encounter that DVC fails to authenticate, you can try to reset the authentication. Locate the file
$CACHE_HOME/pydrive2fs/{gdrive_client_id}/default.json, where$CACHE_HOMEdepends on your operating system:~/Library/Caches~/.cache
This is the typical location, but it may vary depending on what distro you are running{user}/AppData/LocalDelete the complete
{gdrive_client_id}folder and retry authenticating withdvc push. -
After completing the above steps, it is very easy for others (or yourself) to get set up with both code and data by simply running
(assuming that you give them access rights to the folder in your drive). Try doing this (in some other location than your standard code) to make sure that the two commands indeed download both your code and data.
-
Let's now look at the process of creating a new version of our data. We are going to add some new data to our dataset and version control this as well. The new data can be downloaded from this Google Drive folder or by running these two commands:
Copy the data to your
data/rawfolder and then rerun your data pipeline to incorporate the new data into the files in yourprocessedfolder. The new data should be 4 files with train images and 4 files with train targets, a total of 20,000 additional observations. -
Redo the above steps, adding the new data using
dvc, committing and tagging the metafiles e.g. the following commands should be executed (with appropriate input):dvc add -> git add -> git commit -> git tag -> dvc push -> git push. -
Let's say that you wanted to go back to the state of your data in v1.0. If the above steps have been done correctly, you should be able to do this using:
Confirm that you have reverted to the original data.
-
(Optional) Finally, it is important to note that
dvcis not only intended to be used to store data files but also any other large files such as trained model weights (with billions of parameters these can be quite large). For example, if we always store our best-performing model in a file calledbest_model.ckptthen we can usedvcto version control it, store it online and make it easy for others to download. Feel free to experiment with this using your model checkpoints.
In general dvc is a great framework for version-controlling data and models. However, it is important to note that it
does have some performance issues when dealing with datasets that consist of many files. Therefore, if you are ever
working with a dataset that consists of many small files, it can be a
good idea to:
-
Zip files into a single archive and then version control the archive. The
ziparchive should be placed in adata/rawfolder and then unzipped in thedata/processedfolder. -
If possible turn your data into 1D arrays, then it can be stored in a single file such as
.parquetor.csv. This is especially useful for tabular data. Then you can version control the single file instead of the many files.
🧠 Knowledge check
-
How do you know that a repository is using dvc?
Solution
Similar to a git repository having a
.gitdirectory, a repository using dvc needs to have a.dvcfolder. Alternatively you can use thedvc statuscommand. -
Assume you just added a folder called
data/that you want to track withdvc. What is the sequence of 5 commands to successfully version control the folder? (assuming you already set up a remote)
That's all for today. With the combined power of git and dvc we should be able to version control everything in
our development pipeline such that no changes are lost (assuming we commit regularly). It should be noted that dvc
offers more than just data version control, so if you want to deep dive into dvc we recommend their
pipeline feature and how this can be used to set up
version-controlled experiments. Note that we are going to revisit dvc
later for a more permanent (and large-scale) storage solution.