![]()
Docker
Core Module
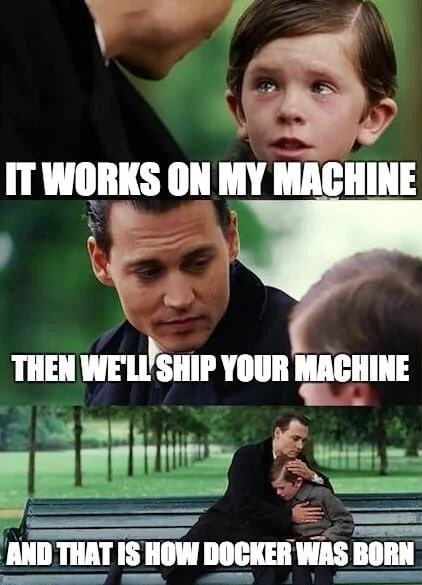
While the above picture may seem silly at first, it is actually pretty close to how Docker
came into existence. A big part of creating an MLOps pipeline is being able to reproduce it. Reproducibility
goes beyond versioning our code with git and using conda environments to keep track of our Python installations.
To truly achieve reproducibility, we need to capture system-level components such as:
- Operating system
- Software dependencies (other than Python packages)
Docker provides this kind of system-level reproducibility by creating isolated program dependencies. In addition to providing reproducibility, one of the key features of Docker is scalability, which is important when we later discuss deployment. Because Docker ensures system-level reproducibility, it does not (conceptually) matter whether we try to start our program on a single machine or on 1,000 machines at once.
Docker Overview
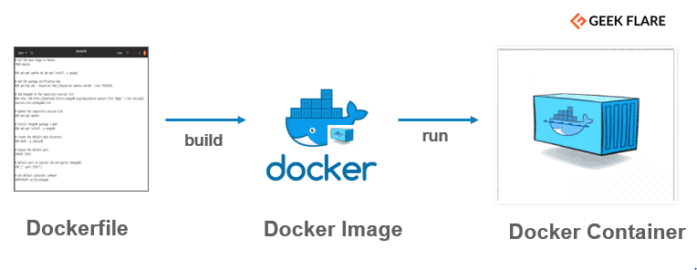
Docker has three main concepts: Dockerfile, Docker image, and Docker container:
-
A Dockerfile is a basic text document that contains all the commands a user could call on the command line to run an application. This includes installing dependencies, pulling data from online storage, setting up code, and specifying commands to run (e.g.,
python train.py). -
Running, or more correctly, building a Dockerfile will create a Docker image. An image is a lightweight, standalone/containerized, executable package of software that includes everything (application code, libraries, tools, dependencies, etc.) necessary to make an application run.
-
Actually running an image will create a Docker container. This means that the same image can be launched multiple times, creating multiple containers.
The exercises today will focus on how to construct the actual Dockerfile, as this is the first step to constructing your own container.
Docker Sharing
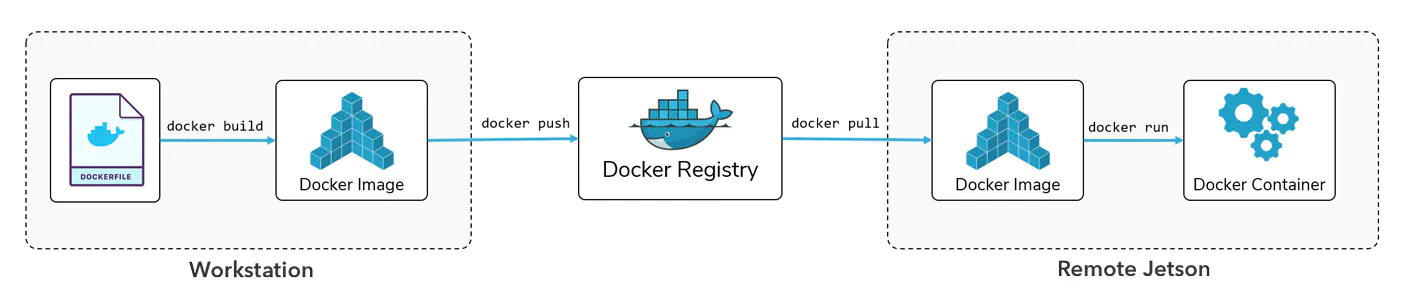
The whole point of using Docker is that sharing applications becomes much easier. In general, we have two options:
-
After creating the
Dockerfile, we can simply commit it to GitHub (it's just a text file) and then ask other users to simply build the image themselves. -
After building the image ourselves, we can choose to upload it to an image registry such as Docker Hub, where others can get our image by simply running
docker pull, allowing them to instantaneously run it as a container, as shown in the figure below:
❔ Exercises
In the following exercises, we guide you on how to build a dockerfile for your MNIST repository that will make the training and prediction a self-contained application. Please make sure that you somewhat understand each step and do not just copy the exercise. Also, note that you probably need to execute the exercise from an elevated terminal, i.e. with administrative privilege.
The exercises today are only an introduction to docker and some of the steps are going to be unoptimized from a production setting view. For example, we often want to keep the size of the docker image as small as possible, which we are not focusing on for these exercises.
If you are using VScode then we recommend installing the
VScode docker extension for easily getting an overview of
which images have been building and which are running. Additionally, the extension named Dev Containers may also be
beneficial for you to download.
-
Start by installing docker. How much trouble you need to go through depends on your operating system. For macOS users, we recommend installing OrbStack, which is a lightweight, fast, and user-friendly alternative to Docker Desktop with a more intuitive GUI. For Windows users, we recommend you install Docker Desktop, which comes with a graphical user interface (GUI) for quickly viewing docker images and docker containers currently built/in use. Windows users that have not installed WSL yet are going to have to do it now (as docker needs it as a backend for starting virtual machines) but you do not need to install docker in WSL. macOS users can also use Docker Desktop* if they prefer. After installing docker we recommend that you restart your laptop.
GUI vs CLI
In this course we are only going to use the command line interface (CLI) of docker. However, feel free to explore the graphical user interface (GUI) if you want.
-
Try running the following to confirm that your installation is working:
which should give the message
-
Next, let's try to download an image from Docker Hub. Download the
busyboximage:which is a very small (1-5Mb) containerized application that contains the most essential GNU file utilities, shell utilities, etc.
-
After pulling the image, write
which should show you all available images. You should see the
busyboximage that we just downloaded. -
Let's try to run this image.
You will see that nothing happens! The reason for that is we did not provide any commands to
docker run. We essentially just ask it to start thebusyboxvirtual machine, do nothing, and then close it again. Now, try again, this time withNote how fast this process is. In just a few seconds, Docker is able to start a virtual machine, execute a command, and kill it afterward.
-
Try running:
What does this command do? What if you add
-ato the end? -
If we want to run multiple commands within the virtual machine, we can start it in interactive mode.
This can be a great way to investigate what the filesystem of our virtual machine looks like.
-
As you may have already noticed by now, each time we execute
docker run, we can still see small remnants of the containers usingdocker ps -a. These stray containers can end up taking up a lot of disk space. To remove them, usedocker rmwhere you provide the container ID that you want to delete.In general we recommend using the
--rmflag when running a container, e.g.which will automatically remove the container after it has finished running.
-
Let's now move on to trying to construct a Dockerfile ourselves for our MNIST project. Create a file called
train.dockerfile. The intention is that we want to develop one Dockerfile for running our training script and one for making predictions. -
Instead of starting from scratch, we nearly always want to start from some base image. For this exercise, we have two options: using a simple
pythonimage or using auv-based image for faster dependency installation: -
Next, we are going to install some essentials in our image. The essentials more or less consist of a Python installation and build tools. These instructions may seem familiar if you are using Linux:
-
The previous two steps are common for any Docker application where you want to run Python. All the remaining steps are application-specific (to some degree):
-
Let's copy over our application (the essential parts) from our computer to the container:
Remember that we only want the essential parts to keep our Docker image as small as possible. Why do we need each of these files/folders to run training in our Docker container?
-
Let's set the working directory in our container and add commands that install the dependencies (1):
-
 We split the installation into two steps so that Docker can cache our project dependencies
separately from our application code. This means that if we change our application code, we do not need to
reinstall all the dependencies. This is a common strategy for Docker images. As an alternative, you can use
We split the installation into two steps so that Docker can cache our project dependencies
separately from our application code. This means that if we change our application code, we do not need to
reinstall all the dependencies. This is a common strategy for Docker images. As an alternative, you can use RUN make requirementsif you have aMakefilethat installs the dependencies. Just remember to also copy over theMakefileinto the Docker image.
-
-
Finally, we are going to name our training script as the entrypoint for our Docker image. The entrypoint is the application that we want to run when the image is executed:
The
"u"here makes sure that any output from our script, e.g., anyprint(...)statements, gets redirected to our terminal. If not included, you would need to usedocker logsto inspect your run.
-
-
We are now ready to build our Dockerfile into a Docker image.
MAC M1/M2 users
In general, Docker images are built for a specific platform. For example, if you are using a Mac with an M1/M2 chip, then you are running on an ARM architecture. If you are using a Windows or Linux machine, then you are running on an AMD64 architecture. This is important to know when building Docker images. Thus, Docker images you build may not work on platforms different than the ones you build on. You can specify which platform you want to build for by adding the
--platformargument to thedocker buildcommand:and also when running the image:
Note that this will significantly increase the build and run time of your Docker image when running locally, because Docker will need to emulate the other platform. In general, for the exercises today, you should not need to specify the platform, but be aware of this if you are building Docker images on your own.
Please note that here we are providing two extra arguments to
docker build. The-f train.dockerfile .(the dot is important to remember) indicates which Dockerfile we want to run (except if you just named itDockerfile) and the-t train:latestis the respective name and tag that we see afterward when runningdocker images(see image below). Please note that building a Docker image can take a couple of minutes.
Docker images and space
Docker images can take up a lot of space on your computer, especially the Docker images we are trying to build because PyTorch is a huge dependency. If you are running low on space, you can try to
Alternatively, you can manually delete images using
docker rm {image_name}:{image_tag}. -
Try running
docker imagesand confirm that you get output similar to the above. If you succeed with this, then try running the docker image.You should hopefully see your training starting. Please note that we can start as many containers as we want at the same time by giving them all different names using the
--nametag.-
You are most likely going to rebuild your Docker image multiple times, either due to an implementation error or the addition of new functionality. Therefore, instead of watching your package manager download
torchfor the 20th time, you can reuse the cache from the last time the Docker image was built. To do this, replace the line in your Dockerfile that installs your requirements with:which mounts your local pip cache to the Docker image.
which mounts your local uv cache to the Docker image, see documentation.
For building the image with cache mounts, you need to have enabled the BuildKit feature. If you have Docker version v23.0 or later (you can check this by running
docker version), then this is enabled by default. Otherwise, you need to enable it by setting the environment variableDOCKER_BUILDKIT=1before building the image.Try changing your Dockerfile and rebuild the image twice e.g. first time running
docker build ...it will still take some time as it needs to fill up the cache. The second time you rundocker build ...you should see that the build process is much faster.
-
-
Remember, if you are ever in doubt about how files are organized inside a Docker image, you always have the option of starting the image in interactive mode:
-
When your training has completed you will notice that any files that are created when running your training script are not present on your laptop (for example if your script is saving the trained model to a file). This is because the files were created inside your container (which is a separate little machine). To get the files you have two options:
-
If you already have a completed run then you can use
to copy the files between your container and laptop. For example to copy a file called
trained_model.ptfrom a folder you would do:Try this out.
-
A much more efficient strategy is to mount a volume that is shared between the host (your laptop) and the container. This can be done with the
-voption for thedocker runcommand. For example, if we want to automatically get thetrained_model.ptfile after running our training script we could simply execute the container asThis command mounts our local
modelsfolder as a correspondingmodelsfolder in the container. Any file saved by the container to this folder will be synchronized back to our host machine. Try this out! Note if you have multiple files/folders that you want to mount (if in doubt about file organization in the container try to do the next exercise first). Also note that the%cd%needs to change depending on your OS, see this page for help.
-
-
With training done we also need to write an application for prediction. Create a new docker image called
evaluate.dockerfile. This file should call yoursrc/<project-name>/evaluate.pyscript instead. This image will need some trained model weights to work. Feel free to either include these during the build process or mount them afterwards. When you create the file try tobuildandrunit to confirm that it works. Hint: if you are passing in the model checkpoint and evaluation data as arguments to your script, yourdocker runprobably needs to look something likedocker run --name evaluate --rm \ -v %cd%/trained_model.pt:/models/trained_model.pt \ # mount trained model file -v %cd%/data/test_images.pt:/test_images.pt \ # mount data we want to evaluate on -v %cd%/data/test_targets.pt:/test_targets.pt \ evaluate:latest \ ../../models/trained_model.pt \ # argument to script, path relative to script location in container -
(Optional, requires GPU support) By default, a virtual machine created by docker only has access to your
cpuand not yourgpu. While you do not necessarily have a laptop with a GPU that supports the training of neural networks (e.g. one from Nvidia) it is beneficial that you understand how to construct a docker image that can take advantage of a GPU if you were to run this on a machine in the future that has a GPU (e.g. in the cloud). It does take a bit more work, but many of the steps will be similar to building a normal docker image.-
There are three prerequisites for working with Nvidia GPU-accelerated docker containers. First, you need to have the Docker Engine installed (already taken care of), have an Nvidia GPU with updated GPU drivers and finally have the Nvidia container toolkit installed. The last part you likely have not installed and need to do. Some distros of Linux have known problems with the installation process, so you may have to search through known issues in nvidia-docker repository to find a solution.
-
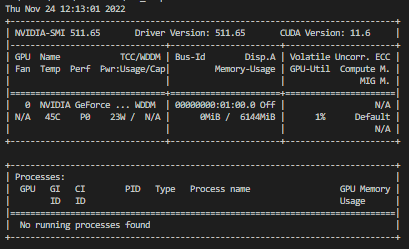
To test that everything is working start by pulling a relevant Nvidia docker image. In my case this is the correct image:
but it may differ based on what Cuda version you have. You can find all the different official Nvidia images on Docker Hub. After pulling the image, try running the
nvidia-smicommand inside a container based on the image you just pulled. It should look something like this:and should show an image like below:
If it does not work, try redoing the steps.
-
We should hopefully have a working setup now for running Nvidia accelerated docker containers. The next step is to get PyTorch inside our container, such that our PyTorch implementation also correctly identifies the GPU. Luckily for us, Nvidia provides a set of docker images for GPU-optimized software for AI, HPC and visualizations through their NGC Catalog. The containers that have to do with PyTorch can be seen in the PyTorch release notes. Try pulling the latest one:
It may take some time because the NGC images include a lot of other software for optimizing PyTorch applications. It may be possible for you to find other images for running GPU-accelerated applications that have a smaller memory footprint, but NGC is the recommended and supported way.
-
Let's test that this container works:
This should run the container in interactive mode attached to your current terminal. Try opening
pythonin the container and try writing:which should hopefully return
True. -
Finally, we need to incorporate all this into our already developed docker files for our application. This is also fairly easy as we just need to change our
FROMstatement at the beginning of our docker file:change to
try doing this to one of your dockerfiles, build the image and run the container. Remember to check that your application is using GPU by printing
torch.cuda.is_available().
-
-
(Optional) Another way you can use Dockerfiles in your day-to-day work is for Dev-containers. Developer containers allow you to develop code directly inside a container, making sure that your code is running in the same environment as it will when deployed. This is especially useful if you are working on a project that has a lot of dependencies that are hard to install on your local machine. Setup instructions for VS Code and PyCharm can be found here (should be simple since we have already installed Docker):
We will focus on the VS Code setup here.
-
First, install the Remote - Containers extension.
-
Create a
.devcontainerfolder in your project root and create aDockerfileinside it. We will keep this file very barebones for now, so let's just define a base installation of Python: -
Create a
devcontainer.jsonfile in the.devcontainerfolder. This file should look something like this:This file tells VS Code that we want to use the
Dockerfilethat we just created and that we want to install our Python dependencies after the container has been created. -
After creating these files, you should be able to open the command palette in VS Code (F1) and search for the option
Remote-Containers: Reopen in ContainerorRemote-Containers: Rebuild and Reopen in Container. Choose either of these options.
This will start a new VS Code instance inside a Docker container. You should be able to see this in the bottom left corner of your VS Code window. You should also be able to see that the Python interpreter has changed to the one inside the container.
You are now ready to start developing inside the container. Try opening a terminal and run
pythonandimport torchto confirm that everything is working.
-
-
(Optional) In M8 on Data version control you learned about the framework
dvcfor version controlling data. A natural question at this point would then be how to incorporatedvcinto our docker image. We need to do two things:- Make sure that
dvchas all the correct files to pull data from our remote storage - Make sure that
dvchas the correct credentials to pull data from our remote storage
We are going to assume that
dvc(and anydvcextension needed) is part of yourrequirements.txtfile and that it is already being installed in aRUN pip install -r requirements.txtcommand in your Dockerfile. If not, then you need to add it.-
Add the following lines to your Dockerfile
The first line initializes
dvcin the Docker image. The--no-scmoption is needed because normallydvccan only be initialized inside a git repository, but this option allows initializingdvcwithout being in one. The second and third lines copy over thedvcconfig file and thedvcmetadata files that are needed to pull data from your remote storage. The last line pulls the data. -
If your data is not public, we need to provide credentials in some way to pull the data. We are for now going to do it in a not-so-secure way. When
dvcfirst connected to your drive, a credential file was created. This file is located in$CACHE_HOME/pydrive2fs/{gdrive_client_id}/default.jsonwhere$CACHE_HOME.~/Library/Caches~/.cache
This is the typical location, but it may vary depending on what distro you are running.{user}/AppData/LocalFind the file. The content should look similar to this (only some fields are shown):
We are going to copy the file into our Docker image. This, of course, is not a secure way of doing it, but it is the easiest way to get started. As long as you are not sharing your Docker image with anyone else, then it is fine. Add the following lines to your Dockerfile before the
RUN dvc pullcommand:COPY <path_to_default.json> default.json dvc remote modify myremote --local gdrive_service_account_json_file_path default.jsonwhere
<path_to_default.json>is the path to thedefault.jsonfile that you just found. The last line tellsdvcto use thedefault.jsonfile as the credentials for pulling data from your remote storage. You can confirm that this works by runningdvc pullin your Docker image.
- Make sure that
🧠 Knowledge check
-
What is the difference between a docker image and a docker container?
Solution
A Docker image is a template for a Docker container. A Docker container is a running instance of a Docker image. A Docker image is a static file, while a Docker container is a running process.
-
What are the 3 steps involved in containerizing an application?
Solution
- Write a Dockerfile that includes your app (including the commands to run it) and its dependencies.
- Build the image using the Dockerfile you wrote.
- Run the container using the image you've built.
-
What advantage is there to running your application inside a Docker container instead of running the application directly on your machine?
Solution
Running inside a Docker container gives you a consistent and independent environment for your application. This means that you can be sure that your application will run the same way on your machine as it will on another machine. Thus, Docker gives the ability to abstract away the differences between different machines.
-
A Docker container is built from a series of layers that are stacked on top of each other. This should be clear if you look at the output when building a Docker image. What is the advantage of this?
Solution
The advantage is efficiency and reusability. When a change is made to a Docker image, only the layer(s) that are changed need to be updated. For example, if you update the application code in your Docker image, which usually is the last layer, then only that layer needs to be rebuilt, making the process much faster. Additionally, if you have multiple Docker images that share the same base image, then the base image only needs to be downloaded once.
This covers the absolute minimum you should know about Docker to get a working image and container. If you want to really deep dive into this topic, you can find a copy of the Docker Cookbook by Sébastien Goasguen in the literature folder.
If you are actively going to be using Docker in the future, one thing to consider is the image size. Even these simple images that we have built still take up GB in size. Several optimization steps can be taken to reduce the image size for you or your end user. If you have time, you can read this article on different approaches to reducing image size. Additionally, you can take a look at the dive-in extension for Docker Desktop that lets you explore your Docker images in depth.