![]()
![]()
Using the cloud
Core Module
Interface changes
The Google Cloud Platform (GCP) interface is constantly changing. Therefore, some of the screenshots and instructions in this module may be slightly outdated. However, the overall concepts and steps should still be applicable. If you are ever in doubt about how to do something in GCP, I recommend checking out the official GCP documentation.
In this set of exercises, we are going to get more familiar with using some of the resources that GCP offers.
Compute
The most basic service of any cloud provider is the ability to create and run virtual machines. In GCP this service is called Compute Engine API. A virtual machine allows you to essentially run an operating system that behaves like a completely separate computer. There are many reasons for using virtual machines:
-
Virtual machines allow you to scale your operations, essentially giving you access to infinitely many individual computers.
-
Virtual machines allow you to use large-scale hardware. For example, if you are developing a deep learning model on your laptop and want to know the inference time for a specific hardware configuration, you can just create a virtual machine with those specs and run your model.
-
Virtual machines allow you to run processes in the "background". If you want to train a model for a week or more, you do not want to do this on your laptop as you cannot move it or do anything with it while it is training. Virtual machines allow you to just launch a job and forget about it (at least until you run out of credit).
❔ Exercises
We are now going to start using the cloud.
-
Click on the
Compute Enginetab in the sidebar on the homepage of GCP. -
Click the
Create Instancebutton. You will see the following image below.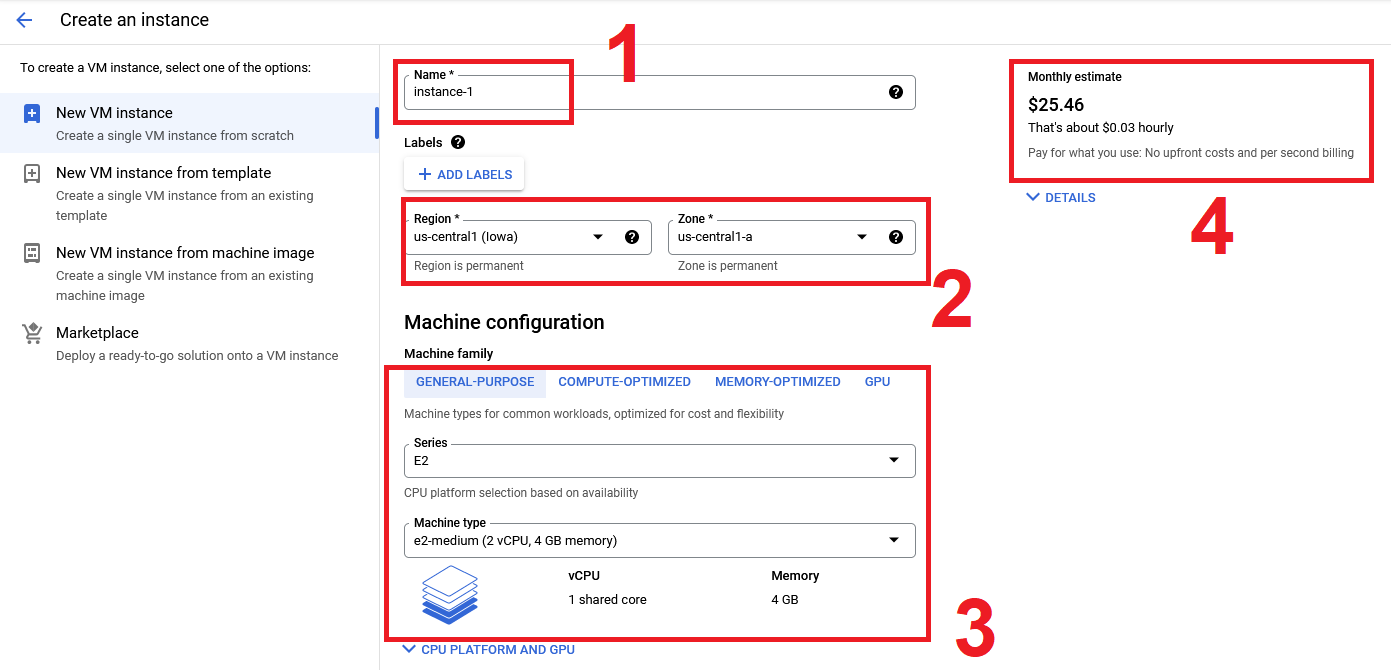
Give the virtual machine a meaningful name, and set the location to some location that is closer to where you are (to reduce latency, we recommend
europe-west-1). Finally, try to adjust the configuration a bit. Can you find at least two settings that alter the price of the virtual machine?Solution
In general, the price of a virtual machine is determined by the class of hardware attached to it. Higher class CPUs and GPUs mean higher prices. Additionally, the amount of memory and disk space also affects the price. Finally, the location of the virtual machine also affects the price.
-
After figuring this out, create a
e2-mediuminstance (leave the rest configured as default). Before clicking theCreatebutton make sure to check theEquivalent codebutton. You should see a very long command that you could have typed in the terminal that would create a VM similar to configuring it through the UI. -
After creating the virtual machine, in a local terminal type:
You should hopefully see the instance you have just created.
-
You can start a terminal directly by typing:
You can always see the exact command that you need to run to
sshinto a VM by selecting theView gcloud commandoption in the Compute Engine overview (see image below).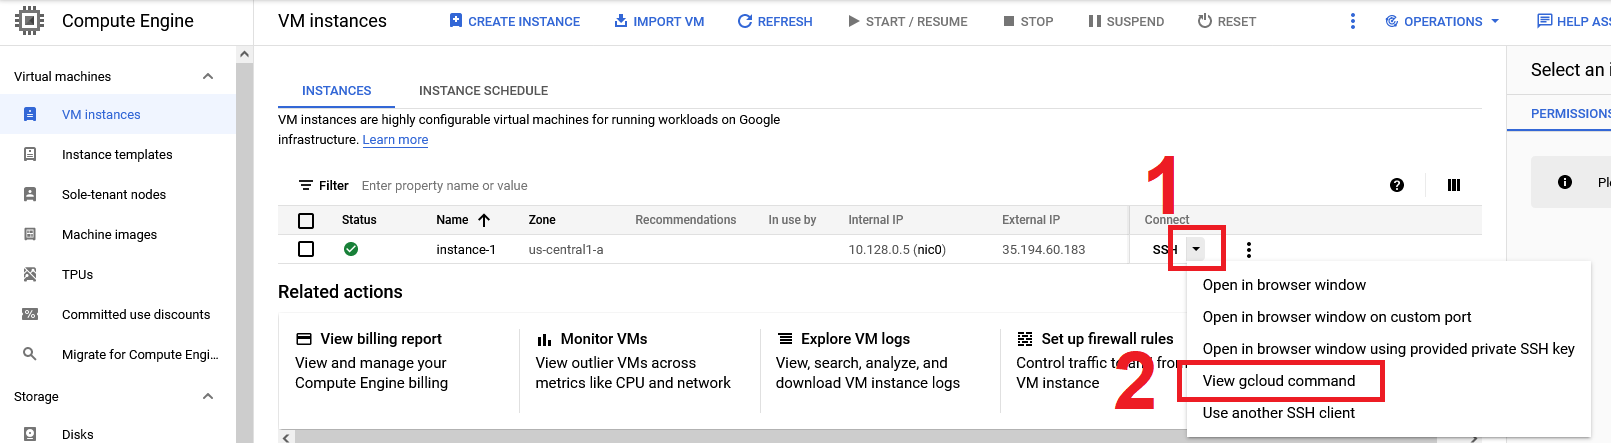
-
While logged into the instance, check if Python and PyTorch are installed. You should see that neither is installed. The VM we have only specified what compute resources it should have, and not what software should be in it. We can fix this by starting VMs based on specific docker images (it's all coming together).
-
GCP comes with several ready-to-go images for doing deep learning. More info can be found in the deep learning containers guide. Try, running this line:
What does the output show?
Solution
The output should show a list of images that are available for you to use. The images are essentially docker images that contain a specific software stack. The software stack is often a specific version of Python, PyTorch, TensorFlow, etc. The images are maintained by Google and are updated regularly.
-
Next, start (in the terminal) a new instance using a PyTorch image. The command for doing it should look something like this:
gcloud compute instances create <instance_name> \
    --zone=<zone> \
    --image-family=<image-family> \
    --image-project=deeplearning-platform-release \
    # add these arguments if you want to run on GPU and have the quota to do so
    --accelerator="type=nvidia-tesla-V100,count=1" \
    --maintenance-policy TERMINATE \
    --metadata="install-nvidia-driver=True" \
You can find more info in the PyTorch VM instance guide on what
<image-family>should be and what extra argument you need to add if you want to run on GPU (if you have access).Solution
The command should look something like this:
GPU notes (resource availability and drivers)
GPU quotas and availability vary by region/zone, so you may need to try multiple combinations. You can check GPU availability per region/zone in the GCP GPU regions/zones guide. If
--metadata="install-nvidia-driver=True"does not install a working driver, install it manually after the VM boots:sudo apt-get update sudo apt-get install -y build-essential dkms linux-headers-$(uname -r) sudo apt-get install -y ubuntu-drivers-common sudo ubuntu-drivers devices sudo ubuntu-drivers install sudo rebootThen verify:
nvidia-smi
python3 -c "import torch; \
print('torch:', torch.__version__); \
print('torch.version.cuda:', torch.version.cuda); \
print('cuda available:', torch.cuda.is_available())"
A tested combination (Jan 2026) uses a V100 GPU:
gcloud compute instances create "<instance_name>" \
    --zone="europe-west4-a" \
    --machine-type=n1-standard-8 \
    --image="pytorch-2-7-cu128-ubuntu-2204-nvidia-570-v20260108" \
    --image-project=deeplearning-platform-release \
    --maintenance-policy=TERMINATE \
    --accelerator=type=nvidia-tesla-v100,count=1 \
    --metadata=install-nvidia-driver=True \
    --boot-disk-size=200GB
Note: older GPUs like P100 can report "cuda capability too old" with recent PyTorch. If GPU setup is blocked by quotas or availability, continue the exercises on CPU.
-
sshinto the VM as in one of the previous exercises. Confirm that the container indeed contains both a Python installation and PyTorch is also installed. Hint: you also have the possibility through the web page to start a browser session directly to the VMs you create: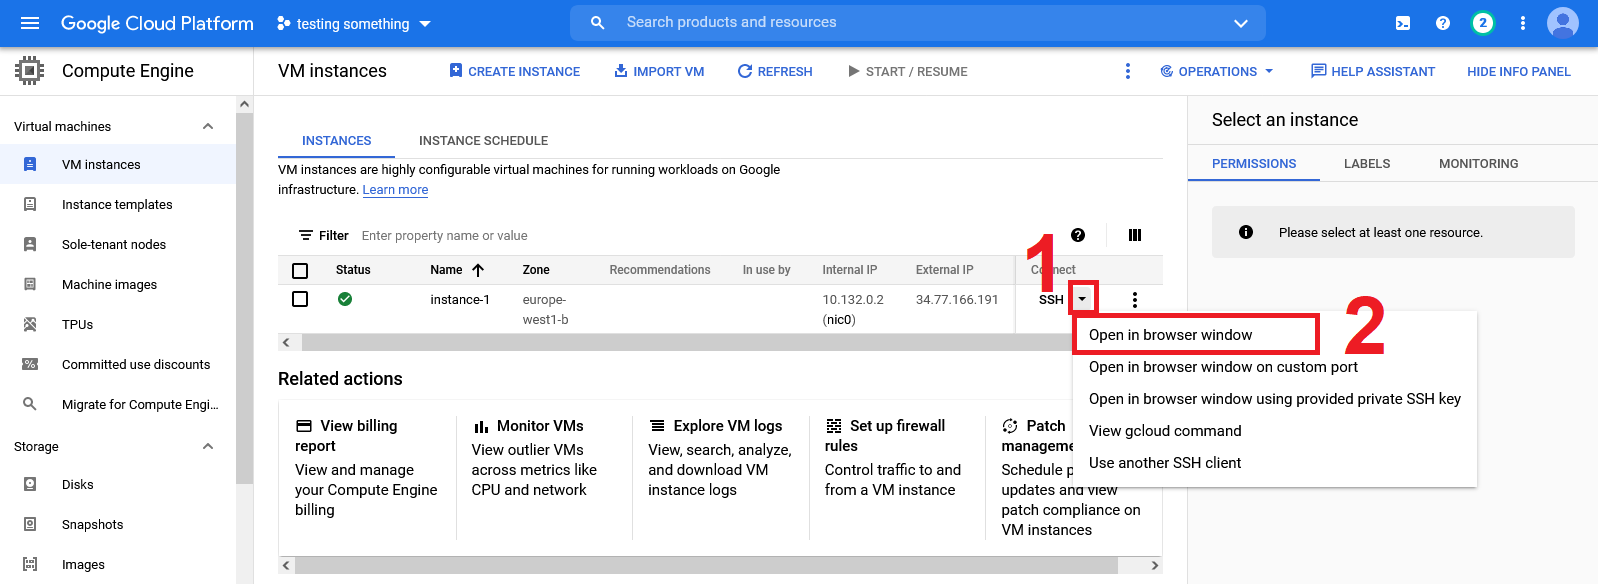
-
-
Everything that you have done locally can also be achieved through the web terminal, which of course comes pre-installed with the
gcloudcommand etc.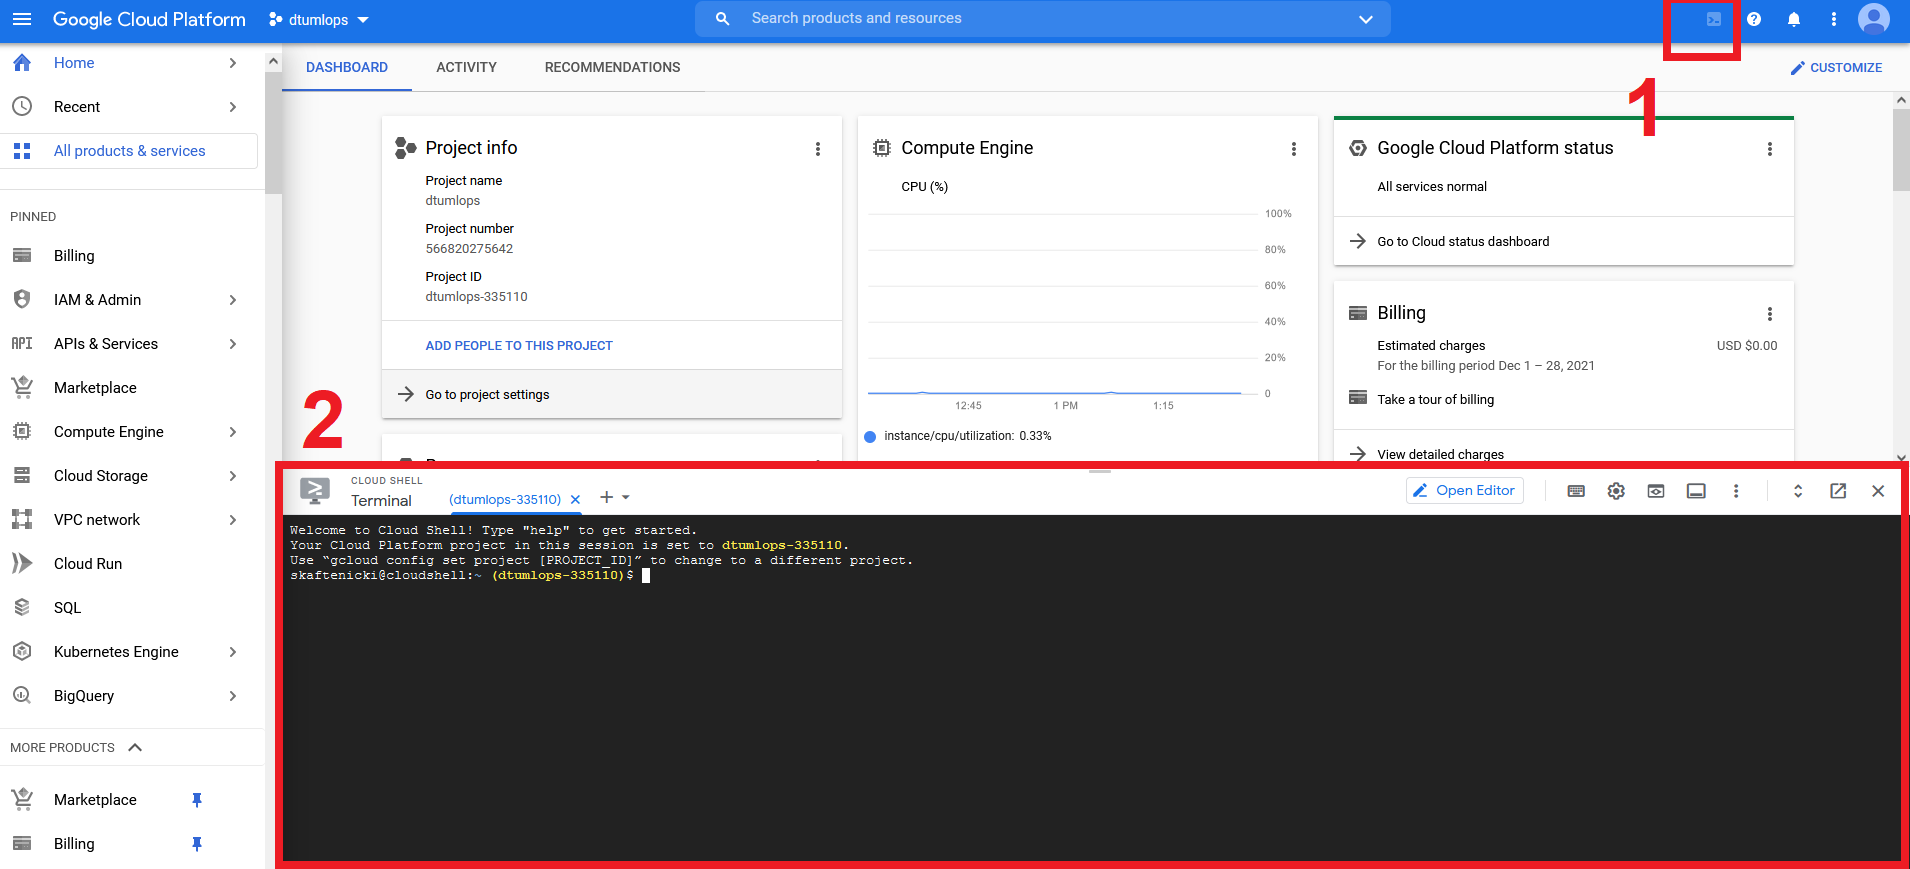
Try launching this and run some of the commands from the previous exercises.
-
Finally, we want to make sure that we do not forget to stop our VMs. VMs are charged by the minute, so even if you are not using them you are still paying for them. Therefore, you must remember to stop your VMs when you are not using them. You can do this by either clicking the
Stopbutton on the VM overview page or by running the following command:
Data storage
Another big part of cloud computing is the storage of data. There are many reasons that you want to store your data in the cloud including:
- Easily being able to share
- Easily expand as you need more
- Data is stored in multiple locations, making sure that it is not lost in case of an emergency
Cloud storage is luckily also very cheap. Google Cloud only takes around $0.026 per GB per month. This means that around 1 TB of data would cost you $26 which is more than what the same amount of data would cost on Google Drive, but the storage in Google Cloud is much more focused on enterprise usage such that you can access the data through code.
❔ Exercises
When we did the exercise on data version control, we made dvc work together with our own Google Drive to store data.
However, a big limitation of this is that we need to authenticate each time we try to either push or pull the data. The
reason is that we need to use an API instead which is offered through GCP.
We are going to follow the instructions from this page
-
Let's start by creating data storage. On the GCP start page, in the sidebar, click on
Cloud Storage. On the next page clickCreate bucket: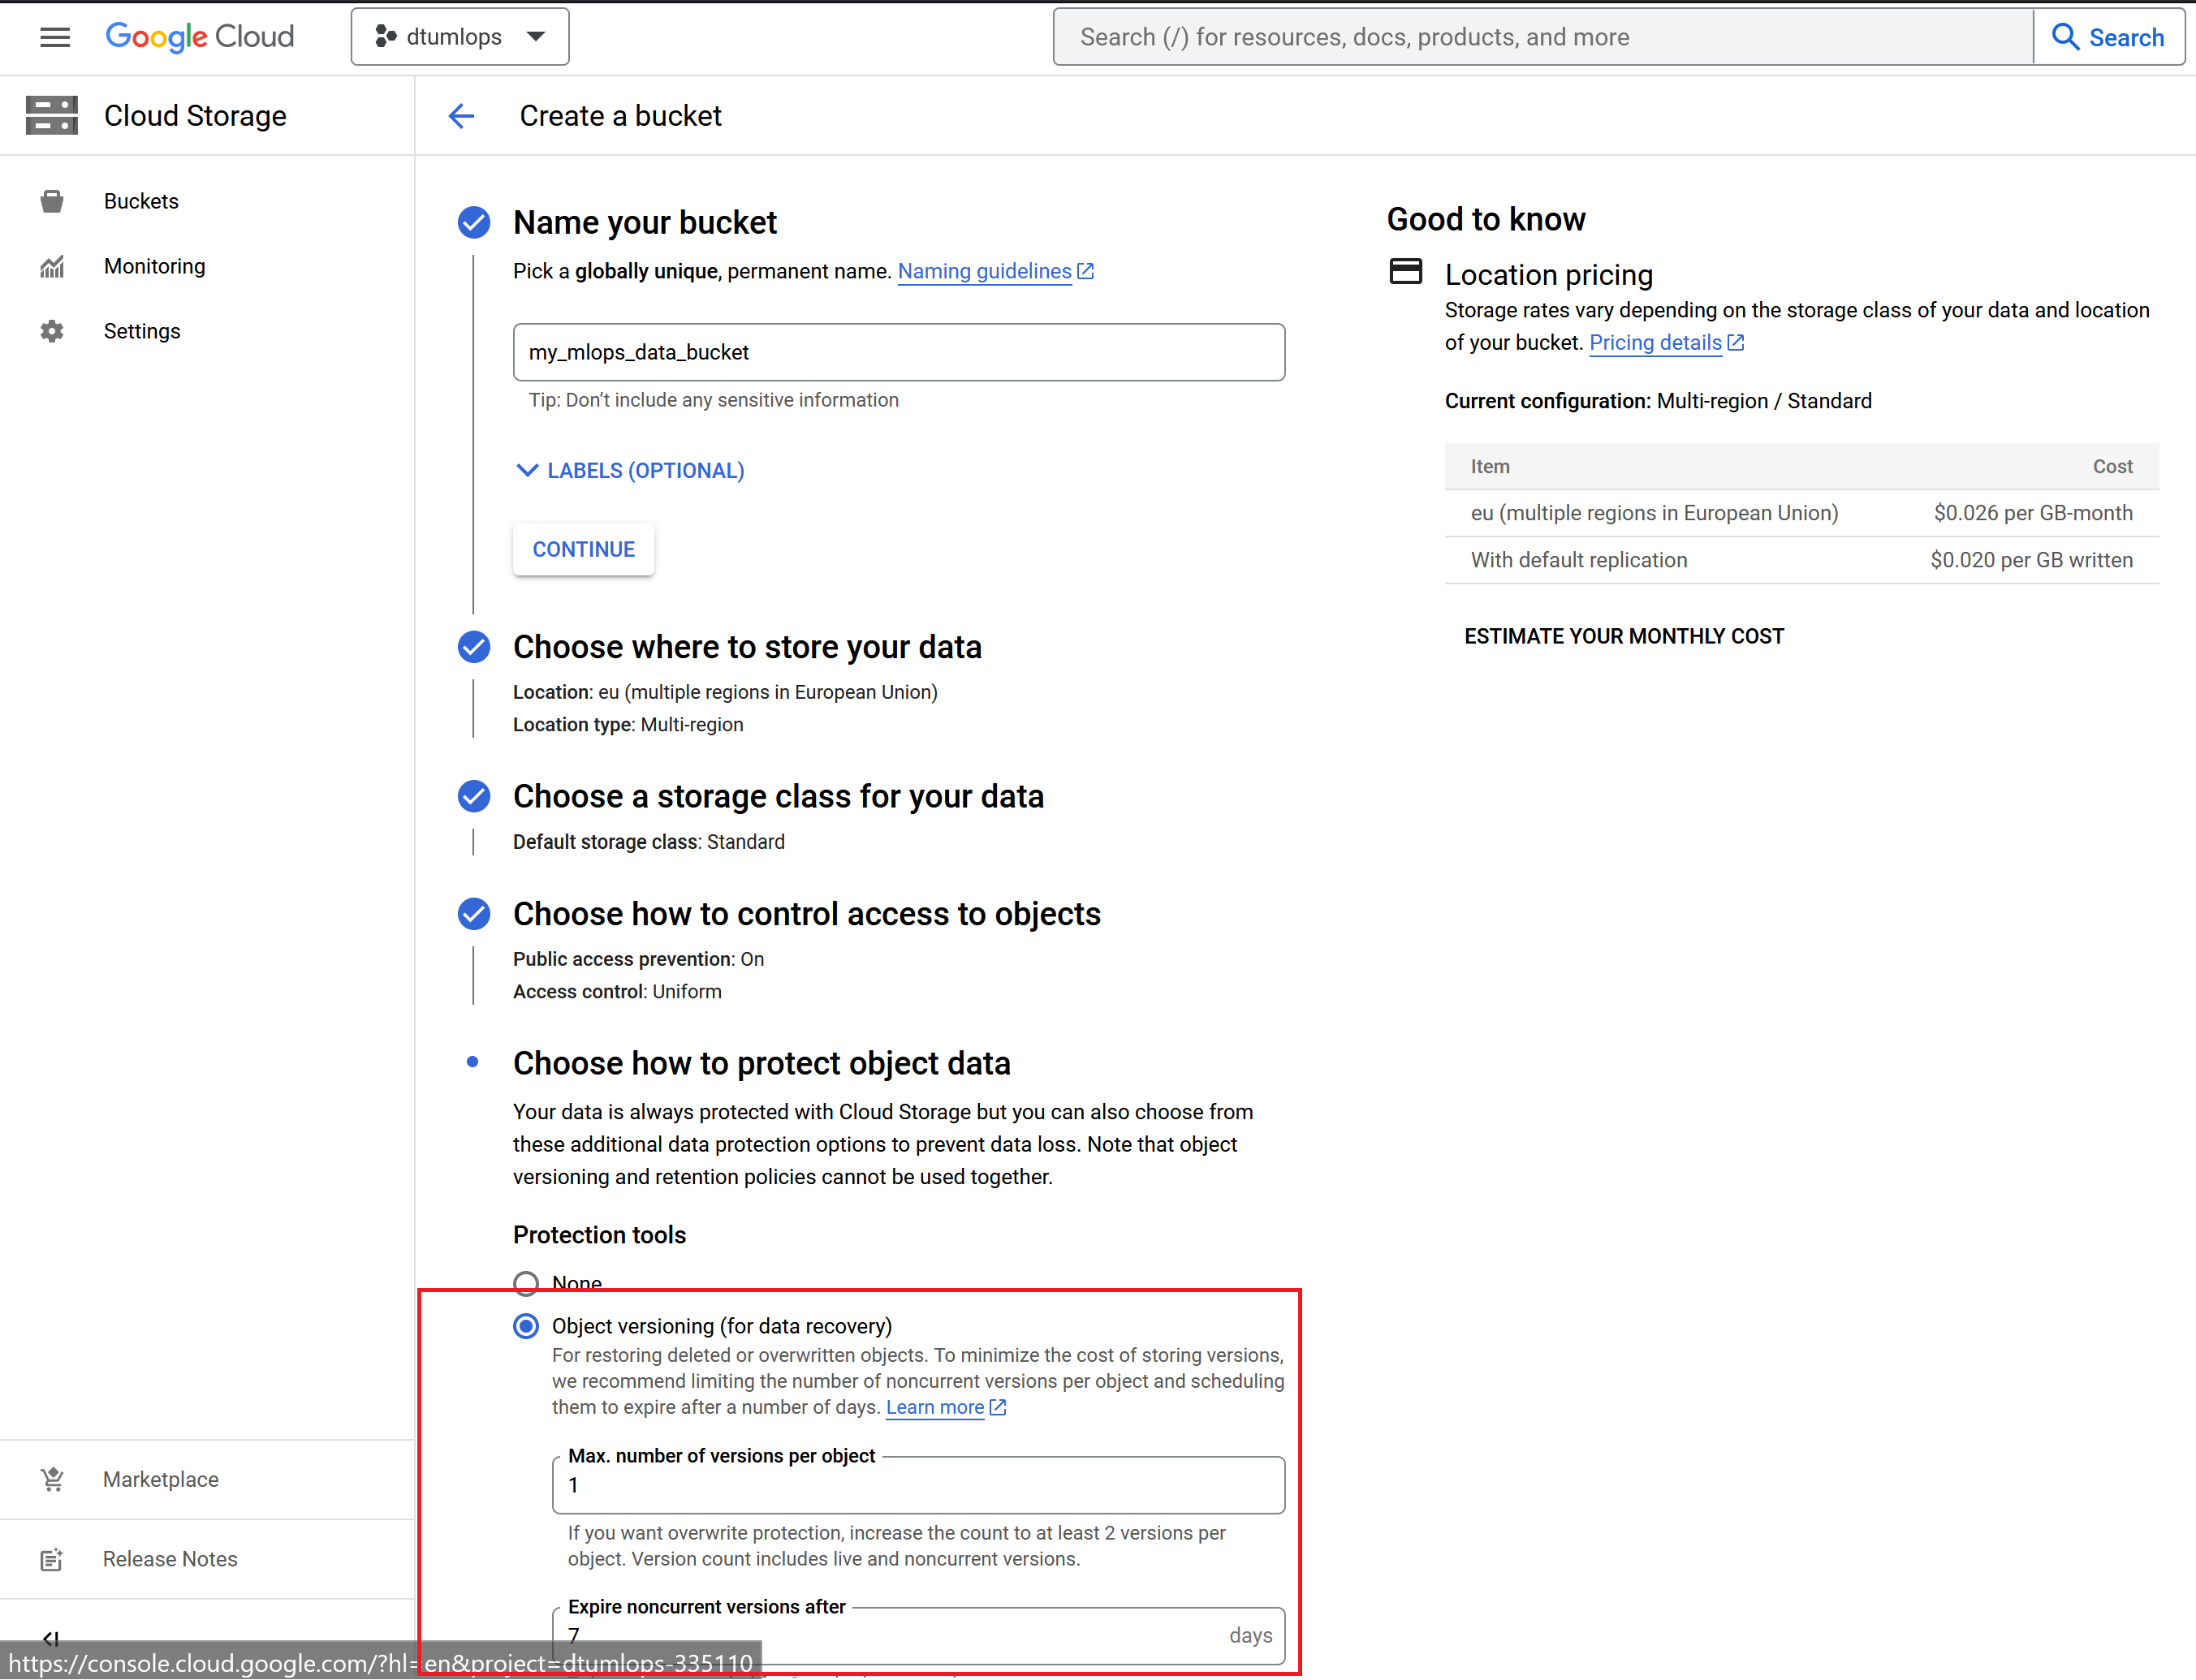
Give the bucket a unique name, set it to a region close by and importantly remember to enable Object versioning under the last tab. Finally, click
Create. -
After creating the storage, you should be able to see it online and you should be able to see it if you type in your local terminal:
gsutil is a command line tool that allows you to create, upload, download, list, move, rename and delete objects in cloud storage. For example, you can upload a file to cloud storage by running:
-
Next, we need the Google storage extension for
dvc. -
Now in your corrupt MNIST repository where you have already configured
dvc, we are going to change the storage from our Google Drive to our newly created Google Cloud storage.In addition, we are also going to modify the remote to support object versioning (called
version_awareindvc):This will change the default way that
dvchandles data. Instead of just storing the latest version of the data as content-addressable storage, it will now store the data as it looks in our local repository, which allows us to not only usedvcto download our data. -
The above command will change the
.dvc/configfile.git addandgit committhe changes to that file. Finally, push data to the cloud. The
The --no-run-cacheflag is used to avoid pushing the cache file to the cloud, which is not supported by the Google Cloud storage.
-
Finally, make sure that you can pull without having to give your credentials. The easiest way to see this is to delete the
.dvc/cachefolder that should be on your laptop and afterward do a
This setup should work when trying to access the data from your laptop, which we authenticated in the previous module. However, how can you access the data from a virtual machine, inside a docker container or from a different laptop? We in general recommend two ways:
-
You can make the bucket publicly accessible, i.e. no authentication is needed. That means that anyone with the URL to the data can access it. This is the easiest way to do it, but also the least secure. You can read more about how to make your buckets public in the making data public guide.
-
You can use the service account that you created in the previous module to authenticate the VM. This is the most secure way to do it, but also the most complicated. You first need to give the service account the correct permissions. Then you need to authenticate using the service account. In
dvcthis is done by setting the environment variableGOOGLE_APPLICATION_CREDENTIALSto the path of
Artifact registry
You should hopefully at this point have seen the strength of using containers to create reproducible environments. They allow us to specify exactly the software that we want to run inside our VMs. However, you should already have run into two problems with containers
- The building process can take a lot of time
- Docker images can be large
For this reason, we want to move both the building process and the storage of images to the cloud. In GCP the two services that we are going to use for this are called Cloud Build for building the containers in the cloud and Artifact registry for storing the images afterward.
❔ Exercises
In these exercises, I recommend that you start with a dummy version of some code to make sure that the building process
does not take too long. Below is a simple Python script that does image classification using Sklearn, together with
the corresponding requirements.txt file and Dockerfile.
Python script
requirements.txt
| requirements.txt | |
|---|---|
Dockerfile
The docker images for this application are therefore going to be substantially faster to build and smaller in size than the images we are used to that use PyTorch.
-
Start by enabling the services
Google Artifact Registry APIandGoogle Cloud Build API. This can be done through the website (by searching for the services) or can also be enabled from the terminal: -
The first step is creating an artifact repository in the cloud. You can either do this through the UI or by using
gcloudin the command line.Find the
Artifact Registryservice (search for it in the search bar) and click on it. From there click on theCreate repositorybutton. You should see the following page: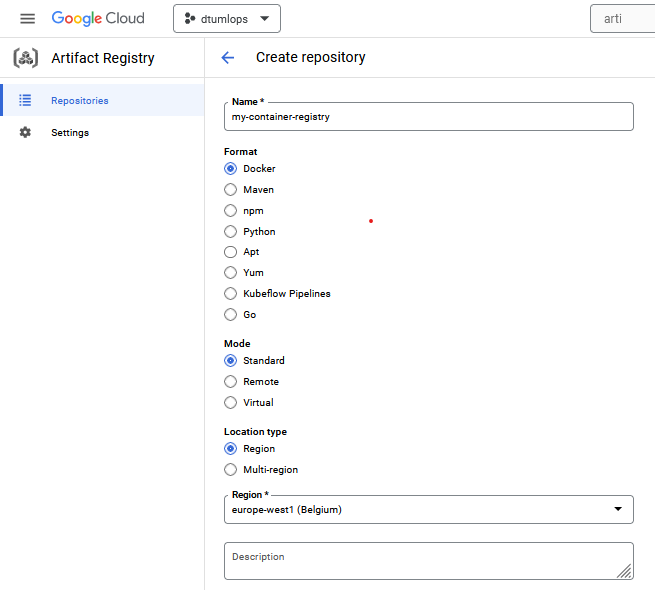
Give the repository a name, make sure to set the format to
Dockerand specify the region. At the bottom of the page you can optionally add a cleanup policy. We recommend that you add one to keep costs down. Give the policy a name choose theKeep most recent versionsoption and set the keep count to5. ClickCreateand you should now see the repository in the list of repositories.gcloud artifacts repositories create <registry-name> \ --repository-format=docker \ --location=europe-west1 \ --description="My docker registry"where you need to replace
<registry-name>with a name of your choice. You can read more about the command here. We recommend that after creating the repository you update it with a cleanup policy to keep costs down. You can do this by running:gcloud artifacts repositories set-cleanup-policies REPOSITORY --project=<project-id> --location=<region> --policy=policy.yamlwhere the
policy.yamlfile should look something like this:and you can read more about the command here.[ { "name": "keep-minimum-versions", "action": {"type": "Keep"}, "mostRecentVersions": { "keepCount": 5 } } ]Whenever we in the future want to push or pull to this artifact repository we can refer to it using this URL:
for example,
europe-west1-docker.pkg.dev/dtumlops-335110/container-registrywould be a valid URL (this is the one I created). -
We are now ready to build our containers in the cloud. In principle, GCP cloud build works out of the box with docker files. However, the recommended way is to add specialized
cloudbuild.yamlfiles. You can think of thecloudbuild.yamlfile as the corresponding file in GCP as workflow files are in GitHub actions, which you learned about in module M16. It is essentially a file that specifies a list of steps that should be executed to do something, but the syntax is different.Look at the documentation on how to write a
cloudbuild.yamlfile for building and pushing a docker image to the artifact registry. Try to implement such a file in your repository.Solution
For building docker images the syntax is as follows:
steps:
- name: 'gcr.io/cloud-builders/docker'
  id: 'Build container image'
  args: [
    'build',
    '.',
    '-t',
    'europe-west1-docker.pkg.dev/$PROJECT_ID/<registry-name>/<image-name>',
    '-f',
    '<path-to-dockerfile>'
  ]
- name: 'gcr.io/cloud-builders/docker'
  id: 'Push container image'
  args: [
    'push',
    'europe-west1-docker.pkg.dev/$PROJECT_ID/<registry-name>/<image-name>'
  ]
options:
  logging: CLOUD_LOGGING_ONLY
where you need to replace
<registry-name>,<image-name>and<path-to-dockerfile>with your own values. You can hopefully recognize the syntax from the docker exercises. In this example, we are calling thecloud-builders/dockerservice with both thebuildandpusharguments. -
You can now try to trigger the
cloudbuild.yamlfile from your local machine. Whatgcloudcommand would you use to do this?Solution
You can trigger a build by running the following command:
This command will submit a build to the cloud build service using the configuration file
cloudbuild.yamlin the current directory. The.specifies that the build context is the current directory. The build context is all the files that are uploaded to the cloud build service, thus if your Dockerfile hasCOPYcommands that copy files from the local directory to the container, these files need to be in the build context. Do note that by default all files in your.gitignorefile are excluded from the build context, but you can override this by using the--ignore-fileflag, which you can read more about here. -
Instead of relying on manually submitting builds, we can setup the build process as continuous integration such that it is triggered every time we push code to the repository. This is done by setting up a trigger in the GCP console. From the GCP homepage, navigate to the triggers panel:
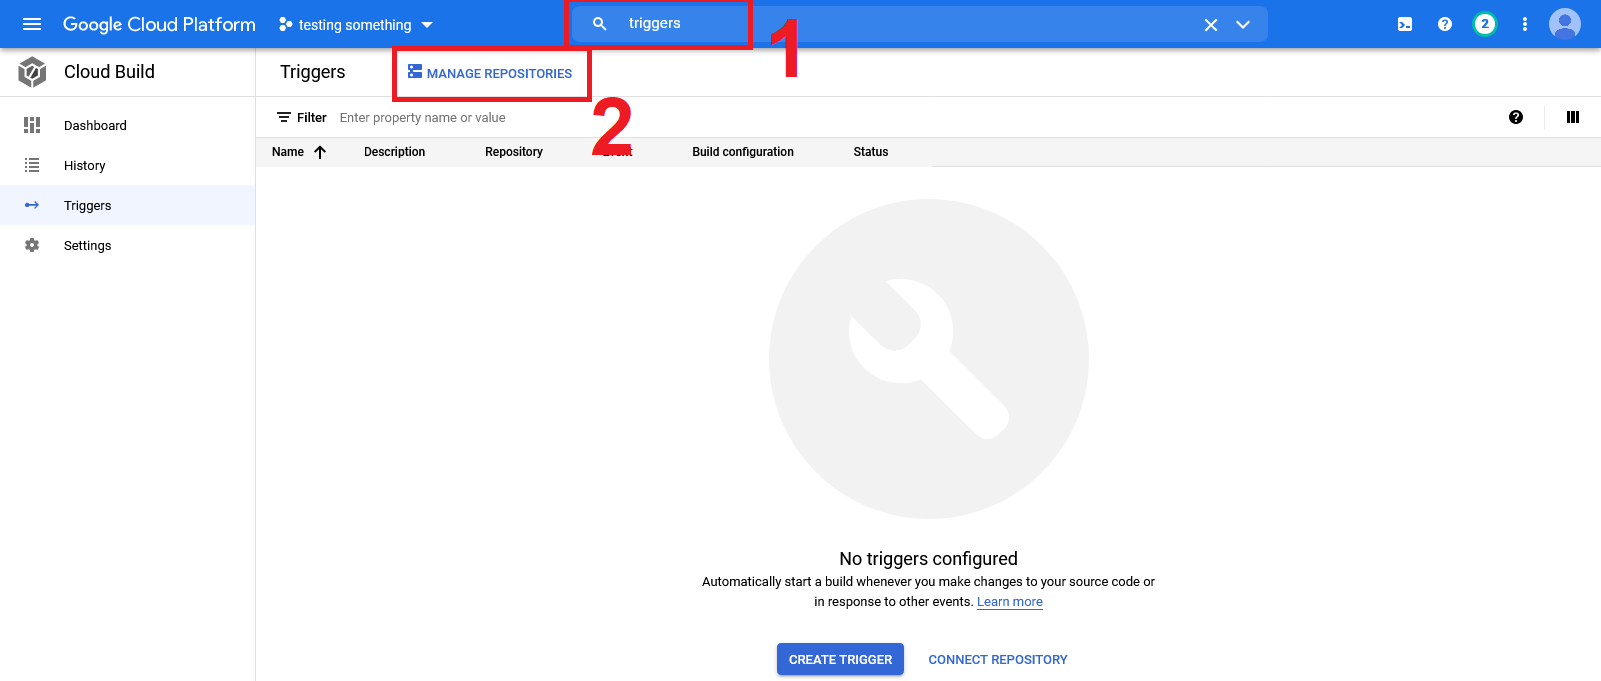
Click on manage repositories.
-
From there, click
Connect Repositoryand go through the steps of authenticating your GitHub profile with GCP and choose the repository that you want to set up build triggers for. For now, skip theCreate a trigger (optional)part by pressingDoneat the end.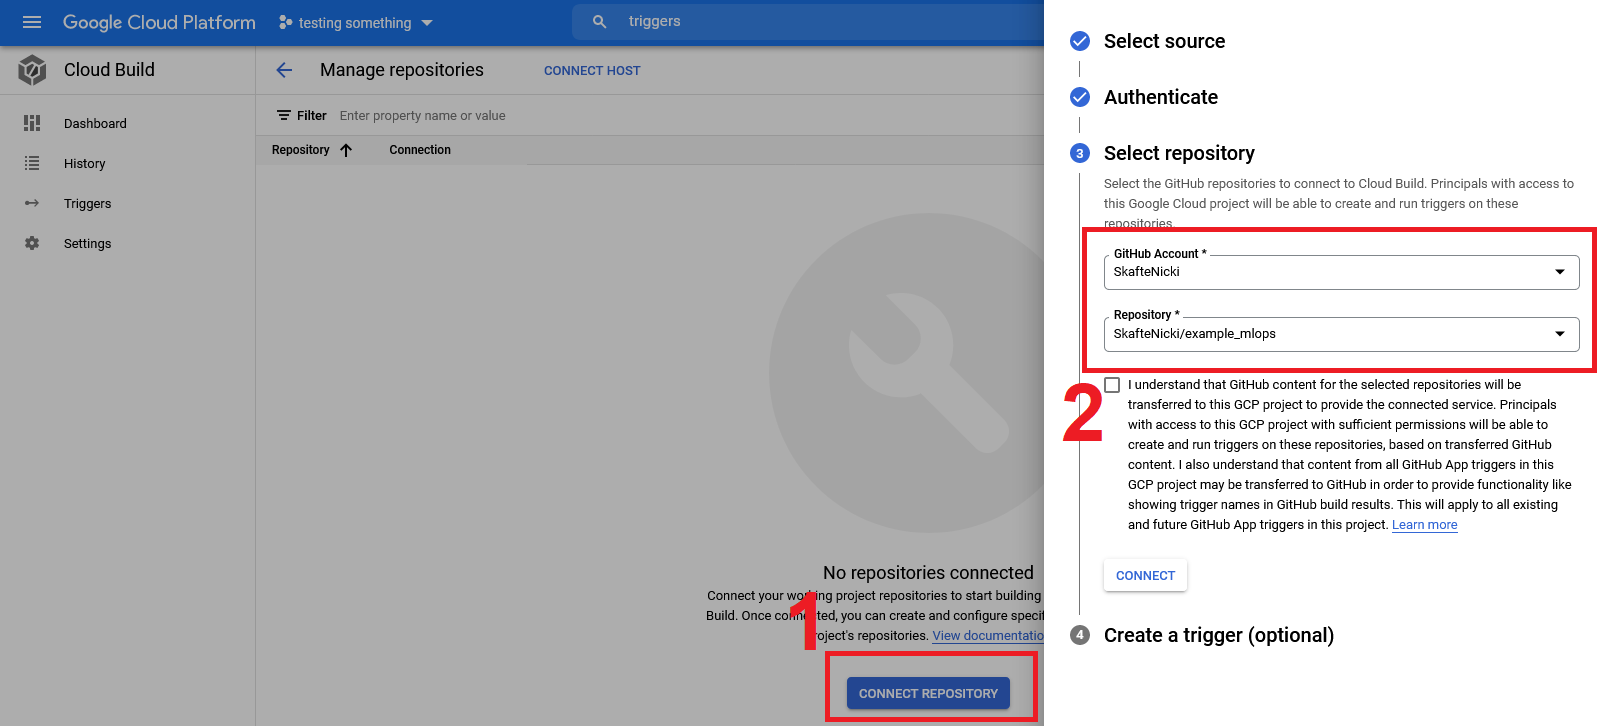
-
Navigate back to the
Triggershomepage and clickCreate trigger. Set the following:- Give a name
- Event: choose
Push to branch - Source: choose the repository you just connected
- Branch: choose
^main$ - Configuration: choose either
AutodetectedorCloud build configuration file
Finally, click the
Createbutton and the trigger should show up on the triggers page. -
To activate the trigger, push some code to the chosen repository.
-
Go to the
Cloud Buildpage and you should see the image being built and pushed.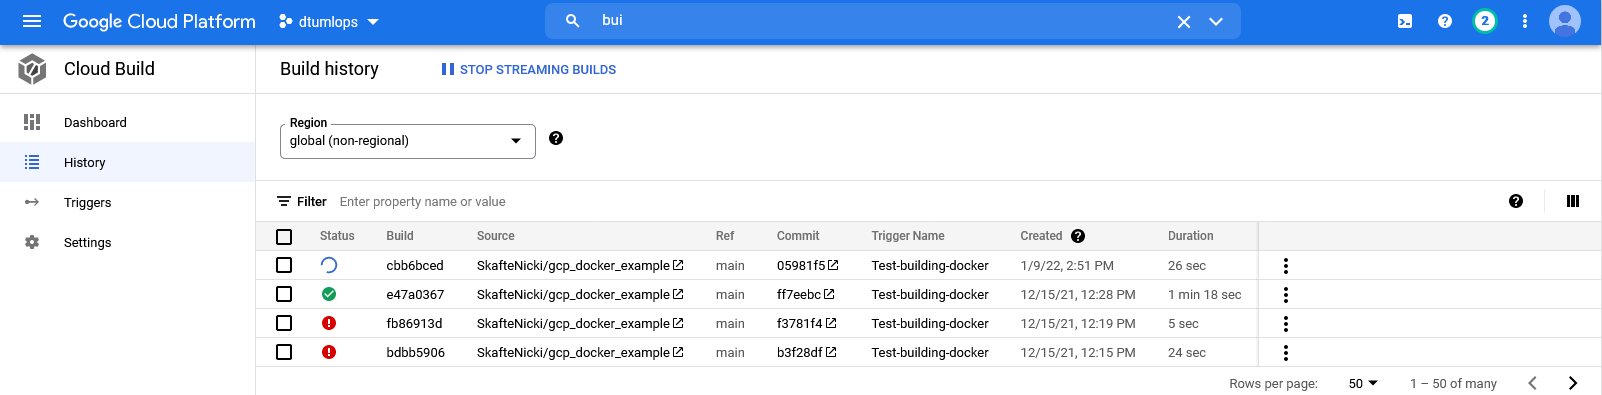
Try clicking on the build to check out the build process and build summary. As you can see from the image, if a build is failing you will often find valuable info by looking at the build summary. If your build is failing try to configure it to run in one of these regions:
us-central1, us-west2, europe-west1, asia-east1, australia-southeast1, southamerica-east1as specified in the documentation. -
If/when your build is successful, navigate to the
Artifact Registrypage. You should hopefully find that the image you just built was pushed here. Congrats!
-
-
Make sure that you can pull your image down to your laptop
you will need to authenticate
dockerwith GCP first. Instructions can be found in the docker auth guide, but the following command should hopefully be enough to makedockerand GCP talk to each other:where you need to replace
<region>with the region you are using. Do note you need to havedockeractively running in the background, just like any other time you want to usedocker. -
Automatization through the cloud is in general the way to go, but sometimes you may want to manually create images and push them to the registry. Figure out how to push an image to your
Artifact Registry. For simplicity, you can just push thebusyboximage you downloaded during the initial docker exercises. This page should help you with the exercise.Solution
Pushing to a repository is similar to pulling. Assuming that you have already built an image called
busyboxyou can push it to the repository by running:docker tag busybox <region>-docker.pkg.dev/<project-id>/<registry-name>/busybox:latest docker push <region>-docker.pkg.dev/<project-id>/<registry-name>/busybox:latestwhere you need to replace
<region>,<project-id>and<registry-name>with your own values. -
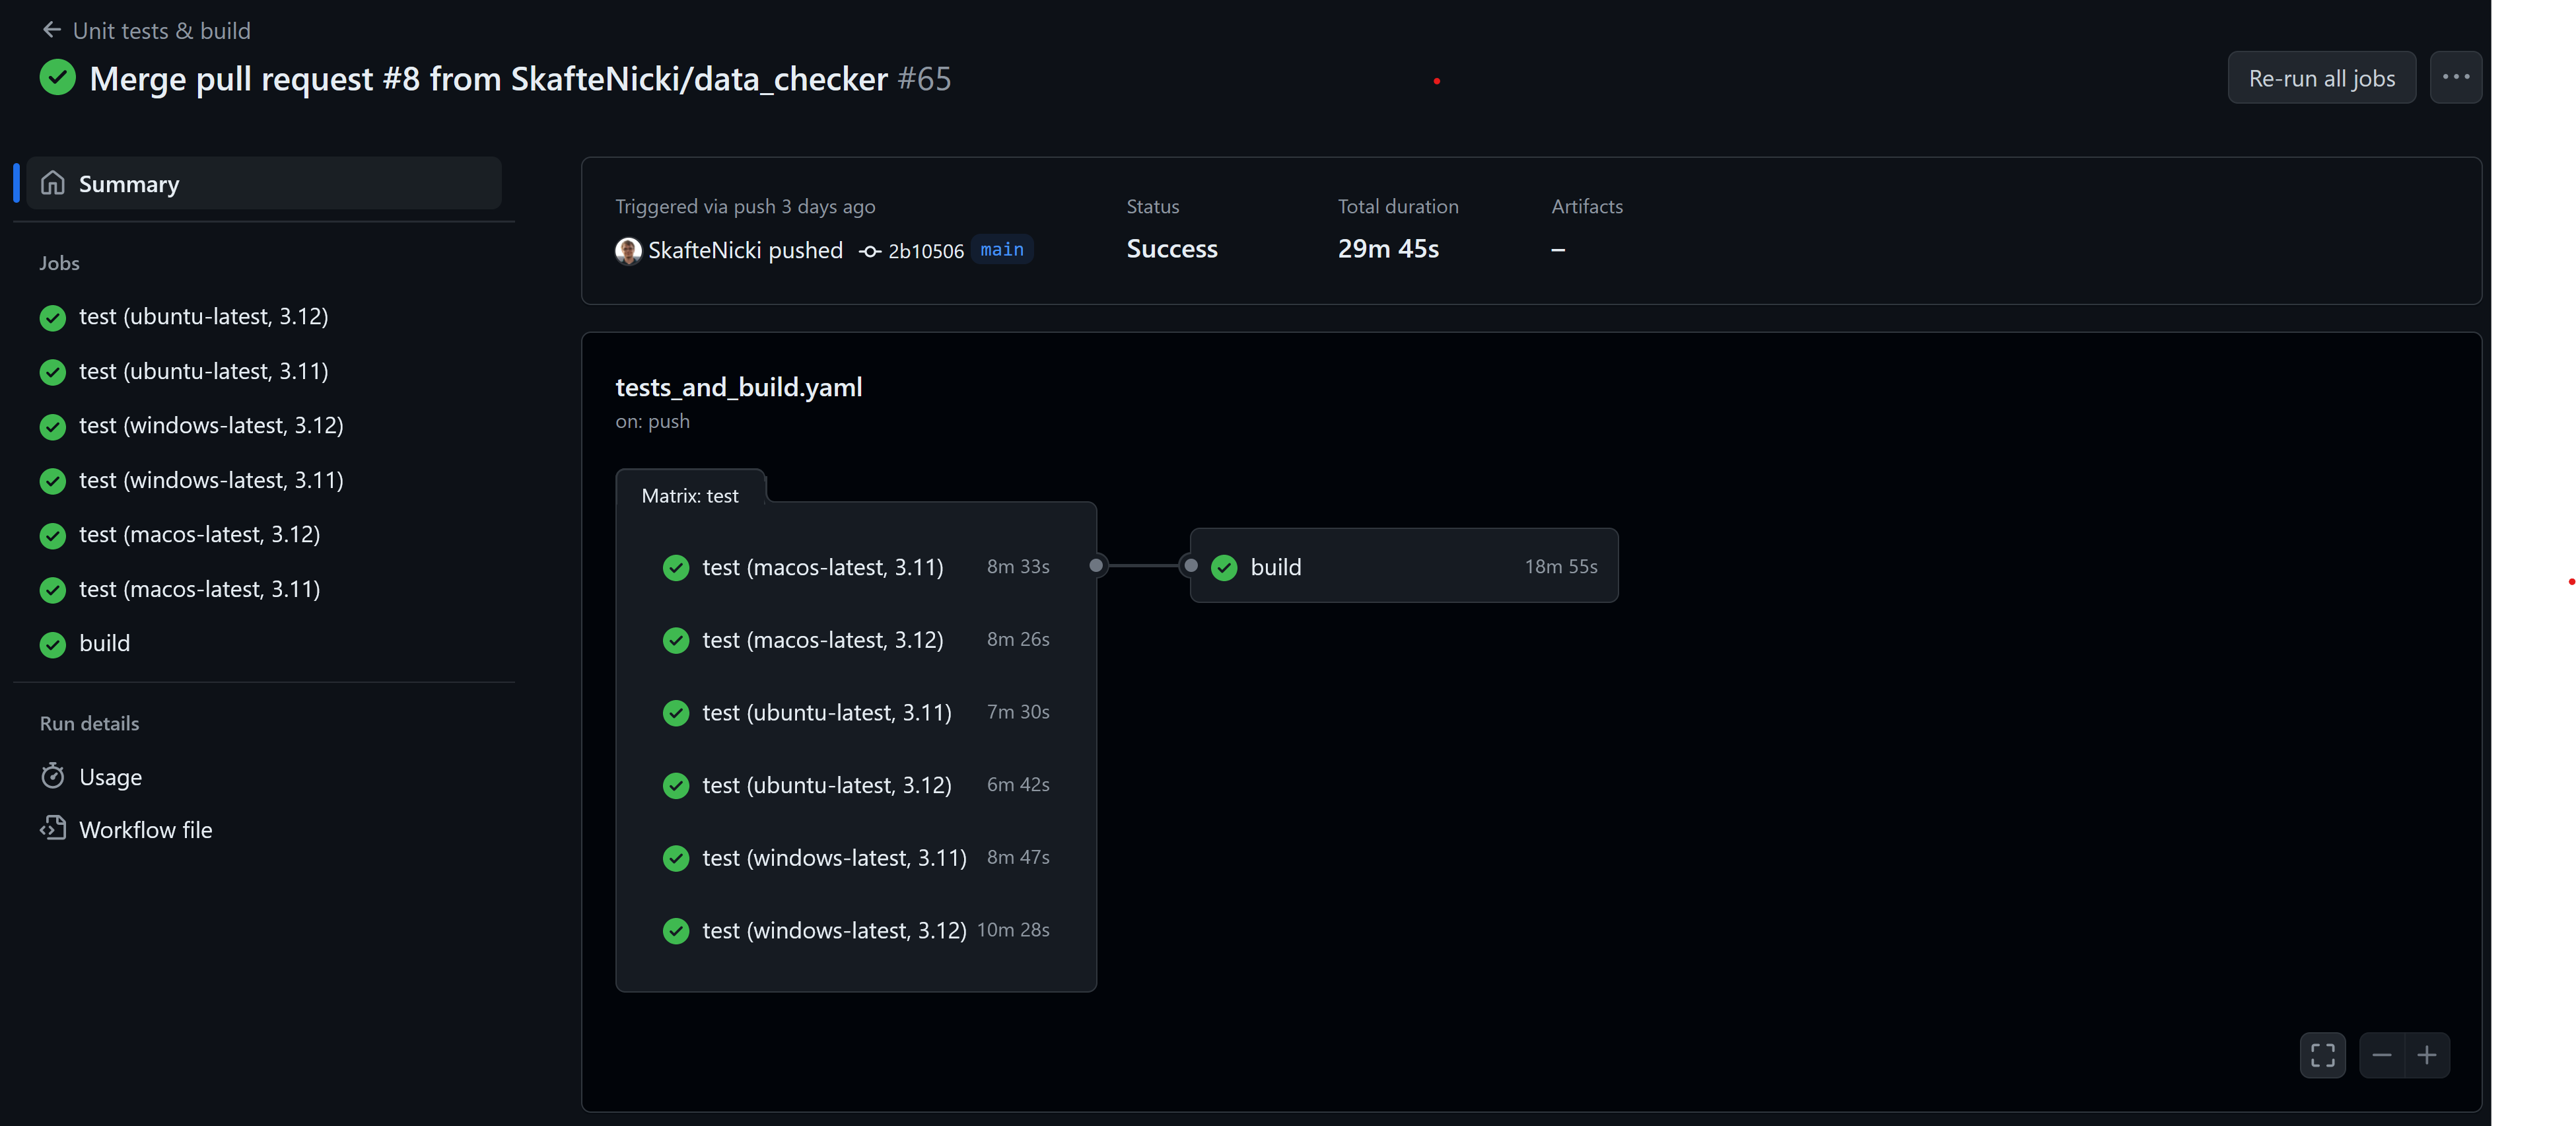
(Optional) Instead of using the built-in trigger in GCP, another way to activate the build-on code changes is to integrate with GitHub Actions. This has the benefit that we can make the build process depend on other steps in the pipeline. For example, in the image below we have conditioned the build to only run if tests are passing on all operating systems. Lets try to implement this.
-
Start by adding a new secret to GitHub with the name
GCLOUD_SERVICE_KEYand the value of the service account key that you created in the previous module. This is needed to authenticate the GitHub action with GCP. -
We assume that you already have a workflow file that runs some unit tests:
We now want to add a job that triggers the build process in GCP. How can you make the
buildjob depend on thetestjob? Hint: Relevant documentation. -
Additionally, we probably only want to build the image if the job is running on our main branch, i.e. not part of a pull request. How can you make the
buildjob only run on the main branch? -
Finally, we need to add the steps to submit the build job to GCP. You need four steps:
- Check out the code
- Authenticate with GCP
- Set up gcloud
- Submit the build
How can you do this? Hint: For the first two steps these two GitHub actions can be useful: auth and setup-gcloud.
Solution
name: Unit tests & build on: push: branches: [main] pull_request: branches: [main] jobs: test: ... build: needs: test if: ${{ github.event_name == 'push' && github.ref == 'refs/heads/main' }} runs-on: ubuntu-latest steps: - name: Checkout code uses: actions/checkout@v5 - name: Auth with GCP uses: google-github-actions/auth@v2 with: credentials_json: ${{ secrets.GCLOUD_SERVICE_KEY }} - name: Set up Cloud SDK uses: google-github-actions/setup-gcloud@v2 - name: Submit build run: gcloud builds submit . --config cloudbuild_containers.yaml
-
-
(Optional) The
cloudbuildspecification format allows you to specify so-called substitutions. A substitution is simply a way to replace a variable in thecloudbuild.yamlfile with a value that is known only at runtime. This can be useful for using the samecloudbuild.yamlfile for multiple builds. Try to implement a substitution in your docker cloud build file such that the image name is a variable.Build in substitutions
You have probably already encountered substitutions like
$PROJECT_IDin thecloudbuild.yamlfile. These are substitutions that are automatically replaced by GCP. Other commonly used are$BUILD_ID,$PROJECT_NUMBERand$LOCATION. You can find a full list of built-in substitutions here.Solution
We just need to add the
substitutionsfield to thecloudbuild.yamlfile. For example, if we want to replace the image name with a variable called_IMAGE_NAMEwe can do the following:steps: - name: 'gcr.io/cloud-builders/docker' id: 'Build container image' args: [ 'build', '.', '-t', 'europe-west1-docker.pkg.dev/$PROJECT_ID/<registry-name>/$_IMAGE_NAME', '-f', '<path-to-dockerfile>' ] - name: 'gcr.io/cloud-builders/docker' id: 'Push container image' args: [ 'push', 'europe-west1-docker.pkg.dev/$PROJECT_ID/<registry-name>/$_IMAGE_NAME' ] options: logging: CLOUD_LOGGING_ONLY substitutions: _IMAGE_NAME: 'my_image'Do note that user substitutions are prefixed with an underscore
_to distinguish them from built-in ones. You can read more here.-
How would you provide the value for the
_IMAGE_NAMEvariable to thegcloud builds submitcommand?Solution
You can provide the value for the
_IMAGE_NAMEvariable by adding the--substitutionsflag to thegcloud builds submitcommand:If you want to provide more than one substitution you can do so by separating them with a comma.
-
Training
As the final step in our journey through different GCP services in this module, we are going to look at the training of our models. This is one of the important tasks that GCP can help us with because we can always rent more hardware as long as we have credits, meaning that we can both scale horizontally (run more experiments) and vertically (run longer experiments).
We are going to check out two ways of running our experiments. First, we are going to return to the Compute Engine service because it gives the most simple form of scaling of experiments. That is: we create a VM with an appropriate docker image, start it, log into the VM and run our experiments. Most people can run a couple of experiments in parallel this way. However, what if there was an abstract layer that automatically created a VM for us, launched our experiments and then closed the VM afterwards?
This is where the Vertex AI service comes into play. This is a dedicated service for handling ML models in GCP in the cloud. Vertex AI is in principal an end-to-end service that can take care of everything machine learning-related in the cloud. In this course, we are primarily focused on just the training of our models, and then use other services for other parts of our pipeline.
❔ Exercises
-
Let's start by going through how we could train a model using PyTorch using the Compute Engine service:
-
Start by creating an appropriate VM. If you want to start a VM that has PyTorch pre-installed with only CPU support you can run the following command:
gcloud compute instances create <instance-name> \
    --zone europe-west1-b \
    --image-family=pytorch-latest-cpu \
    --image-project=deeplearning-platform-release
Alternatively, if you have access to GPU in your GCP account you could start a VM in the following way:
-
Next log into your newly created VM. You can either open an
sshterminal in the cloud console or run the following command: -
It is recommended to always check that the VM we get is actually what we asked for. In this case, the VM should have PyTorch pre-installed so let's check for that by running
Additionally, if you have a VM with GPU support also try running the
nvidia-smicommand. -
When you have logged in to the VM, it works as your machine. Therefore to run some training code you would need to do the same setup step you have done on your machine: clone your GitHub, install dependencies, download data, and run code. Try doing this to make sure you can train a model.
-
-
The above exercises should hopefully have convinced you that it can be hard to scale experiments using the Compute Engine service. The reason is that you need to manually start, set up and stop a separate VM for each experiment. Instead, let's try to use the Vertex AI service to train our models.
-
Start by enabling it by searching for
Vertex AIin the cloud console by going to the service or by running the following command: -
The way we are going to use Vertex AI is to create custom jobs because we have already developed docker containers that contain everything to run our code. Thus the only command that we need to use is the
gcloud ai custom-jobs createcommand. An example here would be:gcloud ai custom-jobs create \ --region=europe-west1 \ --display-name=test-run \ --config=config.yaml \ # these are the arguments that are passed to the container, only needed if you want to change defaults --command 'python src/my_project/train.py' \ --args=--epochs=10 --args=--batch-size=128Essentially, this command combines everything into one command: it first creates a VM with the specs specified by a configuration file, then loads a container specified again in the configuration file, and finally it runs everything. An example of a config file could be:
# config_gpu.yaml
workerPoolSpecs:
    machineSpec:
        machineType: n1-standard-8
        acceleratorType: NVIDIA_TESLA_T4
        acceleratorCount: 1
    replicaCount: 1
    containerSpec:
        imageUri: <region>-docker.pkg.dev/<project-id>/<registry-name>/<image-name>:<image-tag>
In this case we are requesting an Nvidia Tesla T4 GPU. This will only work if you have a quota for allocating this type of GPU in the Vertex AI service. To check your quota, go into quotas and search for
custom_model_training_nvidia_t4in theFilterfield to see the quota. If not, you can try to request a quota increase. Remember that it is not enough to just request a quota for the GPU; the request needs to be approved by Google before you can use it.You can read more about the configuration formatting in the CustomJobSpec reference and the different types of machines in the documentation. Try to execute a job using the
gcloud ai custom-jobs createcommand. For additional documentation you can look at the documentation on the command and this page and this page. -
Assuming you manage to launch a job, you should see an output like this:

Try executing the commands that are outputted to look at both the status and the progress of your job.
-
In addition, you can also visit the
Custom Jobstab in thetrainingpart of Vertex AI.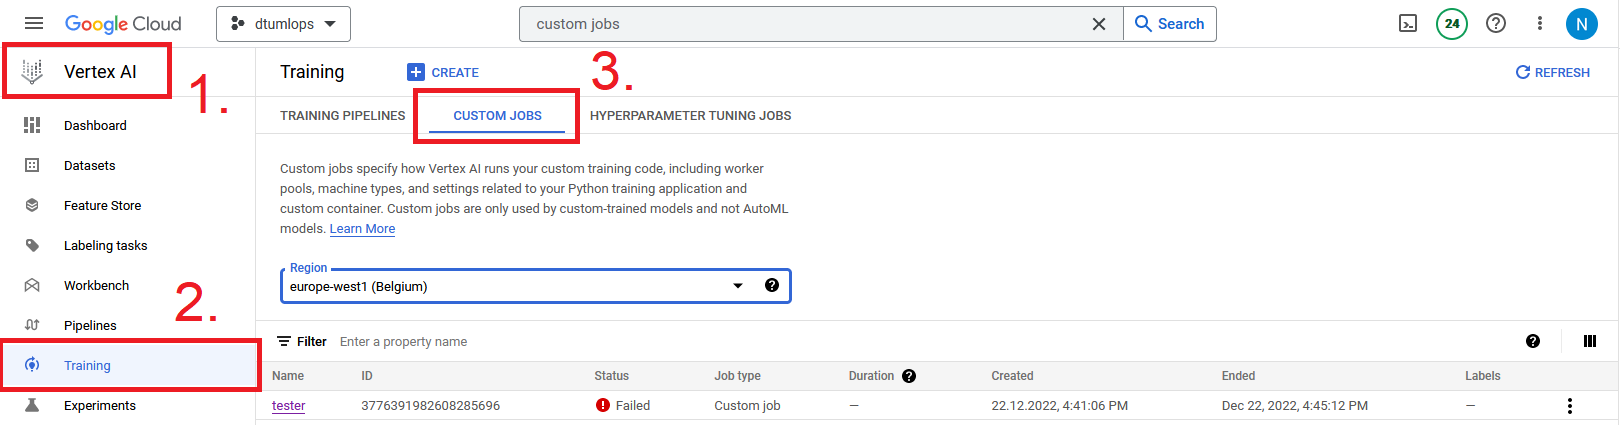
You will need to select the specific region that you submitted your job to in order to see the job.
-
During custom training, we do not necessarily need to use
dvcfor downloading our data. A more efficient way is to use cloud storage as a mounted file system. This allows us to access data directly from the cloud storage without having to download it first. All our training jobs are automatically mounted to agcsfolder in the root directory. Try to access the data from your training script:# loading from a bucket using mounted file system data = torch.load('/gcs/<my-bucket-name>/data.pt') # writing to a bucket using mounted file system torch.save(data, '/gcs/<my-bucket-name>/data.pt')should speed up the training process a bit.
-
Your code may depend on environment variables for authenticating, for example with weights and biases during training. These can also be specified in the configuration file. How would you do this?
Solution
You can specify environment variables in the configuration file by adding the
envfield to thecontainerSpecfield. For example, if you want to specify theWANDB_API_KEYyou can do it like this:workerPoolSpecs: machineSpec: machineType: n1-highmem-2 replicaCount: 1 containerSpec: imageUri: <region>-docker.pkg.dev/<project-id>/<registry-name>/<image-name>:<image-tag> env: - name: WANDB_API_KEY value: <your-wandb-api-key>You need to replace
<your-wandb-api-key>with your actual key. Also, remember that this file now contains a secret and should be treated as such. -
Try to execute multiple jobs with different configurations, e.g., change the
--argsfield in thegcloud ai custom-jobs createcommand at the same time. This should hopefully show you how easy it is to scale experiments using the Vertex AI service.
-
Secrets management
Similar to GitHub Actions, GCP also has secrets storage that can be used to keep secrets safe. This is called the Secret Manager in GCP. By using the Secret Manager, we have the option of injecting secrets into our code without having to store them in the code itself.
❔ Exercises
-
Let's look at the example from before where we have a config file like this for custom Vertex AI jobs:
workerPoolSpecs:
    machineSpec:
        machineType: n1-highmem-2
    replicaCount: 1
    containerSpec:
        imageUri: gcr.io/<project-id>/<docker-img>
        env:
        - name: WANDB_API_KEY
          value: $WANDB_API_KEY
We do not want to store the
WANDB_API_KEYin the config file, rather we would like to store it in the Secret Manager and inject it right before the job starts. Let's figure out how to do that.-
Start by enabling the secrets manager API by running the following command:
-
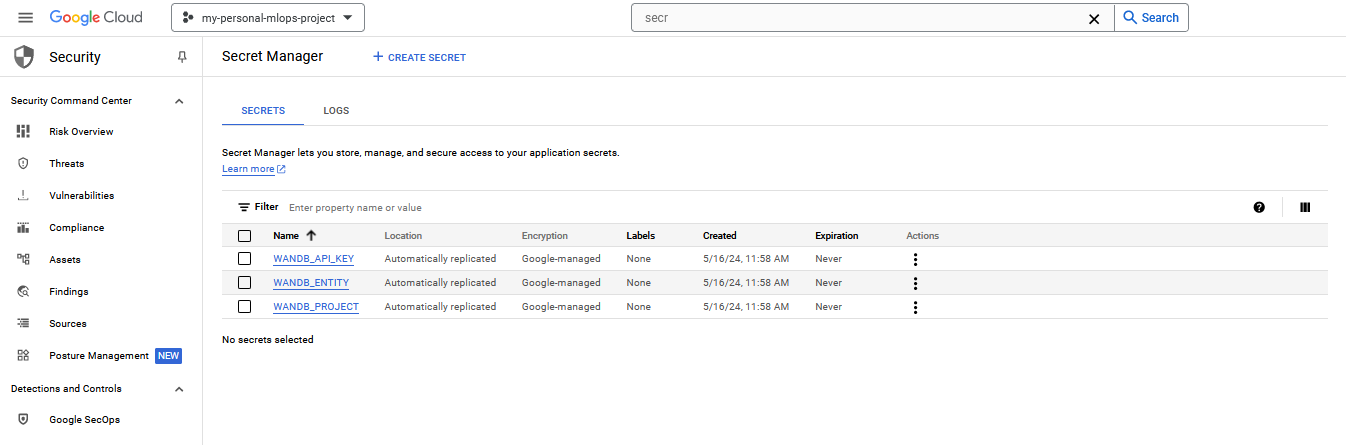
Next, go to the secrets manager in the cloud console and create a new secret. You just need to give it a name, a value and leave the rest as default. Add one or more secrets like in the image below.
-
We are going to inject the secrets into our training job by using cloudbuild. Create a new cloudbuild file called
vertex_ai_train.yamland add the following content:Slowly go through the file and try to understand what each step does.
Solution
There are two parts to using secrets in cloud build. First, there is the
availableSecretsfield that specifies what secrets from the Secret Manager should be injected into the build. In this case, we are injecting theWANDB_API_KEYand setting it as an environment variable. The second part is thesecretEnvfield in the first step. This field specifies which secrets should be available in the first step. The steps are then doing:-
The first step calls the envsubst command which is a general Linux command that replaces environment variables in a file. In this case, it replaces the
$WANDB_API_KEYwith the actual value of the secret. We then save the file asconfig.yaml.tmpand rename it back toconfig.yaml. -
The second step is just to show that the replacement was successful. This is mostly for debugging purposes and can be removed.
-
The third step is the actual training job. It waits for the first step to finish before running.
-
-
Finally, try to trigger the build
and check that the
WANDB_API_KEYis correctly injected into theconfig.yamlfile.
-
🧠 Knowledge check
-
In the Compute Engine, we have the option to either stop or suspend the VMs, can you describe what the difference is?
Solution
Suspended instances preserve the guest OS memory, device state, and application state. You will not be charged for a suspended VM but will be charged for the storage of the aforementioned states. Stopped instances do not preserve any of the states and you will be charged for the storage of the disk. However, in both cases if the VM instances have resources attached to them, such as static IPs and persistent disks, they are charged until they are deleted.
-
As seen in the exercises, a
cloudbuild.yamlfile often contains multiple steps. How would you make steps dependent on each other e.g. one step can only run if another step has finished? And how would you make steps execute concurrently?Solution
In both cases, the solution is the
waitForfield. If you want a step to wait for another step to finish you you need to give the first step anidand then specify thatidin thewaitForfield of the second step.steps: - name: 'alpine' id: 'step1' entrypoint: 'sh' args: ['-c', 'echo "Hello World"'] - name: 'alpine' id: 'step2' entrypoint: 'sh' args: ['-c', 'echo "Hello World 2"'] waitFor: ['step1']If you want steps to run concurrently you can set the
waitForfield to['-']:
This ends the session on how to use Google Cloud services for now. In a future session, we are going to investigate some more of the services offered in GCP, in particular for deploying the models that we have just trained.