![]()
GitHub actions
Core Module
With the tests established in the previous module, we are now ready to move on to implementing some continuous integration in our pipeline. As you probably have already realized, testing your code locally may be cumbersome to do, because
- You need to run it often to make sure to catch bugs early on
- If you want to have high code coverage of your code base, you will need many tests that take a long time to run
For these reasons, we want to automate the testing, such that it is done every time we push to our repository. If we combine this with only pushing to branches and then only merging these branches whenever all automated testing has passed, our code should be fairly safe against unwanted bugs (assuming your tests cover your code well).
GitHub actions
GitHub actions are the continuous integration solution that GitHub provides. Each of your repositories gets 2,000 minutes of free testing per month which should be more than enough for the scope of this course (and probably all personal projects you do). Getting GitHub actions set up in a repository may seem complicated at first, but workflow files that you create for one repository can more or less be reused for any other repository that you have.
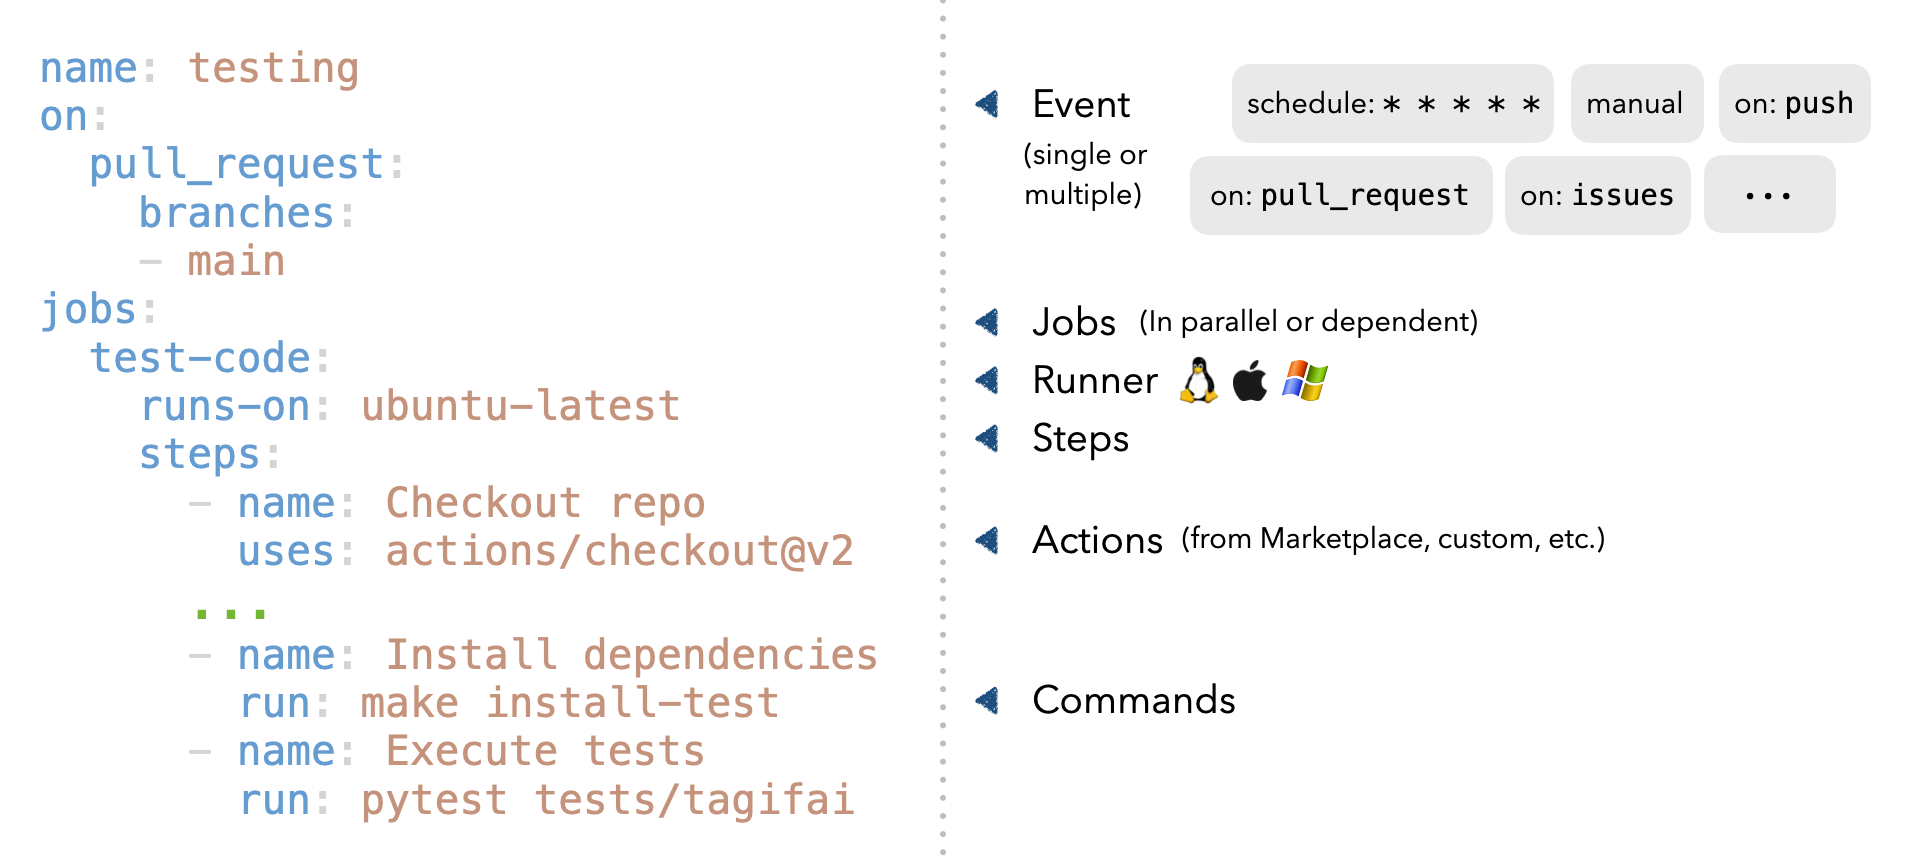
Let's take a look at how a GitHub workflow file is organized:
- Initially, we start by giving the workflow a
name. - Next, we specify what events the workflow should be triggered. This includes both the action (pull request, push, etc.) and on what branches it should activate.
- Next, we list the jobs that we want to do. Jobs are by default executed in parallel but can also be dependent on each other.
- In the
runs-on, we can specify which operating system we want the workflow to run on. - Finally, we have the
steps. This is where we specify the actual commands that should be run when the workflow is executed.
❔ Exercises
-
Start by creating a
.githubfolder in the root of your repository. Add a sub-folder to that calledworkflows. -
Go over this page that explains how to do automated testing of Python code in GitHub actions. You do not have to understand everything, but at least get a feeling of what a workflow file should look like.
-
We have provided a workflow file called
tests.yamlthat should run your tests for you. Place this file in the.github/workflows/folder. The workflow file consists of three steps:-
First, a Python environment or uv environment is initiated (in this case Python 3.12)
-
Next, all dependencies required to run the test are installed
-
Finally,
pytestis called and our tests will be run
Go over the file and try to understand the overall structure and syntax of the file.
tests.yamltests.yaml -
-
(Optional, for
pipusers) For the script to work you need to define therequirements.txtandrequirements_tests.txt. The first file should contain all the packages required to run your code. The second file contains all additional packages required to run the tests. In your simple case, it may very well be that the second file is empty. However, sometimes additional packages are used for testing that are not strictly required for the scripts to run. -
Finally, try pushing the changes to your repository. Hopefully, your tests should just start, and after some time you will see a green check mark next to the hash of the commit. Also, try to inspect the Actions tab where you can see the history of actions run.

-
Normally we develop code on only one operating system and just hope that it will work on other operating systems. However, continuous integration enables us to automatically test on systems different to the one we are using.
-
The provided
tests.yamlonly runs on one operating system. Which one? -
Alter the file such that it executes the test on the two other main operating systems that exist. You can find information on available operating systems also called runners in the GitHub runners documentation
Solution
We can "parametrize" the script to run on different operating systems by using the
strategyattribute. This attribute allows us to define a matrix of values that the workflow will run on. The following code will run the tests onubuntu-latest,windows-latest, andmacos-latest: -
Can you also figure out how to run the tests using different Python versions?
Solution
Just add another line to the
strategyattribute that specifies the Python version and use the value in the setup Python action. The following code will run the tests on Python versions:tests.yaml -
If you push the above changes you will maybe see that whenever one of the tests in the matrix fails, it will automatically cancel the other tests. This is for saving time and resources. However, sometimes you want all the tests to run even if one fails. Can you figure out how to do that?
-
-
As the workflow is currently implemented, GitHub actions will destroy every downloaded package when the workflow has been executed. To improve this we can take advantage of
caching:-
Figure out how to implement
cachingin your workflow file. You can find a guide in the GitHub caching guide and in the setup-python caching documentation . -
When you have implemented a caching system go to
Actions->Cachesin your repository and make sure that they are correctly added. It should look something like the image below.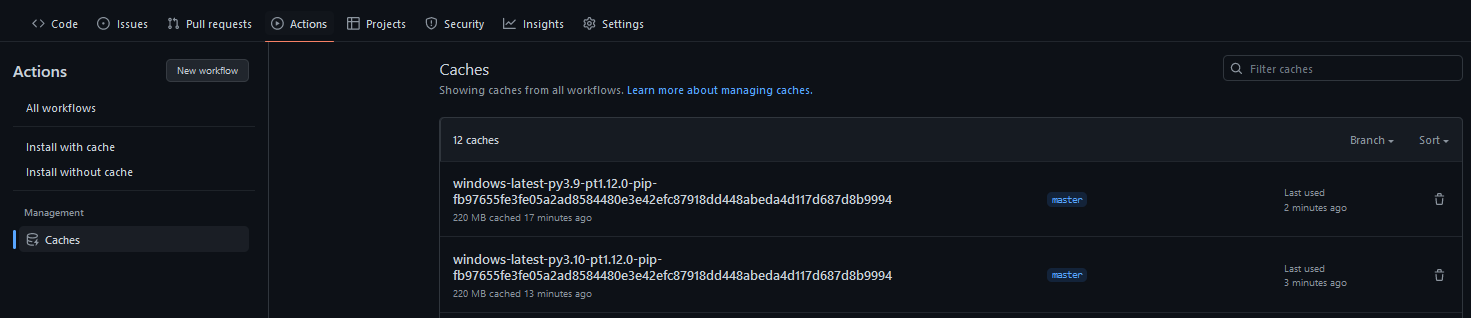
-
Measure how long your workflow takes before and after adding
caching. Did caching improve the runtime of your workflow?
-
-
(Optional) Code coverage can also be added to the workflow file by uploading it as an artifact after running the coverage. Follow the instructions in this post on how to do it.
-
With different checks in place, it is a good time to learn about branch protection rules. A branch protection rule is essentially some kind of guard that prevents you from merging code into a branch before certain conditions are met. In this exercise, we will create a branch protection rule that requires all checks to pass before merging code into the main branch.
-
Start by going into your
Settings -> Rules -> Rulesetsand create a new branch ruleset. See the image below.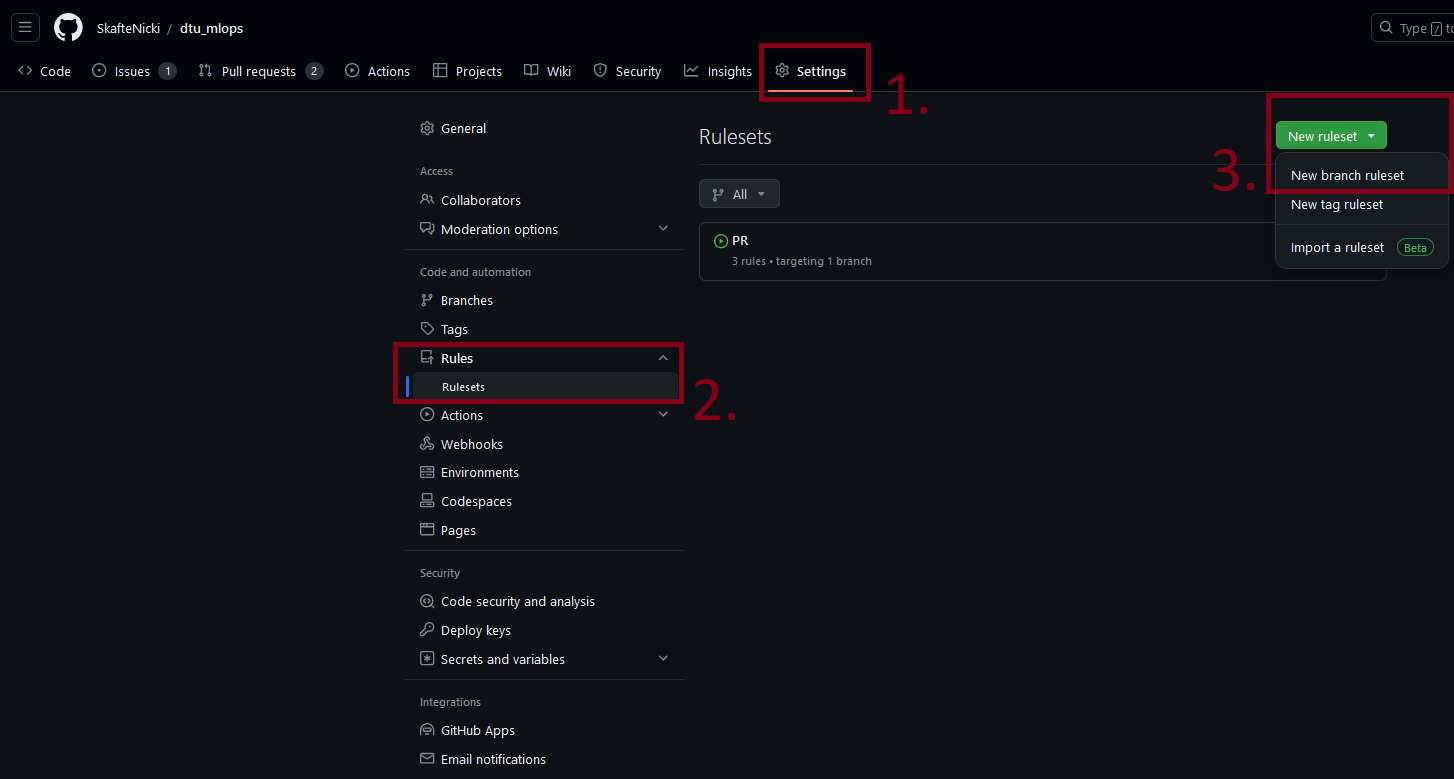
-
In the ruleset start by giving it a name and then set the target branches to be
Default branch. This means that the ruleset will be applied to your master/main branch. As shown in the image below, two rules may be particularly beneficial when you later start working with other people:-
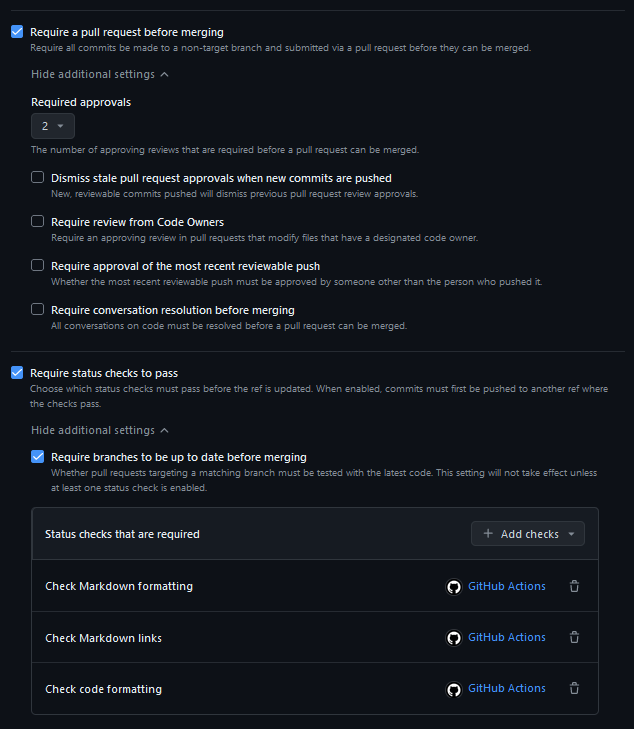
The first rule to consider is Require a pull request before merging. As the name suggests, this rule requires that changes that are to be merged into the main branch must be done through a pull request. This is a good practice as it allows for code review and testing before the code is merged into the main branch. Additionally, this opens the option to specify that the code must be reviewed (or at least approved) by a certain number of people.
-
The second rule to consider is Require status checks to pass. This rule makes sure that our workflows are passing before we can merge code into the main branch. You can select which workflows are required, as some may be nice to have passing but not strictly needed.
Finally, if you think the rules are a bit too restrictive you can always add that the repository admin, e.g. you, can bypass the rules by adding
Repository adminto the bypass list. Implement the following rules:- At least one person needs to approve any PR
- All conversations need to be resolved
- All your workflows need to pass
Finding the correct names of the checks
When selecting which checks should be required you may have a hard time finding the correct names of the checks. The problem is most likely that you should not be looking for the name of your workflows but instead the name of the jobs e.g. if your workflow file looks like this:
name: Code linting

on:
  push:
    branches: [main]
  pull_request:
    branches: [main]

jobs:
  format:
    name: Check code formatting
then you should search for
Check code formattingand notCode linting. -
-
If you have created the rules correctly you should see something like the image below when you try to merge a pull request. In this case, all three checks are required to pass before the code can be merged. Additionally, a single reviewer is required to approve the code. A bypass rule is also setup for the repository admin.

-
-
(Optional, only continue if you done module M8 - DVC on data version control) One problem you may have encountered is running tests that have to do with your data, with the core problem being that your data is not stored on GitHub (assuming you have and therefore cannot be tested. However, we can download data while running our continuous integration. Let's try to create that.
-
The first problem is that we need our continuous integration pipeline to be able to authenticate with our storage solution. We can take advantage of an authentication file that is created the first time we push with DVC. It is located in
$CACHE_HOME/pydrive2fs/{gdrive_client_id}/default.jsonwhere$CACHE_HOMEdepends on your operating system:~/Library/Caches~/.cache
This is the typical location, but it may vary depending on what distro you are running{user}/AppData/LocalFind the file. The content should look similar to this (only some fields are shown):
-
The content of that file should be treated as a password and not shared with the world and the relevant question is therefore how to use this info in a public repository. The answer is GitHub secrets, where we can store information and access it in our workflow files and it is still not public. Navigate to the secrets option (as shown below) and create a secret with the name
GDRIVE_CREDENTIALS_DATAthat contains the content of the file you found in the previous exercise.
-
Afterward, add the following code to your workflow file:
- uses: iterative/setup-dvc@v1
- name: Get data
  run: dvc pull
  env:
    GDRIVE_CREDENTIALS_DATA: ${{ secrets.GDRIVE_CREDENTIALS_DATA }}
which runs
dvc pullusing the secret authentication file. For help you can visit this small repository that implements the same workflow. -
Finally, add the changes, commit, push and confirm that everything works as expected. You should now be able to run unit tests that depend on your input data.
-
-
In module M6 on good coding practices (optional module) of the course you were introduced to a couple of good coding practices such as being consistent with your coding style, how your Python packages are sorted and that your code follows certain standards. All this was done using the
ruffframework. In this set of exercises, we will create GitHub workflows that will automatically test for this.-
Create a new workflow file called
codecheck.yaml, that implements the following three steps:-
Sets up Python or uv environment
-
Installs
ruff -
Runs
ruff checkandruff formaton the repository
(HINT: You should be able to just change the last steps of the
tests.yamlworkflow file)Solution
codecheck.yamlcodecheck.yaml -
-
In addition to
ruffwe also usedmypyin those sets of exercises for checking if the typing we added to our code was good enough. Add another step to thecodecheck.yamlfile that runsmypyon your repository. -
Try to make sure that all steps are passed on the repository. Especially
mypycan be hard to get passing, so this exercise formally only requires you to getruffpassing.
-
-
(Optional) As you have probably already experienced in module M9 on docker, it can be cumbersome to build docker images, sometimes taking a couple of minutes to build each time we make changes to our code base. For this reason, we just want to build a new image every time we commit our code because that should mark that we believe the code to be working at that point. Thus, let's automate the process of building our docker images using GitHub actions. Do note that in a future module we will look at how to build containers using cloud providers, and this exercise is therefore very much optional.
-
Start by making sure you have a dockerfile in your repository. If you do not have one, you can use the following simple dockerfile:
-
Push the dockerfile to your repository
-
Next, create a Docker Hub account
-
Within Docker Hub create an access token by going to
Settings -> Security. Click theNew Access Tokenbutton and give it a name that you recognize. -
Copy the newly created access token and head over to your GitHub repository online. Go to
Settings -> Secrets -> Actionsand click theNew repository secret. Copy over the access token and give it the nameDOCKER_HUB_TOKEN. Additionally, add two other secretsDOCKER_HUB_USERNAMEandDOCKER_HUB_REPOSITORYthat contain your docker username and docker repository name respectively. -
Next, we are going to construct the actual GitHub actions workflow file
name: Docker Image continuous integration

on:
  push:
    branches: [ master ]

jobs:
    build:
    runs-on: ubuntu-latest
    steps:
    - uses: actions/checkout@v5
    - name: Build the Docker image
      run: |
        echo "${{ secrets.DOCKER_HUB_TOKEN }}" | docker login \
          -u "${{ secrets.DOCKER_HUB_USERNAME }}" --password-stdin docker.io
        docker build . --file Dockerfile \
          --tag docker.io/${{ secrets.DOCKER_HUB_USERNAME }}/${{ secrets.DOCKER_HUB_REPOSITORY }}:$GITHUB_SHA
        docker push \
          docker.io/${{ secrets.DOCKER_HUB_USERNAME }}/${{ secrets.DOCKER_HUB_REPOSITORY }}:$GITHUB_SHA
The first part of the workflow file should look somewhat recognizable. However, the last three lines are where all the magic happens. Carefully go through them and figure out what they do. If you want some help you can look at the help page for
docker login,docker buildanddocker push. -
Upload the workflow to your GitHub repository and check that it is being executed. If everything works you should be able to see the built docker image in your container repository in the docker hub.
-
Make sure that you can execute
docker pulllocally to pull down the image that you just continuously build. -
(Optional) To test that the container works directly in GitHub you can also try to include an additional step that runs the container.
-
Dependabot
A great feature that GitHub provides is the ability to have bots help you with maintaining your repository. One of the
most useful bots is called Dependabot. As the name suggests, Dependabot helps you keep your dependencies up to date.
This is important because dependencies often either contain fixes for bugs or security vulnerabilities that you want to
have in your code.
❔ Exercises
-
To get dependabot working in your repository, we need to add a single configuration file to your repository. Create a file called
.github/dependabot.yaml. Look through the documentation for how to set up the file such that it updates your Python dependencies on a weekly basis.Solution
The following code will check for updates in the
pipecosystem every week, i.e. it automatically will look forrequirements.txtfiles and update the packages in there. -
Push the changes to your repository and check that the dependabot is working by going to the
Insightstab and then theDependency graphtab. From here under theDependabottab you should be able to see if the bot has correctly identified what files to track and if it has found any updates.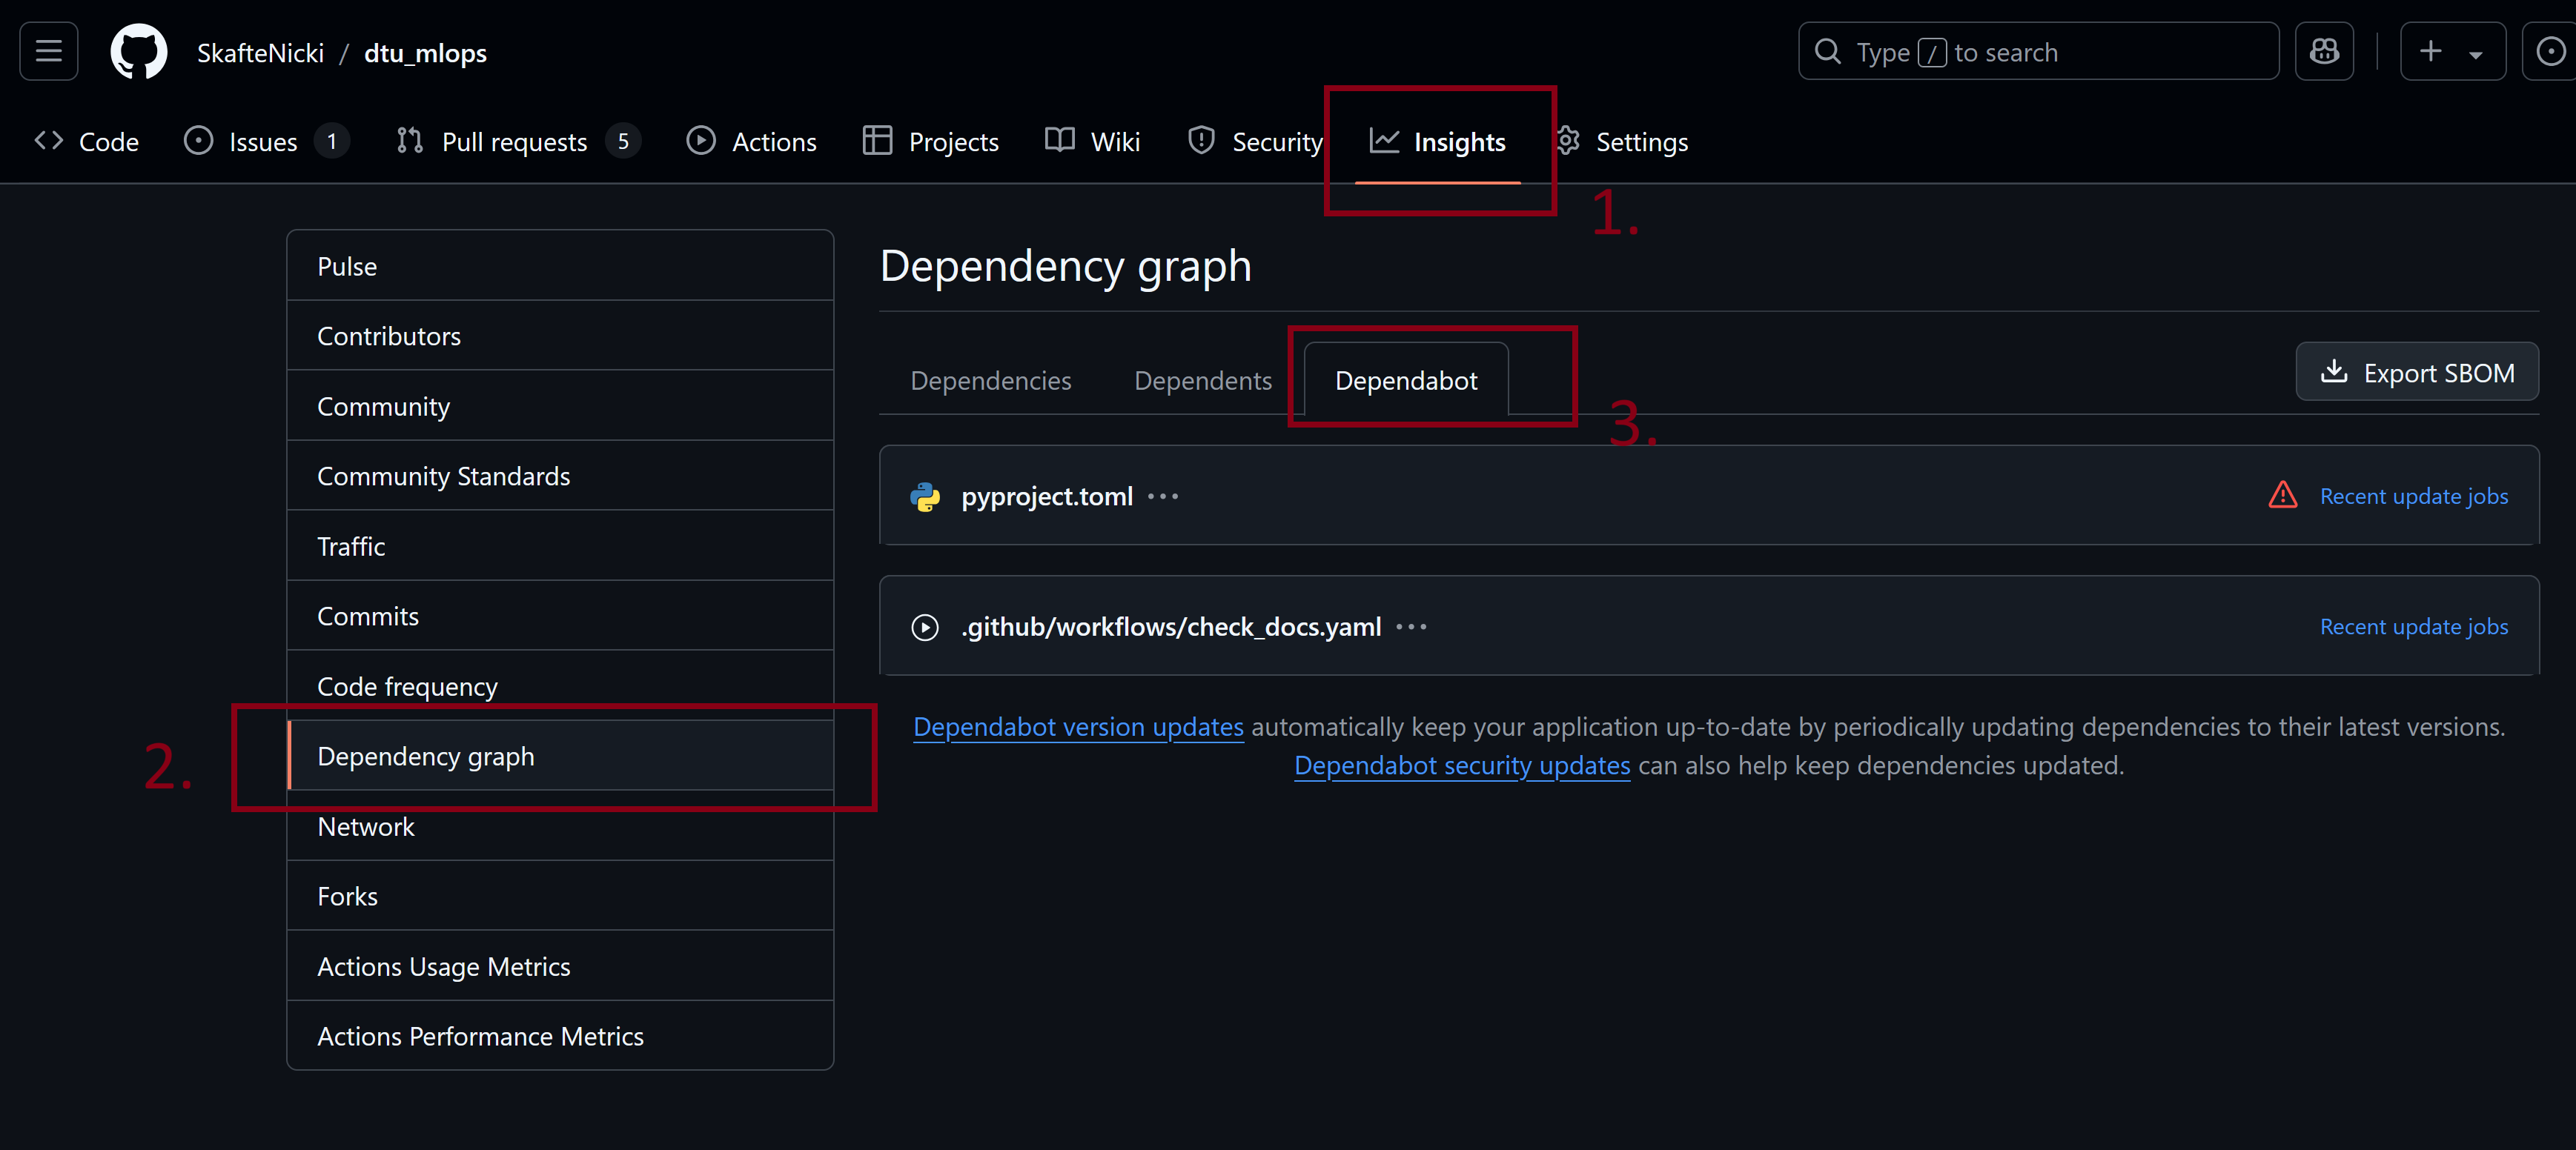
Click the
Recent update jobsto see the history of Dependabot checking for updates. If there are no updates you can try to click theCheck for updatesbutton to force Dependabot to check for updates. -
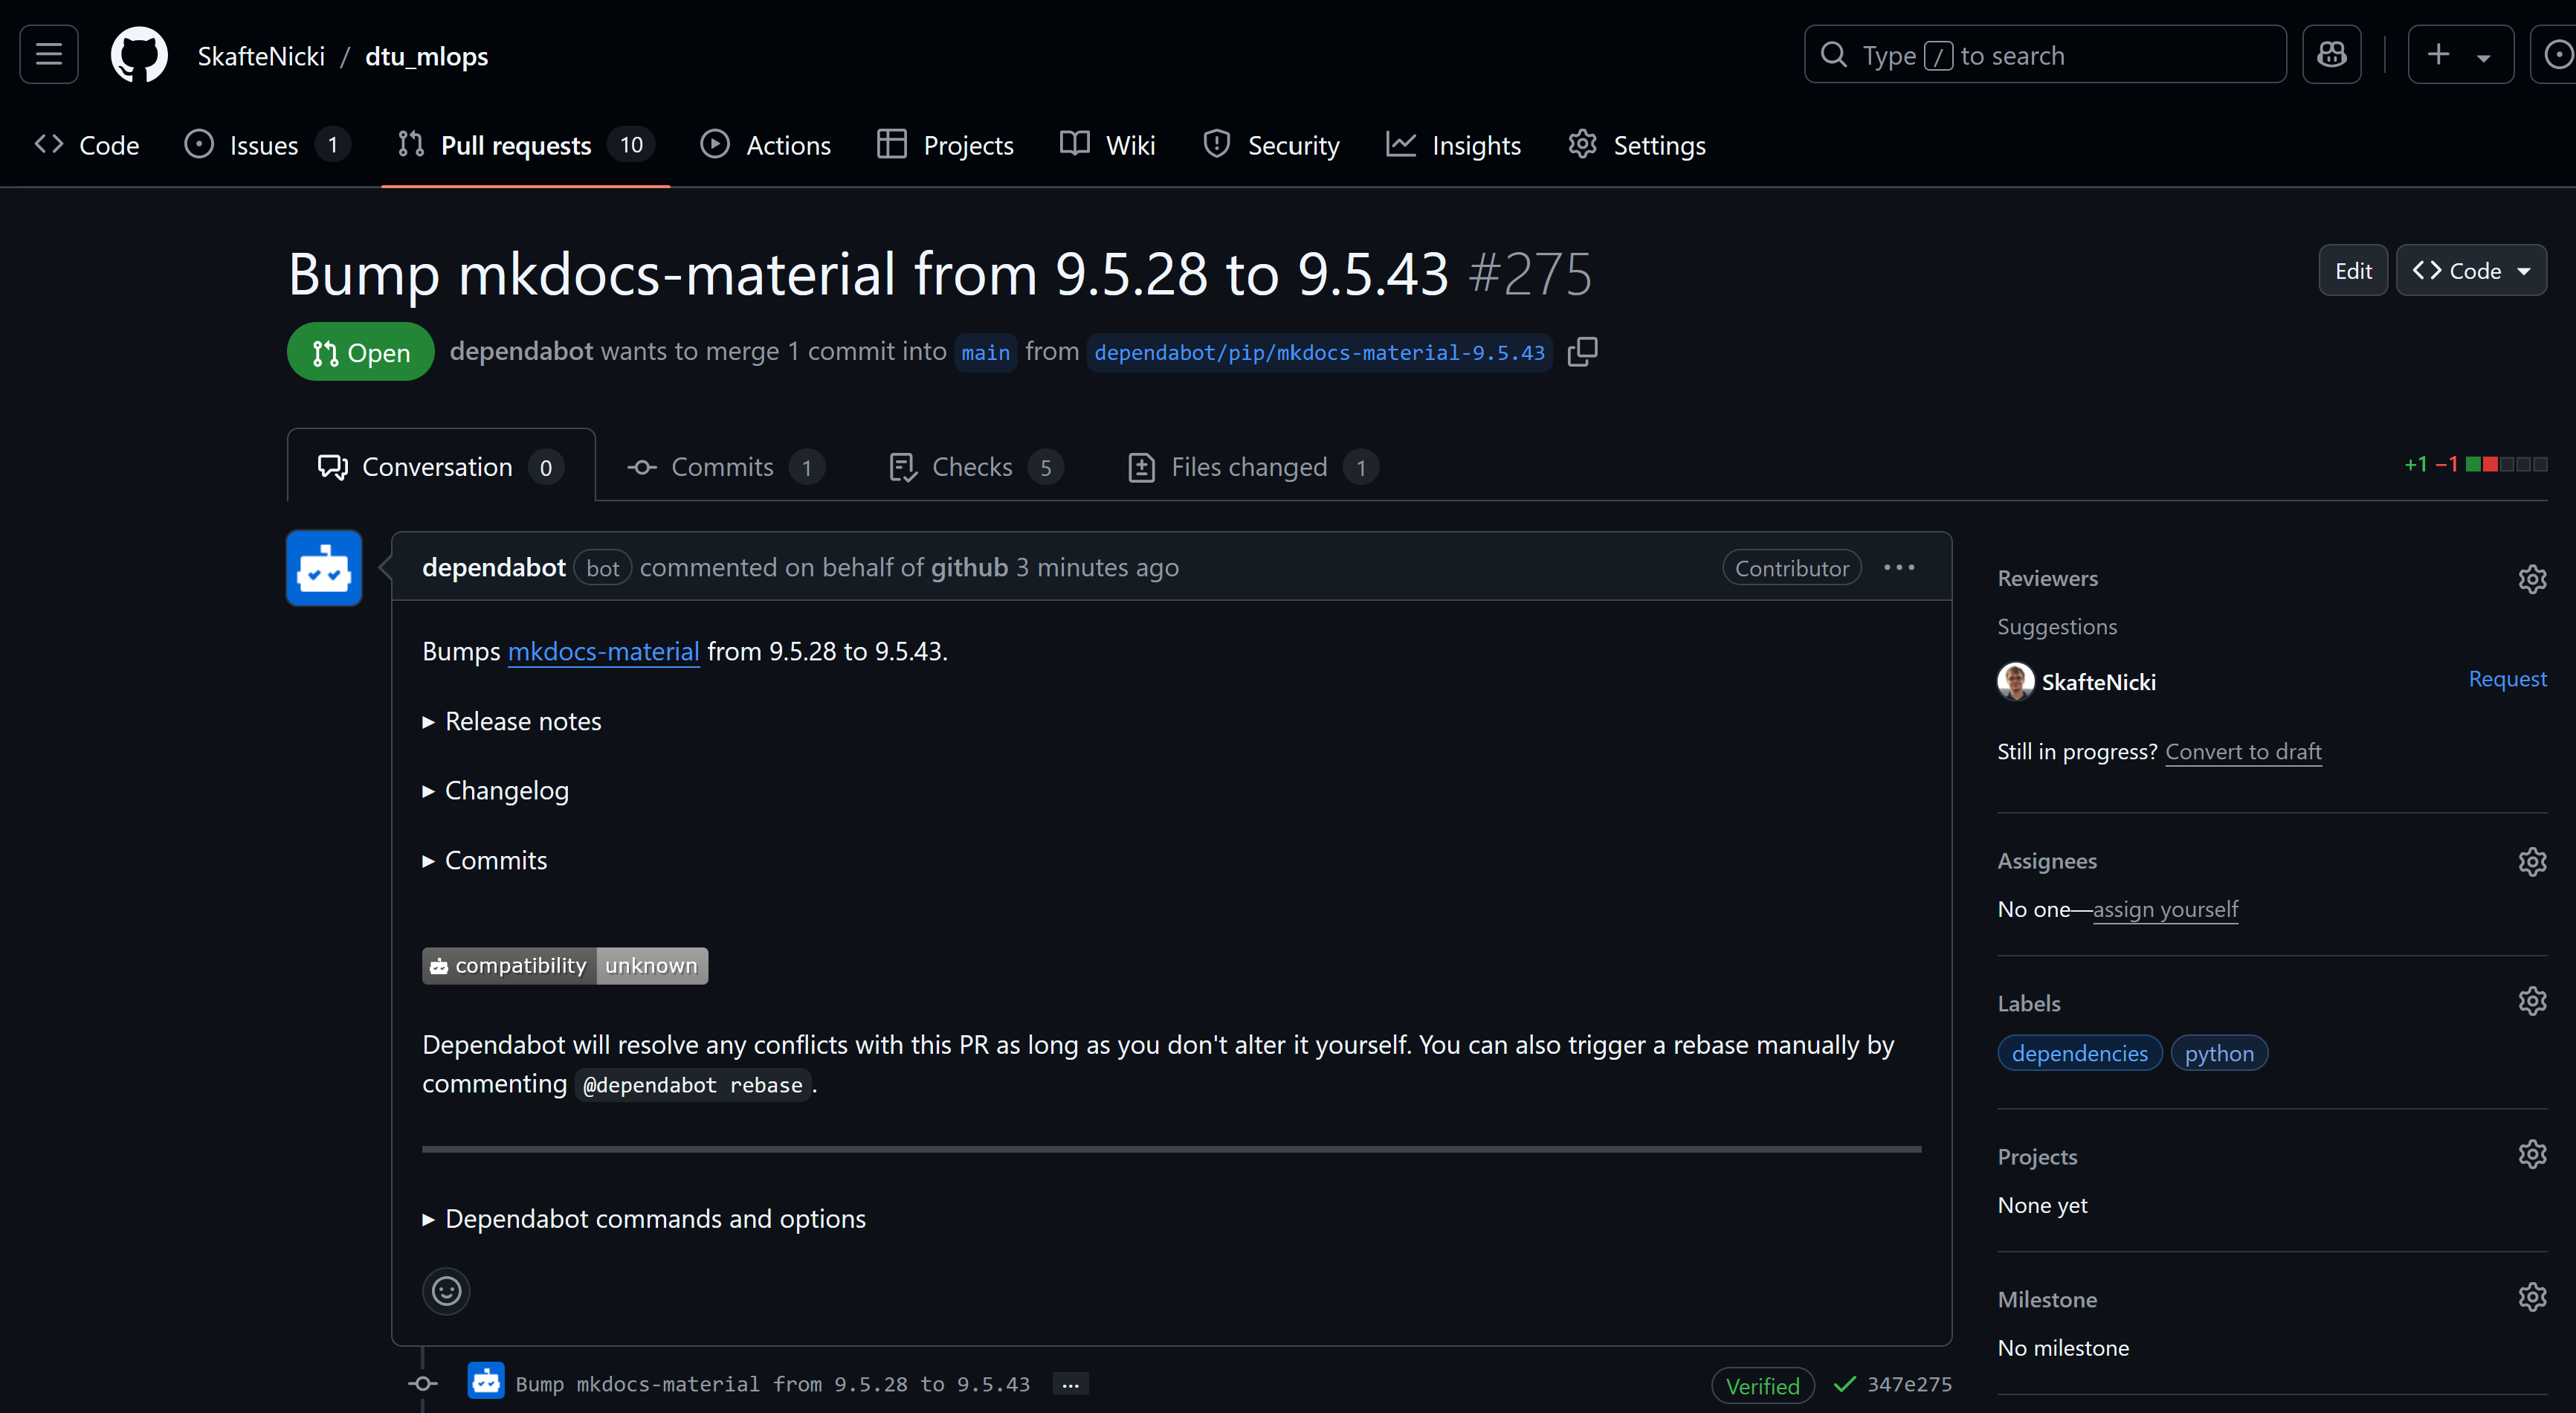
At this point the Dependabot should hopefully have found some updates and created one or more pull requests. If it has not done so you most likely need to update your requirement file such that your dependencies are correctly restricted/specified e.g.
# lets assume pytorch v2.5 is the latest version

# these different specifications will not trigger dependabot because
# the latest version is included in the specification
torch
torch == 2.5
torch >= 2.5
torch ~= 2.5

# these specifications will trigger dependabot because the latest
# version is not included
torch < 2.5
torch == 2.4
torch <= 2.4
If you have a pull request from Dependabot, check it out and see if it looks good. If it does, you can merge it.
-
(Optional) Dependabot can also help keep our GitHub Actions pipelines up-to-date. As you may have realized during this module, when we write statements like in our workflow files:
The
@v5specifies that we are using version 5 of theactions/checkoutaction. This means that if a new version of the action is released, we will not automatically get the new version. Dependabot can help us with this. Try adding to thedependabot.yamlfile that Dependabot should also check for updates in the GitHub Actions ecosystem.
🧠 Knowledge check
-
When working with GitHub actions you will often encounter the following 4 concepts:
- Workflow
- Runner
- Job
- Action
Try to define them in your own words.
Solution
- Workflow: A
yamlfile that defines the instructions to be executed on specific events. Needs to be placed in the.github/workflowsfolder. - Runner: Workflows need to run somewhere. The environment that the workflow is being executed on is called the runner. Most commonly the runner is hosted by GitHub but can also be hosted by yourself.
- Job: A series of steps that are executed on the same runner. A workflow must include at least one job but often contains many.
- Action: An action is the smallest unit in a workflow. Jobs often consist of multiple actions that are executed sequentially.
-
The
onattribute specifies upon which events the workflow will be triggered. Assume you have set theonattribute to the following:on: push: branches: [main] pull_request: branches: [main] schedule: - cron: "0 0 * * *" workflow_dispatch: {}What 4 events would trigger the execution of that action?
Solution
- Direct push to branch
mainwould trigger it - Any pull request opened that will merge into
mainwill trigger it - At the end of the day the action would trigger, see cron for more info
-
The trigger can be executed by manually triggering it through the GitHub UI, for example, shown below

- Direct push to branch
This ends the module on GitHub workflows. If you are more interested in this topic you can check out module M31 on documentation which first includes locally building some documentation for your project and afterward using GitHub actions for deploying it to GitHub Pages. Additionally, GitHub also has a lot of templates already for running different continuous integration tasks. If you try to create a workflow file directly in GitHub you may encounter the following page:
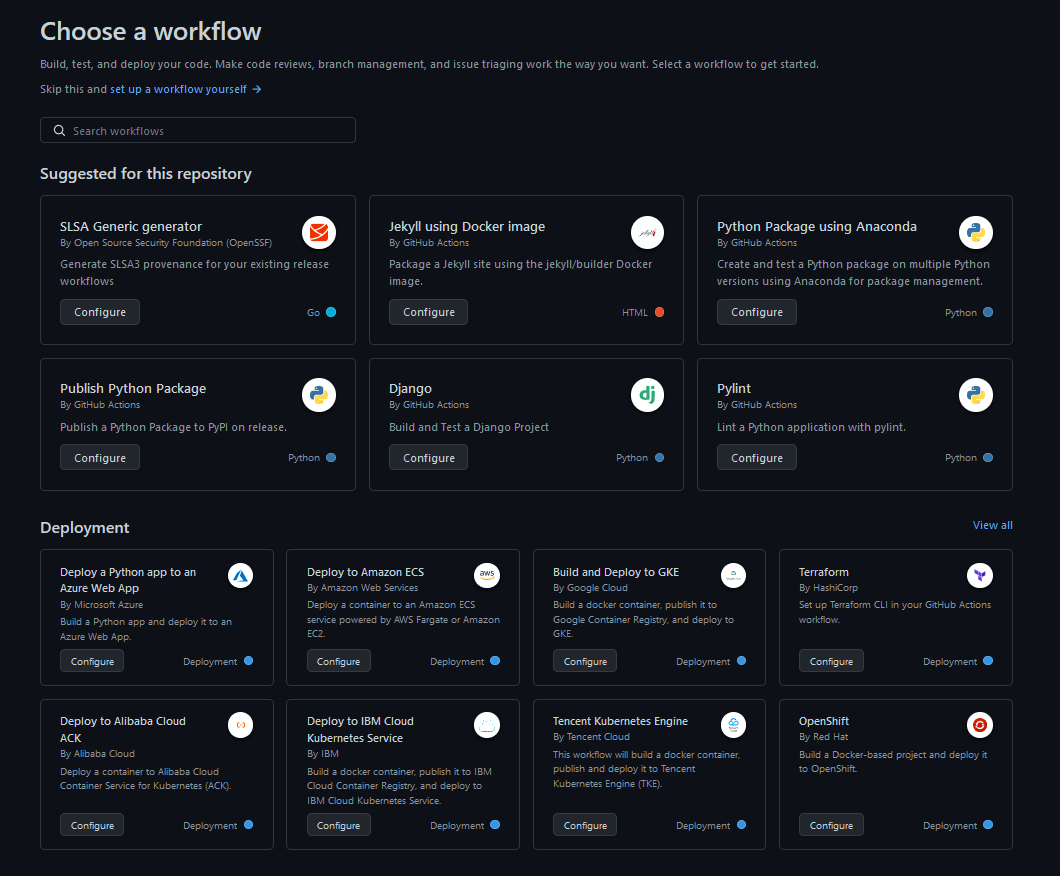
We highly recommend checking this out if you want to write any other kind of continuous integration pipeline in GitHub actions. We can also recommend this repository that has a list of awesome actions, and check out the act repository which is a tool for running your GitHub Actions locally!